Wednesday, May 30, 2012

The Heat Is On!

Summer has definitely arrived early in the South this year!  We are already reaching temperatures of 98 degrees...and it's only May!!  UGH!!  Believe me when I say, that I am not looking forward to July!  But, we do have at least one compensation...water play!  Whether it's the sprinkler in the backyard, heading to the pool, or making the short drive to the beach, water play is about the only way to survive through Summer.  And even better than those three options, is the Splash Pad located in the center of our outdoor mall, which is about 2 minutes away from our house.  The kids LOVE it, and so do I!  They can run around and play, while I get to sit in the shade of the huge umbrellas and enjoy watching them have fun.

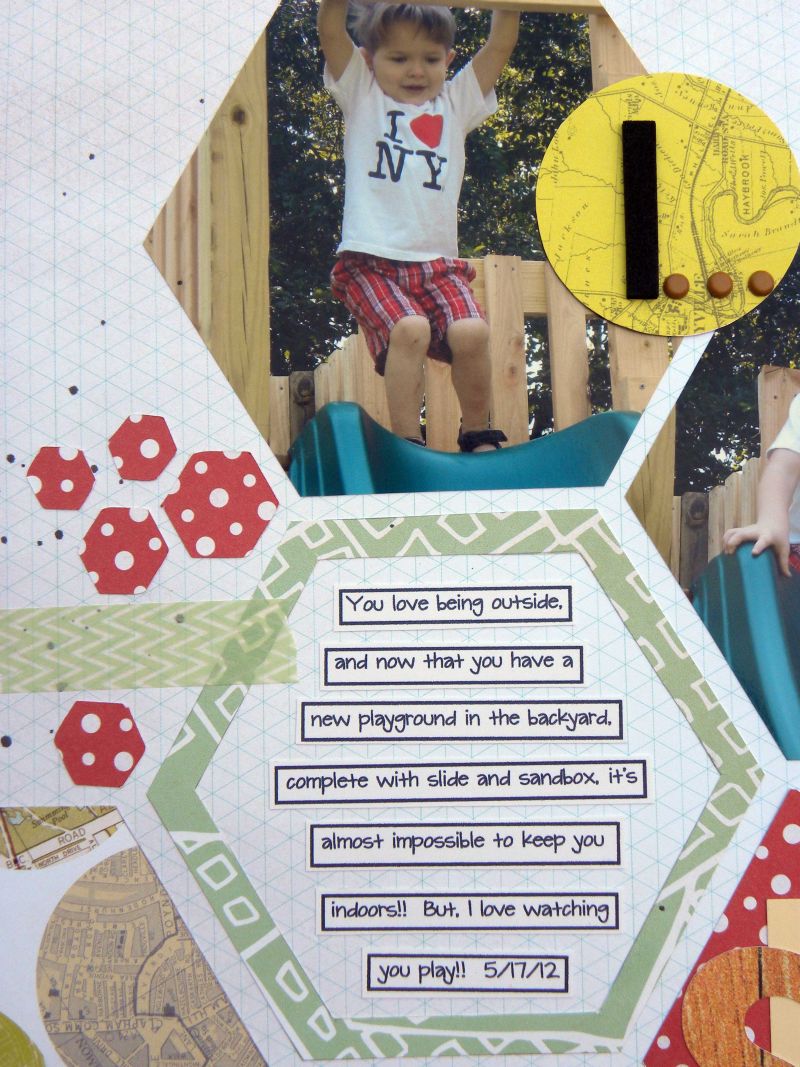
We took the kids over during the afternoon last week and it was the first trip of the Summer.  I snapped a couple of pics on my phone, because it was just one of those outings where I didn't feel like dragging my camera along.  I just snapped a few photos of each of the kids...because I have definitely accumulated plenty of Splash Pad photos over the past six years!  When I printed these pictures, I immediately knew I wanted to use my brand, spanking new Simple Stories Summer Fresh collection for this layout.  I really am in love with this line and here is what I created with it:


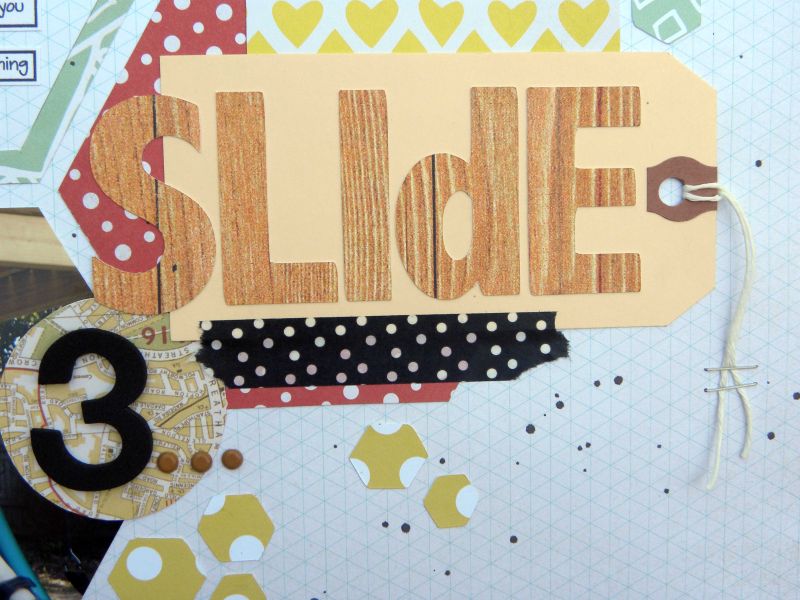
I really love the way Simple Stories manufactures their paper lines.  Each collection contains full 12x12 patterned sheets, along with full sheets that are broken down into 4x6, 6x8, 4x4, 2x12, 4x12, and 6x12 sizes.  These are so perfect for cutting border strips or journaling areas for your layouts.  You can also cut individual elements and words from the cut-apart element pieces.  I used these pieces for the title on my layout.  The words "This" and "Summer" were both fussy cut from the cut-apart element pieces, and then I just added some foam squares for dimension and a little bit of stitching for extra texture and emphasis.


My starting point for this layout came from the Recipe Challenge hosted at Club CK.  Recipe Challenges are one of my favorite type of challenges.  It's a little bit of this and that, but it still gives you the freedom to create and design any type of layout you wish to create.  For this challenge, CK came up with:  three 4x6 photos, both black & white, multi-layered embellishments, a list, and at least one ticket or ticket shape.  When I decided to use the Simple Stories line, I was a little stumped at first on how to incorporate the black & white.  But then I remembered my awesome roll of SMASH tape and thought it would make a perfect border for the top and bottom of my photos.  I love the contrast it adds and brings your eye to the photos.  I also decided to have a little fun with the sun pattern at the top of the layout.  For the center, I used my multi-layered embellishment and then used some baker's twine to outline each of the separations between the "ray" patterns.

And if all of this wasn't enough, I decided to incorporate the "thought" from thinking*through*design, which was to use hand stitching.  I am a big fan of stitching on my layouts.  I love how it adds texture and a fun element to your layouts.  You can hand draw your title and stitch over it, stitch through your title, stitch around an embellishment, stitch flourishes on your layout...etc., etc., etc.  The possibilities are endless.

Thanks for stopping by today...this week is flying by and the weekend will be here before we know it!  And just an FYI, I added two new buttons to my Blog.  You can follow me on Twitter or Pinterest!!

Products Used:  Patterned Paper & Stickers:  Simple Stories; SMASH Tape:  K&Company; Baker's Twine:  The Twinery; Button:  Dill Buttons; Embroidery Floss:  Janlynn
 

Monday, May 28, 2012

Sketch Support Announcement

Happy Memorial Day!!!  I hope everyone has enjoyed their weekend and that you are able to take a little time today, to remember those who have come before us to fight for all of the freedoms we have, in our Country each and every day.

I just wanted to stop in for a quick post and let those of you who may have missed the announcement on the Sketch Support Blog, know what is going on.  Allison Davis has decided to take a break with Sketch Support and no more new sketches will be posted for an indefinite amount of time.  Here is the official announcement posted on the Blog yesterday:

Sketch Support will be taking a break for an unknown amount of time. There will not be any new sketches or layouts posted during this break.

We knew when starting up Sketch Support that there was going to be a lot of work involved. We never expected it to be easy and knew that it was going to take time and effort. We are taking the time right now to decide if that time and effort we put into this site is worth it. It was a difficult decision to make but it was time to evaluate things and see where we stand.


I wish I could give you a specific date of when things might start up again but at this time I do not know.


Thank you for understanding.


I have only been a member of the Sketch Support Team, for the past 5 months, but I have thoroughly enjoyed it.  There are some amazingly talented Ladies on this Team, and I have loved working with Allison.  I completely understand her reasons for taking a break from the Blog.  Being a wife and mom, working, and life is all hard enough just on it's on...not including having time for yourself.  And running a Blog on top of all of that is just so much added work.  I hope as a little time goes by and things slow down, that maybe Allison will be able to start things up again and begin adding new sketches to the Blog.

Stay tuned for any further announcements concerning when or if, Allison will be able to continue things at Sketch Support.


Sunday, May 27, 2012

Creative Scrappers Featured Designer

I am so excited to be joining in with the very talented Design Team at Creative Scrappers today, as a Featured Designer for Sketch #210.  Kristine Davidson always has an amazing sketch reveal every Sunday and I love seeing how the Design Team used the sketch.  I was more than thrilled, when I received an email from Kristine, after submitting some of my layouts for her Featured Designer call.  Hopefully, some of the talent from the awesome DT members will rub off on me, this week!!  :)

Here is the sketch that Kristine sent me to work with and the layout I created based on the sketch:


This photo was taken after our daughter's dress rehearsal, for her end of the year Ballet Recital.  We have a beautiful area, on the beach, not very far from us.  After the rehearsal was over, we went over with some of her friends and took some great shots of the girls together and separately.  While our daughter was out at the edge of the water, seagulls were flying over-head and I snapped this photo at just the right time.  I immediately knew I wanted to use the song title, "I'm Like a Bird" by Nelly Furtado as the title of this layout.

I used Basic Grey's Plumeria collection and fussy cut some of the beautiful flowers from one of the 12x12 pages and added a little tearing and distressing to the background paper.  I used the flowers in place of the full banner across the page and then added in a little bit of the banner under the photo area.

I really enjoyed working with this sketch and I hope you will come over and visit Creative Scrappers this week.  You will find some great inspiration and have the chance to win at the end of the month, by linking your layout.  Thanks to Kristine, for inviting me to join CS this week!

Products Used:  Patterned Paper & Stickers:  BasicGrey; Thickers:  American Crafts; Mini Market Stickers:  October Afternoon; Mini Round Gems:  Recollections; Embroidery Floss:  Janlynn; Doily: Hobby Lobby; Other:  Bird Die-Cut & Paper Flowers    

Saturday, May 26, 2012

From Ballet, To Birthdays, To the Backyard!

Today was my last reveal for the month of May, as a Special Investigator at CSI:  Color, Stories, Inspiration.  I had so much fun joining in with the CSI Team and was very honored to be invited by Debbi Tehrani, to work with this month's Case Files.  When I saw Case File #21, I thought..."purple!!"  So not my favorite color, but I decided to take on the challenge anyway, and I think this one ended up being my favorite for the month.


I knew I wanted to keep a clean look on this layout, so I used a white background and changed the photos to black and white.  I chose several elements from the evidence to work with:  doilies, flowers, layers/tiers, add icing, and pins.  I used the word "sweet" as my journaling prompt, from the Testimony portion of the Case File.  And believe me, even though our daughter looks pooped and bored in these photos, she was a trooper for having so many photos taken, after she just finished her dress rehearsal!!  :)

Products Used:  Cardstock:  The Paper Studio; Patterned Paper:  BasicGrey; Flower:  Prima; Font:  Brush Script & CK Girl; Thickers:  American Crafts; Teeny Alphas:  Glitz Designs; Pins:  Recollections; Punch:  Marvy; Wood Accents:  Studio Calico; Acrylic Paint:  Apple Barrel; Pearls:  Zva Creative; Pom Pom Trim:  My Mind's Eye; Doily:  Hobby Lobby

Today was also the last day for our product swap with Nikki Sivils at Sketch Support.  I worked with Nikki's Audrey collection, which was one of the 4 new releases from W-CHA.  It is a great girly collection and I had so much fun with it on the May One Page Sketch.


I changed the sketch up, just a little bit, by using one photo instead of two.  But for the most part, I kept the basic design of this sketch pretty much in tact.  I had a little fun misting on this layout, because I finally got some masks.  My sweet friend Angela sent me a little goodie box and lo and behold there were two awesome masks packed away in there!!  So excited! I also misted the white doily, just to dress it up a little bit.

Products Used:   Cardstock: Bazzill; Patterned Paper and Stickers: Nikki Sivils; Spray Mist: Smooch Spritz and October Afternoon; Thickers: American Crafts; Font: CK Girl; Punch: Anna Griffin; Doilies: Hobby Lobby; Pom Pom Trim: Wright's; Buttons: Michael's; Edgers: Provo Craft; Mini Clothes Pin: Canvas Corp; Punch: Marvy

And this final layout, is one that I ended up loving the final product.  Let me explain...!!  :)  I am on the Design Team for my Local Scrapbook Store, ScrapHappy Pensacola.  Christy, the store owner, gives me and the fellow DT Ladies new products as they come in to the store, to make samples to go with the product displays.  When I visited on Wednesday, she had some of the new Graphic 45 Tropical Travelogue in the store.  Now, I would not normally buy G45, because even though I consider it to be phenomenally gorgeous, it just doesn't work for the type of layouts I create.  Anyway, I brought some of the paper home and a couple of this and thats along with it and I thought, "hey, the 'B' sides of these papers are pretty cool!".  So I found a photo and went to work and here is what came about:


So not to sound braggy, but I think I am in love with this one!!  :)  And it just goes to show you, that even though you may think a paper line is not for you...you may just end up surprising yourself, if you take a chance on it.  I just went to work adding some layering, fussy cut some of the pretty flowers from one of the 12x12 pages, splattered some Smooch Spritz in the background, and added a few knick knacks here and there.  And just a little side note...the stripy piece of paper (red & white) behind my journaling strips, was the backing piece in a package of Flash Cards from Elle's Studio.  Hey, sometimes the packaging is just as great as the products!!  :)

Products Used:  Cardstock:  The Paper Studio; Patterned Paper:  Graphic 45; Smooch Spritz:  Clear Snap; Font:  Arial & Arial Black; Alpha Stickers:  Doodle Bug Design Inc.; Flash Card:  Elle's Studio; Buttons:  Blumenthal Lansing; Brads:  My Mind's Eye; Baker's Twine:  The Twinery:  Washi Tape:  October Afternoon; Embroidery Floss:  Janlynn

Friday, May 25, 2012

When We Said, I Do

Happy Friday, everyone!!  I try not to wish my days away, but I have to say, that I always look forward to Fridays, because the new Fabulous Friday challenge at Frosted Designs goes Live!!  We have a great challenge this week...Wedding!  The great thing about this challenge, is all of the options.  You could create a layout about your own wedding, or how about making a gift for someone for an upcoming wedding, or what a great opportunity to create cards for an upcoming wedding or wedding shower!!  Lots of great ideas for this one!

I'm sure you can guess what I chose to do...a layout, because yes, I am a layout fanatic!!  :)  The two photos on this layout are actually some that I have displayed in frames in our home.  Both photos are 8x10's, so I removed them from the frames and scanned them with my HP.  Once they were scanned into my Documents, I inserted them into my desktop publishing program and re-sized them to 3x4.  I also used an online photo editing program at BeFunky.com to add the warming filter to my photos. Here is the layout I created for this week's challenge:


I used one of my favorite new lines from Echo Park for this page.  Their Graceful collection has such a pretty mix of colors and patterns.  And I also incorporated another fun trend onto this layout for the Three Cool Chicks workshop, hosted by Julie Tucker-Wolek, Yvonne Yam, and Amy Tsuruta...a Doily!  Believe it or not, I just recently bought a package of these cute little doilies at Hobby Lobby, but I have had so much fun using them.  They are great for misting or masking, and I love using them as a base for my titles.

I hope you enjoyed stopping by today and found a little inspiration for your layout or project.  Come join us this week at Frosted Designs and you could have the chance to win from our amazing sponsor, Copic Markers.  Everybody wants to get their hands on these amazing markers, so make sure you link up your project, and take a minute to head over to Copic and check them out and maybe leave a little love for them!!

Products Used:

Patterned Paper & Stickers:  Echo Park

Bloomers Trim:  Webster's Pages
Wood Alphas: Pink Paislee
Pearls:  Zva Creative
Baker's Twine:  The Twinery
Embroidery Floss:  Janlynn
Doily:  Hobby Lobby
Punch:  Marvy

Thursday, May 24, 2012

All About the Girls

Lately, it feels like a lot of my layouts have been more on the boy side.  Since Reese is the youngest, I think I am taking more photos of him, because he is still going through all of the funny little firsts stages.  But today, all of my layouts are about the girls...and I'll have even more girly layouts to share this weekend!

This first layout is some of my DT work for Sketch Support.  We are working on the May One Page sketch this week and here is my take on it:


American Crafts put out some AWESOME lines at W-CHA and two of my favorites were the Neapolitan line from Dear Lizzy and SketchBook by Amy Tan.  Of course, I bought some of both!!  :)  This layout uses the Neapolitan line and a few other odds and ends I mixed in.  I actually decided to "play nice" and stay fairly close to this week's sketch.  Instead of adding the banner in the top corner, I chose to use a large die-cut flower...unfortunately, my Cricut did not want to "play nice" and we had words!!  :)  

Products Used - Patterned Paper, Ruffles & Thickers:  American Crafts; Smooch Spritz:  Clear Snap; Baker's Twine:  The Twinery; Wooden Flowers:  Kaisercraft; Flag:  Bella Blvd.; Punch: Marvy; Adhesive:  Diamond Glaze; Other:  Buttons & Staples

These next two layouts use two of my fav collections from another manufacturer...yes, I have many favorites!  :)  Simple Stories has always really impressed me with the design and quality of their papers.  They are so easy to use and make for cranking out some cute and fast pages.  I used their brand new Summer Fresh line on this first layout.  I actually sent a message to my LSS, the day Simple Stories debuted this line on their Blog and said, "I MUST HAVE IT...Please order me a collection pack!!".  Well, I picked it up yesterday and broke it open the minute I got home!


Now, even though these photos are not necessarily "Summer" photos, I still thought they were perfect for this line because of the navy's and yellow's.  This was our second trip to Build-A-Bear in a two month period...once for the girls' birthday in March and this trip, for my daughter's end of the year party with her Girl Scout Troop.  They got to put together the cutest little Daisy bears, complete with matching GS vests!!  I did this layout for one of my FAVORITE challenges at Club CK...the weekly issue challenge hosted by Erika Hayes.  Our challenge this week, was to use Flags...one of the fun trends you see popping up everywhere.  I decided to use some of the SS patterned paper and toothpicks to make some quick, and easy flags for my page.

Products Used:  Patterned Paper & Stickers:  Simple Stories; Thickers:  American Crafts; Smooch Spritz:  Clear Snap; Baker's Twine:  The Twinery; Embroidery Floss:  Janlynn; Punch:  Marvy; Other:  Toothpicks

And for this last layout, I pulled off two challenges!!  Club CK periodically hosts a 1 Hour challenge.  Yesterday afternoon, they posted the Live challenge, which was to use buttons and/or brads to fill negative space.  I didn't have a chance to participate during the Live challenge, but finished this one later last night.  This is also my fourth layout completed for the Three Cool Chicks workshop, using Twine.  I thought the twine through the buttons would be a great girly touch for this page and I added a piece of twine around the perimeter of each of the circles.


I have to admit how much of a bad mom I am, and say that this is the first year that I have taken photos of the kids with their Easter baskets!!  :)  Easter morning is always like a whirlwind, because it is the one Sunday of the year, that we all attempt to make it to the early service at church.  Most of the time we are still asleep at this time of morning, because we like attending the 10:45AM services.  So, needless to say, trying to get the kids up and ready is close to a nightmare.  But we did it this year...and actually got some scrap worthy photos!!

Products Used:  Patterned Paper & Stickers:  Simple Stories; Buttons:  Blumenthal Lansing; Brads:  The Paper Studio; Baker's Twine; Embroidery Floss:  Janlynn; Punch: Marvy; Washi Tape:  SEI

Well, I hope you enjoyed stopping by today!!  Tomorrow, I will be sharing a layout for our new Fabulous Friday challenge at Frosted Designs and my last layout as a Special Investigator at CSI for the month of May goes Live.  I think this one ended up being my favorite of the month!  :)  And I will also have my last layout for our product exchange with Nikki Sivils on the Sketch Support Blog.  So I hope you will stop back by and check it all out!!


Wednesday, May 23, 2012

"Shapin'" Things Up!

When I look back over my 6.5 years of Scrapbooking, I think I can honestly say, that I have only cut my photos into shapes other than squares or rectangles, about a max of 3 times.  I was never into the whole shaped photo thing and the ones that I did cut into shapes, were circles.  Well, when I saw this week's challenge at Studio Calico, hosted by Kelly Purkey, I thought it was time to give it a try.  Kelly's challenge, was to use Hexagon shaped photos and I thought, "if Kelly Purkey is cutting her photos into hexagons, then I'm gonna give it a try too"!!  And guess what?  I ended up loving the end result.  The photos I picked worked perfectly for the Hexagon shape and it gave me a quick and easy design for my layout.


I used my Desktop Publishing program to create the Hexagon shape around my photos.  Then I just printed them and cut out the shapes.  And I decided this would be a fun layout to add some Hexagon confetti to for the Three Cool Chicks workshop.  One of the trends they spotlighted during the workshop was confetti, so I just used my Cricut to cut the smaller Hexagon shapes and placed them around the larger shapes.

I hope you will have a little fun with your next layout!  Maybe Hexagon shaped photos aren't for you, but maybe find a new trend or technique that looks exciting and give it a try.  Who knows, you might end up loving it!!

Products Used:

Patterned Paper:  Studio Calico
Smooch Spritz:  Clear Snap
Brads:  The Paper Studio
Washi Tape:  SEI & K&Company
Thickers:  American Crafts
Font:  CK Journaling & Abadi MT Condensed Extra Bold
Other:  Tag & Staples  

Tuesday, May 22, 2012

Gotta Love Free Stuff!

I am a big fan of Free Stuff...especially Free Scrapbooking Stuff!!  Where can you find this free stuff, you might ask?  There are several digital scrapbook sites that offer free downloads and SVG Cuts sends out free weekly svg's to cut with your electronic die-cutting machines.  And, one of my favorites, is Creating Keepsakes.  Did you know, that Creating Keepsakes has all kinds of free downloads in each issue of their magazine.  You can download PDF files and use the downloads for your digital pages or on your traditional pages, by printing and cutting out the images.  Our Issue Challenge, for this week at Club CK, was to use some of the free downloads in the magazine on our layout.  Here is what I did using the Note to Self collection from Echo Park and some of the free downloads from the magazine:


The word banners and journaling spot are from the free downloads.  I pasted them into my desktop publishing program and then I printed the journaling spot on a white piece of cardstock and fussy cut it.  I actually printed the word banners on a piece of patterned paper from the collection and added the brads to give the appearance that they were haning on my layout.  The great thing about having these downloads, is the ability to resize.  The journaling spot and banners were a little bigger than what I needed, so I sized them down to fit the space.  If you are interested in checking out some of the free Creating Keepsakes downloads, check out their page HERE.  And if you have never visited Club CK, take a minute to head over and check things out!  There is an awesome message board for connecting with other Scrappers, great challenges hosted by CK and also by Club Members, and you can sign up for a free account and load your layouts to your own personal Gallery!  Lots of fun and great inspiration, too!!

Products Used:

Patterned Paper & Stickers:  Echo Park
Free Downloads:  Creating Keepsakes
Brads:  The Paper Studio
Button:  Michael's
Pen:  Sharpie

Monday, May 21, 2012

Washi Love - Trash to Treasure Box

Okay, raise your hand if you love Washi Tape!!  I am raising both of mine!  :)  I don't know about you, but this little roll of goodness is my new favorite of favorites in the scrapbooking world.  If you have no clue what Washi Tape is...let me give you a little explanation:  Washi Tape is basically various rolls of decorative tape...different sized rolls, in all kinds of fun colors and patterns and it is repositional.  And you may be wondering how in the world you use Washi Tape?  Layouts, home dec projects, on cards, making embellishments, taping your kids' mouth shut (well, maybe not that last one...but it would be nice!!)  :)  There are endless possibilities for this must have product!

Now, I must admit that I only currently own 7 rolls of Washi Tape, but I just started my collection a few weeks ago.  But I do plan on adding to my stash, next week, when an order of several rolls arrive at my house from A Cherry on Top!!  Today, I was sitting around thinking about where to store my Washi Tape - because even when I'm not crafting, I am still working on ideas for stuff in my head - true signs of a scrap-a-holic.  I started wondering what I had around the house, that I could upcycle into a Washi Tape holder and from there, I headed to our pantry.  Lo and behold, I just happened to find an empty gum box on the shelf...yes, I buy gum in bulk, because fresh breath is important around here!!  :)  Then I headed to my craft desk and started working.

Here is how it played out:

Step 1 - I measured my box.  The height was around 2.5 inches and the total length of the box, counting all four sides was 16 inches.  I cut my first piece of paper to 2.5x9, and then I used a pencil to mark where I would need to make my folds to fit around the box.  Once my paper was folded at the appropriate spots, I used a large Zig Pen to cover the box and adhere the paper.  I repeated this step with the other side of the box, cutting the length a little shorter than 9 inches. 


Step 2 - I grabbed a couple of rolls of my Washi Tape, to decorate and finish of the edges.  I used a chevron pattern from SEI, to go around the top edges of the box and some SMASH tape from K&Company to finish off the side edges.


Step 3 - I added a little bit of flair to the box.  I used another piece of the SMASH tape and a toothpick, to create a flag banner.  I just folded the tape over on itself and cut a notch in the end.  I grabbed some teeny alphas from Glitz Designs, to add the word Washi and cut out a tiny heart, to represent the word "love".  And last, but not least, I popped on a cute little flower from American Crafts.

 
Fun and Functional!!  I am sure that my Washi Tape collection will eventually outgrow my cute, little box but for now, it's pretty much perfect.  Once I reach that point, I'll start looking around for something new to upcycle, to make room for all of those rolls of tape!!  :)

Products Used:

Patterned Paper:  Echo Park & Bella Blvd.

Washi Tape:  SEI & K&Company
Teeny Alphas:  Glitz Designs
Flower:  American Crafts
Adhesive:  Zig Memory System
Other:  Box & Toothpick 

Sunday, May 20, 2012

Little Snail in a Shell

On Friday night, a new Case File was revealed for CSI:  Color, Stories, Inspiration.  Case File #20 has a fun color scheme and some great elements to use as evidence this week.  I took a couple of photos of my little girl holding a tiny snail out in the yard, right before Debbi sent me the Case Files for the month of May, as my Special Investigator assignment.  When I saw this Case File, I knew right away that I would save these photos for this reveal.


See what I mean!!??  A perfect file to go along with these pics!!  :)  I used I actually used 8 out of the 11 elements, in the evidence portion this week and for my testimony, I put my journaling on top of something...the die cut spiral.  I also used some of the RGB codes this week to print my own patterned paper.  I set the RGB codes in my desktop publishing program, and then used some doodle fonts in word art to create the little circle border across the bottom of my page.  Michelle Singh, once of the CSI Investigators, also provides some amazing coordinates each week for the Case Files.  You can download the coordinates and use them digitally or traditionally, by printing them out.

So don't miss out on the fun this week.  Come over to CSI and upload your layout to the Gallery by Sunday, May 27.  

Products Used:

Cardstock & Brads:  The Paper Studio
Patterned Paper:  SEI & CSI Coordinates
Smooch Spritz:  Clear Snap
Thickers & Flair Button:  American Crafts
Embroidery Floss:  Janlynn