a woman of few words...especially when it comes to the titles for my layouts!! :) So, I was a little worried when I saw what the challenge would be for this week's Fabulous Friday at Frosted Designs!! We are challenging you to use a One Word Title on your layouts or projects. Needless to say, I had to think long and hard on this one. I decided not to do a layout involving photos of the kids, because I always like for my titles to be a mini description for the photos or journaling, so they usually end up pretty long. Instead, I chose to do a layout about my favorite flower, the Sunflower. And I couldn't think of a better title to use for this one, than Sunflower!! :)
I also have one other thing on this layout, that I rarely use...WHITE SPACE...and a lot of it, for me!! :) I really loved the brushed look on this paper and wanted to keep my design a little more simple. This is an all paper layout, other than the brad, button, and green jewel and a little bit of mist. These are my favorite kind of pages to do. I love using my patterned papers to create the elements and embellishments for my pages.
Make sure you take some time, to play along with us this week! You will have the chance to win a prize from our Sponsor, Leave a Paper Trail.
Products Used:
Patterned Paper & Thickers: Amy Tangerine (AC)
Mister Huey's Spray Mist: Studio Calico
Crystal Candy Dots: Pebbles
Punches: Anna Griffin & Marvy
Font: Brady Bunch
Button: Blumenthal Lansing
Brad: The Paper Studio
Friday, July 27, 2012
Wednesday, July 25, 2012
Stylin & Profilin
Last week, was a busy week on the Blog, but things kind of slowed down after Friday. I wish I could say the same for myself!! :) I have been busy with DT layouts, DT comments, hanging out at Club CK, working to get our daughter enrolled under a cover school for this year, ordering Curriculum for the upcoming school year...and anything and everything else in between!! :) But I did stop for about an hour yesterday to work on a layout for one of my favorite challenges at Club CK, the weekly Issue Challenge. This week, we were challenged to use Slang on our layout. Here is what I came up with:
I thought this title was a perfect fit for these photos of our little guy, in his Toboggan and shorts during the middle of Summer and 90+ degree weather!! He was hanging out in the chair watching Dora, so I snapped a few pics of him while he was sitting still...which doesn't happen often. I also incorporated one of the challenges going on at Club CK for their Annual Summer Camp, taking place this week. On Monday, they offered a coloring page print out to use on your layouts or projects. You can print the images on regular paper or a transparency and re-live your childhood by coloring in the images to your heart's content!! I used the banner image and printed it on patterned paper. Once I cut out each of the pieces, I used a Teal colored pencil to fill in the thin edge around each of the banners.
And since I was a little pressed for time, I decided to use the awesome Sketch #128 from Creative Scrappers for this page.
If you would like to join in with Summer Camp at Club CK, then head over this week to the Club Blog and the Creating Keepsakes Blog. Lots of fun challenges and info coming your way this week!
Products Used:
Patterned Paper: My Mind's Eye & Recollections
Brads, Twine, & Stickers: My Mind's Eye
Tags & Punch: EK Success
Punch: Marvy
Thickers: Amy Tangerine (AC)
Wood Veneers: Studio Calico
Font: CK Going Places
Other: Colored Pencils & Creating Keepsakes Print Out
Saturday, July 21, 2012
CK Mixed Media WINNER
Thank you to everyone who stopped by during the Creating Keepsakes Mixed Media Blog Hop. I wanted to pop in this morning and announce the Winner of this awesome Special Issue.
I used Random.org and came up with:
Congrats to moongirl!! Contact me with your mailing info and I will get it to the Ladies at CK, and they will send out your issue!
I used Random.org and came up with:
Congrats to moongirl!! Contact me with your mailing info and I will get it to the Ladies at CK, and they will send out your issue!
Friday, July 20, 2012
Workin' On My Off-Week!!
Today kicks off the newest Fabulous Friday challenge at Frosted Designs and technically, it's not my week to Post, but I HAD to participate in this week's challenge!! It is right up my alley, and I am sure you want to know what it is!! We are challenging you to use ONLY Patterned Paper on your layouts or projects. Now, don't let that scare you...it's a lot easier than it sounds.
I would say that I use all patterned paper on about 80% of my layouts. Sometimes I throw in a solid background, but it is rare. Or I will use cardstock to create a die cut title. But, I am here today to share my very easy secret for using all patterned paper...choose a coordinating line/collection of paper. Most manufacturers include lighter more subtle patterns in their packs, along with brighter and bolder patterns. Normally, I like taking out the less busy patterns to use as a full background or the larger part of paper, that I need for my page. Then, I start building in the other patterns and colors. For those who are just starting out with using all patterned paper, here's an easy recipe: Use the more subtle patterns in larger doses and the busier patterns in small doses. You can also put together your own papers for your layout, by using this same recipe, if you don't have any coordinated collections or lines laying around.
Echo Park is a great company, and they put their lines together very well. I decided to re-visit my Note to Self collection for this challenge and I also added in a couple of sheets from Kaisercraft's Technologic line.
And yes, I did use a darker background on my page, but it still has a subtle pattern. The red pattern and graph paper have enough contrast to stand out from the gray, so it totally worked. Even some of my embellishments are cut from patterned paper!! :) The robots are from the Kaisercraft line and the view master reels (which are my favorite, btw), come from one of the sheets of the EP paper.
I also wanted to play along with the awesome Case File going on at CSI: Color, Stories, Inspiration. The color schemes for the past two Case Files have been some of my favorites. Case File 28 had a fun technology theme and I knew I wanted to document the difference from when we were kids, compared to how things are for our kids today. Here is a look at the color scheme, evidence, and testimony for this Case File:
There were a lot of fun elements to work with under the Evidence and I chose robots, circles, repetition, and metal. And of course, I decided to document something related to technology. The journaling reads:
"When Daddy and Mommy were little, we didn't have hand-held video games or cell phones with Angry Birds and YouTube. But times have changed and I must admit that portable entertainment comes in handy when you have 3 rowdy kids!!"
Products Used:
Patterned Paper: Echo Park & Kaisercraft
Thickers: American Crafts
Metal Tags: EK Success
Punch: EK Success
Mask: Mister Huey's Chevron Mask (Studio Calico)
Smooch Spritz: Clear Snap
Buttons: Blumenthal Lansing
Tickets: Tim Holtz
Mini Round Gems: Recollections
Other: Paper Clips & Aluminum Foil
I wanted to share one more thing in this Post. Next week, Creating Keepsakes will be holding their Annual CK Summer Camp. This is always so much fun and I hope you will come over and check it out. If you visit CK's Blog, you will find a preview of what will be going on each day (make sure you scroll to the end of the post, for the preview). Beginning Monday, July 23, head over to Club CK and check out the Club Blog, to see what will be going on that day.
Thursday, July 19, 2012
Beachy Keen
**If you are looking for the Creating Keepsakes Mixed Media GIVEAWAY, click HERE.**
I love a good play on words for a title and when I saw that one of the June assignments for Get It Scrapped!, was Ideas for Beach Pages, the title for this layout immediately popped into my head! The goal of this assignment, was to create a beach page by taking either a conventional or creative approach. And one of my favorite ways to scrapbook beach photos, is by creating a scene on my page that evokes the feeling of being at the beach.
There are several factors playing together in this layout, that reinforce the beach look I was going for. I loved the red, whites, and blues that I mixed from the October Afternoon lines, because they remind me of those cute little sailor suits we were probably all dressed in, as children. I also fussy cut several "waves" from one of the 8x8 Seaside papers, to add the effect of water under my photos. The wood grain paper definitely brings to mind the piers at the beach or the drift wood that floats onto the sand. And of course, a beach page wouldn't be complete without a sun and a big fluffy cloud floating by! I decided to take a little bit of a different approach with the cloud on this page. I used a pencil to draw a light outline of the cloud and then I used a Zig pen to add adhesive along the outline. Baker's twine was perfect medium to use around the outline for the cloud, so I placed it along the adhesive, section by section to let it dry and stay in place.
With Summer right on top of us, I am sure you will have a ton of photos that need to be scrapped, and I hope you found a little inspiration today. Hop over to Get It Scrapped! and check out how the other members of the Creative Team took on this assignment!
Products Used:
Patterned Paper: October Afternoon & Bella Blvd.
Buttons & Stickers: October Afternoon
Thickers: American Crafts
Baker's Twine: The Twinery
Embroidery Floss: Janlynn
Brad: The Paper Studio
Other: Toothpick
Tuesday, July 17, 2012
Double Whammy Post!
**If you are looking for the Creating Keepsakes Mixed Media GIVEAWAY, click HERE.**
I have two things to share in today's Post!! The first is some BIG news for ScrapFIT, whose Team I will begin my Term with in August. And the second, is my monthly Blog Post for Scraphappy Pensacola, which includes a couple of fun projects.
ScrapFIT and Paper Issues are joining forces to bring you the ultimate tools to keep you in the best paper crafting shape of your life! Starting Augusts 1st , exclusive and unique 'FITkits' will be available each month!
FITkits will be offered up as prizes for each ScrapFIT Workout and for you die hard scrappers who want to get in to shape ASAP you can purchase them strait from the Paper Issues store - along with all the other hot new products they have!
There will be 2 FITkits each month! The first is a full size FITkit including the newest papers and embellishments already coordinated to maximize your FIT potential! The second kits it the LowCal FITkit that is jam packed with a mixture of only the hottest embellishments to hit the market!
Here is a sneak peak of the August FITkit.... your gonna love it!
We are pumped about these FITkits and you wont want to miss out on the release of these kits! Be sure to follow Paper Issues and ScrapFIT both on their blog an Facebook!
____________________________________________________
Here on the Gulf Coast, we have tons of sunshine during the Summer! We love to get outside and enjoy the beautiful weather and probably spend a lot of time in the sprinkler, pool, or ocean to get a break from the heat!
On my last visit to the store, Christy gave me a fun assortment of papers from TCP Studio to work with. Well believe it or not, I decided that I didn't want to create a layout with these papers, but a couple of fun projects instead. Now, I hardly ever stray from my layouts to do projects, so if I can do these, then you definitely can too!! :)
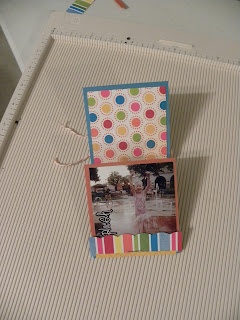
I chose to do a mini matchbook for my first project. These are great to give as gifts to friends, grandparents, or other family members. You can fill them with photos and they are perfectly portable in a wallet or purse. Here is how I created mine:
1. Start by cutting a 3 inch x 7 inch piece of paper. Then score your paper at 3 inches and 6 inches.
2. After scoring and folding, cut a piece of paper at 2.75x2.75 to place on the front cover of your matchbook. Cut a 1 inch strip and use some Edger scissors to cut a scalloped edge and place it over the 1 inch fold.
3. Next, decorate your front cover using stickers, Thickers, and a handmade sun embellishment. I created a fun little flag for my cover, using a toothpick, tiny type, stickers, a piece of scrap paper and baker's twine.
4. Once you are done decorating the front of your book, cut a second strip of paper at 3 inches by 9 inches. Score again at 3 inches and 6 inches. Accordian fold your paper strip.
5. Choose the photos you would like to add to your inside strip. I printed my photos at 2.75x2.75. You will have space for 6 photos.
6. Add your strip to the inside of your matchbook, once you have them adhered to your paper strip.
The next project I have, is great home decor for a kid's bedroom or in a beach house. I used a ceramic tile and the patterned papers from TCP Studio, to create a wall hanging. These tiles are available at your local Home Improvement stores and the 12x12 floor tiles can be available for less than $2 each.
1. Start out by gathering your supplies. You will need a 12x12 Ceramic Tile, Mod Podge, foam brush, patterned papers, Thickers or letter stickers, ink, and a few optional items for decorating your tile.
2. Select a full 12x12 piece of paper to use as your background. Tear around each edge of the paper and then distress with your preferred choice of ink. I like to use brown. Then paint the Mod Podge all over the background of your tile and place the paper over it. Push your paper to adhere it to the tile. Let it dry for about 10 minutes and then paint a coat of Mod Podge over the top of your paper. Don't worry if you have a few air bubbles pop up under your paper...it adds character!! :)
3. Start adding some decoration to your tile. I used some bubble wrap and the brown ink to stamp onto the sand on the patterned paper, just to give it a little more interest. You can create a fun umbrella embellishment for you tile, buy using a dowel rod, bamboo skewer, or sucker stick. Cut out the umbrella shape and glue the stick to your tile and then add the umbrella cover, using some pop dots, to give it a little more dimension on the tile. I topped mine off with a button and added some baker's twine to the dowel rod.
4. Use a mix of Thickers, letter stickers, and die cut words to create a title for your tile.
5. Finish off your project, by making a hand-made sun embellishment, a couple of clouds, and a tropical flower. I used my Expression to cut my shapes and then embossed them using my Sizzix Big Shot.
I hope you enjoyed both of these projects, and that you will stop in to see Christy and pick up some products at ScrapHappy for your next layout or project. Have a fun and crafty Summer!! :)
CK Mixed Media GIVEAWAY
I am so excited to be joining in my first Hop with Creating Keepsakes, as a new Moderator for the 2012-2013 Term. Along the way, you will be visiting the Blogs of many talented Ladies and have the opportunity to win a copy of CK's newest special issue, Mixed Media Scrapbooking, which hits newsstands today! I haven't ever really thought of myself, as a Mixed Media Scrapbooker, but after pouring over the pages of this new issue, I realized I definitely fall into this category!! If you've ever used Spray Mist, Gesso, paint, metal accents, items found around your house, or rhinestones on your layouts or projects, then you are a Mixed Media Scrapbooker too!!
*Products Used: Patterned Paper, Stickers, Buttons, Tin Pin: October Afternoon; Wood Veneers, Spray Mist; Chevron Mask: Studio Calico; Thickers: American Crafts; Punch: Marvy; Tags: EK Success; Embossing Machine: Sizzix
I incorporated several Mixed Media elements into this layout...one of my favorites, being Spray Mist. I chose a neutral text paper from October Afternoon for my background and then used the fun Chevron mask and Mr. Huey's Spray Mist from Studio Calico, to create a fun pattern in my background. After I misted, I removed the nozzle from the Spray Mist bottle and tapped it over my page to create some bigger drops of mist over the background. Two other Mixed Media elements I included, are the embroidery floss and the metal rimmed tags. These both add great texture to my layout, without adding a lot of bulk.
I was really excited to play around with some of the amazing 9 to 5 collection from October Afternoon, that I just received last week. In looking at the whole collection, you might think that it's not geared for children's pages, but I had a lot of fun adapting it to work for my page. There is a fun vintage office theme to this collection and I included a few of my own office supplies to go along with the line. I used an index card for my journaling area and the metal tags are available at any office store and are usually used to hold keys, because they are perfect for labeling what they are for.
And I know, after stopping along the way on this Hop, you have seen tons of great inspiration and that you are hoping to get your hands on a copy of this Issue. Well, I have good news!! CK is giving me a copy of Mixed Media Scrapbooking to give away to one lucky winner. Here's what you can do to win:
*If you are new to my Blog, become a new follower and leave me a comment letting me know that you did.
*If you already follow me, just leave a comment letting me know what Mixed Media ideas you would like to use for your next layout.
*For a second entry, share this on your Blog or FB and come back and leave a second comment letting me know that you did.
I will leave the giveaway open until Midnight (CST) on Thursday, July 19. A random winner will be drawn and announced here on Friday. When you comment, please leave a way for me to contact you.
Make sure you continue along the Hop and make a visit to the very talented Iris Uy. Iris has several amazing layouts in this issue! And just in case, you haven't visited through all of the Blogs, here is a complete listing of everyone participating in the Hop:
Kim Watson
Kim Jackson
Patty Cieri
Erika Hayes
Summer Fullerton
Stacy Cohen
Mou Saha
Laina Lamb
Joey Manwarren
Iris Uy
Paper Crafters Corner
Maggie Holmes
The Scrap Review
Piradee Talvanna
Adele Beck
You also have the opportunity, to check out the bonus online content for Mixed Media Scrapbooking HERE. And, if you would like to purchase a copy of this issue for yourself, a family member, or a friend, you can do so HERE.
And here is a little sneak peek of what you will find in this issue. I know after seeing a few of these pages, you'll definitely want to head out and grab a copy today!!
I didn't have a layout appearing in this issue, but still created one just for today, that shows some of the techniques discussed in Mixed Media Scrapbooking.
I incorporated several Mixed Media elements into this layout...one of my favorites, being Spray Mist. I chose a neutral text paper from October Afternoon for my background and then used the fun Chevron mask and Mr. Huey's Spray Mist from Studio Calico, to create a fun pattern in my background. After I misted, I removed the nozzle from the Spray Mist bottle and tapped it over my page to create some bigger drops of mist over the background. Two other Mixed Media elements I included, are the embroidery floss and the metal rimmed tags. These both add great texture to my layout, without adding a lot of bulk.
I was really excited to play around with some of the amazing 9 to 5 collection from October Afternoon, that I just received last week. In looking at the whole collection, you might think that it's not geared for children's pages, but I had a lot of fun adapting it to work for my page. There is a fun vintage office theme to this collection and I included a few of my own office supplies to go along with the line. I used an index card for my journaling area and the metal tags are available at any office store and are usually used to hold keys, because they are perfect for labeling what they are for.
And I know, after stopping along the way on this Hop, you have seen tons of great inspiration and that you are hoping to get your hands on a copy of this Issue. Well, I have good news!! CK is giving me a copy of Mixed Media Scrapbooking to give away to one lucky winner. Here's what you can do to win:
*If you are new to my Blog, become a new follower and leave me a comment letting me know that you did.
*If you already follow me, just leave a comment letting me know what Mixed Media ideas you would like to use for your next layout.
*For a second entry, share this on your Blog or FB and come back and leave a second comment letting me know that you did.
I will leave the giveaway open until Midnight (CST) on Thursday, July 19. A random winner will be drawn and announced here on Friday. When you comment, please leave a way for me to contact you.
Make sure you continue along the Hop and make a visit to the very talented Iris Uy. Iris has several amazing layouts in this issue! And just in case, you haven't visited through all of the Blogs, here is a complete listing of everyone participating in the Hop:
Kim Watson
Kim Jackson
Patty Cieri
Erika Hayes
Summer Fullerton
Stacy Cohen
Mou Saha
Laina Lamb
Joey Manwarren
Iris Uy
Paper Crafters Corner
Maggie Holmes
The Scrap Review
Piradee Talvanna
Adele Beck
You also have the opportunity, to check out the bonus online content for Mixed Media Scrapbooking HERE. And, if you would like to purchase a copy of this issue for yourself, a family member, or a friend, you can do so HERE.
And here is a little sneak peek of what you will find in this issue. I know after seeing a few of these pages, you'll definitely want to head out and grab a copy today!!
Monday, July 16, 2012
Tweet Talking - Using Bird Motifs
Oh little Blog, how I've missed you!! We were hit with a pretty bad thunderstorm on Friday night and our Internet service was struck in the process. Since then, we have been trying to figure out exactly what was affected and have ruled out some things and are still "iffy" on others. We are going to pick up a new Modem tomorrow and I am HOPING, HOPING that will fix our problem. Having Internet, when you are a SAHM with 3 kids, is about one of the only ways I keep my sanity. Sorry I haven't been able to check in with any of your Blogs this weekend. I can open Blogger on my phone, but for some reason, it only lets me scroll far enough down to see the first two posts in my Dashboard. Highly annoying!!! So, right now I am at hubby's office getting some posts set for auto-post this week, in case things aren't back up and running tomorrow.
Today, we are sharing Bird Motifs on the Get It Scrapped! Blog. Bird embellishments or papers are perfect to use on any type of layout. You can use them for children's pages, Wedding pages, nature pages, pages that are focused on you, and of course, even on bird pages!! :) There are tons of products with the bird motif, from stamps to patterned paper to flair buttons...the list goes on and on.
I actually chose to work with the bird motif on a layout about birds. We visited one of our local Zoos on Memorial Day weekend and they had a small bird sanctuary that the kids loved. One of their favorite movies (and mine too) is Rio. So getting to go in and see the birds up close, was just like visiting some of their favorite birds from the movie.
I chose one of my favorite paper lines for this assignment, Amy Tangerine's SketchBook collection and then went to work creating my page! I incorporated birds and the bird theme into my layout in three different ways. For the large pink bird, I traced a shape onto some of the Amy Tan patterned paper and then went back with a text stamp and black ink to add a little more interest to the image. Then I had these great little wood veneer birds from Studio Calico. I grabbed three different colors of acrylic paint and just painted each one, to give them more of a tropical color to match the birds we saw at the Zoo. And finally, I used a play on words for my title to finish out my bird motif.
Come check out how the other talented Ladies on the Get It Scrapped! Creative Team, incorporated this fun motif into their pages. I know you will find some great ideas for your next layout!
Products Used:
Patterned Paper: Amy Tangerine (AC)
Wood Veneers: Studio Calico (AC)
Ink: Stampin' Up
Acrylic Stamp: Prima
Smooch Spritz: Clear Snap
Washi Tape: Heidi Swapp
Brads: The Paper Studio
Acrylic Paint: Apple Barrel
Font: Arial Black
Today, we are sharing Bird Motifs on the Get It Scrapped! Blog. Bird embellishments or papers are perfect to use on any type of layout. You can use them for children's pages, Wedding pages, nature pages, pages that are focused on you, and of course, even on bird pages!! :) There are tons of products with the bird motif, from stamps to patterned paper to flair buttons...the list goes on and on.
I actually chose to work with the bird motif on a layout about birds. We visited one of our local Zoos on Memorial Day weekend and they had a small bird sanctuary that the kids loved. One of their favorite movies (and mine too) is Rio. So getting to go in and see the birds up close, was just like visiting some of their favorite birds from the movie.
I chose one of my favorite paper lines for this assignment, Amy Tangerine's SketchBook collection and then went to work creating my page! I incorporated birds and the bird theme into my layout in three different ways. For the large pink bird, I traced a shape onto some of the Amy Tan patterned paper and then went back with a text stamp and black ink to add a little more interest to the image. Then I had these great little wood veneer birds from Studio Calico. I grabbed three different colors of acrylic paint and just painted each one, to give them more of a tropical color to match the birds we saw at the Zoo. And finally, I used a play on words for my title to finish out my bird motif.
Come check out how the other talented Ladies on the Get It Scrapped! Creative Team, incorporated this fun motif into their pages. I know you will find some great ideas for your next layout!
Products Used:
Patterned Paper: Amy Tangerine (AC)
Wood Veneers: Studio Calico (AC)
Ink: Stampin' Up
Acrylic Stamp: Prima
Smooch Spritz: Clear Snap
Washi Tape: Heidi Swapp
Brads: The Paper Studio
Acrylic Paint: Apple Barrel
Font: Arial Black
Subscribe to:
Posts (Atom)