Thursday, April 30, 2015

Hip Kit Club | Just For Fun

Do you ever know exactly what product you want to use, but just can’t figure out how to place it on the page?  That’s exactly what happened with the layout I’m sharing today, using the April 2015 Hip Kit & Add-On Kits.  I had all of the product on my desk, and moved it around on the page three times, before I finally decided on my final design.


There was one simple technique, that made the light bulb go off, and that was adding some Yellow in the background using the Prima watercolor pencils, included in the April 2015 Color Add-On.  That pop of color gave me a base layer for adding my photo and embellishments and everything fell into place from there.  I just used the Yellow pencil to draw on the White cardstock, from the April 2015 Cardstock Add-On Kit, and added some water to my brush to blend it.


So next time you are feeling stuck on a design, don’t give up.  There could be that one idea that totally turns around the page design for you!!

https://www.etsy.com/shop/TheCutShoppe?show_panel=true

Wednesday, April 29, 2015

American Crafts | Magnets

If your kids are like mine, they probably love getting into your crafting supplies to work on their own projects.  I wanted to channel their creative energy, and let them create a fun project that also has a useful purpose around the house!

Magnets1

Supplies: Shimelle (370704) - Grey Floral, Shimelle (370712) - Salted Caramel, Shimelle (370721) - Orange Pekoe, Shimelle (370713) - Americano, Shimelle (370745) - Wood Buttons, Shimelle (370736) - Enamel Dots, DIY Shop (366620) - Wooden Clothespins, DIY Shop (366629) - Cork Stickers Butterflies, DIY Shop (66618) - Wood Veneer Butterflies, Knock Outs (KOP63102) - Star Punch

1. Gather some small patterned paper scraps from the True Stories collection, Wooden Clothespins, Foam Brushes and Mod Podge.
Tutorial1

2. Apply Mod Podge to one side of the Clothespin, using the Foam Brush.
 
Tutorial2

3. Adhere the Clothespin to the back side of one of the patterned papers and let dry.
 
Tutorial3

4. Let Mom use a craft knife to trim the excess patterned paper from the edges of the Clothespin, and to remove the center piece of paper, so the metal clip shows through.
 
Tutorial4

5. Cover the Clothespin with another layer of Mod Podge, to protect the patterned paper.
 
Tutorial5

6. Get your embellishments ready to add to the Clothespins, once the Mod Podge is dry.
 
Tutorial6
Tutorial7

7. Adhere a magnetic strip to the backside of your Clothespin. You can find the magnet backing at your local craft store.
 
Tutorial8

8. Now your kids have a finished project that they helped to create and that will be on display on the refrigerator! 
 
Tutorial9
Perfect for hanging up artwork and photos!

https://www.etsy.com/shop/TheCutShoppe?show_panel=true

Tuesday, April 28, 2015

A Flair for Buttons | Beachy Keen

Hi everyone!  I'm stopping in today, to share a new layout with you, using some awesome Flair Buttons from the A Flair for Buttons Shop!  I mixed several Flair Buttons from the Shop, to create a summer look on my layout.


I wanted to cluster all of the elements on my page, so I created a grid using several large wood veneers.  Once the wood veneers were in place I added my title and embellishments.  And I used the Flair Buttons to create a visual triangle around the page.

I also have a process video to go along with today's layout, if you would like to check it out and see how I put everything together!


If you're looking for some fun summer Flair for your upcoming projects, make sure you visit the A Flair for Buttons Shop!  Here's one of my favorites, which includes one of the buttons on my layout today!

Il_570xN.462758483_1kbs

https://www.etsy.com/shop/TheCutShoppe?show_panel=true

Friday, April 24, 2015

American Crafts | When In Doubt Smile

This week on the American Crafts Blog, the Design Team has been focusing on Recycling.  Definitely fitting, with the celebration of Earth Day this week!  It's fun to find ways to recycle on your projects, because we all know the products are fun to use, but sometimes the packaging can be just as fun.  Here's a look at the layout I created, using the True Stories collection from Shimelle.


How to: Create a sewn pocket using clear plastic packaging. I used the Shimelle Enamel Dots packaging to create a small pocket for my layout. Cut the sticky end off of the packing and then stitch around the bottom and two sides. Cut a sentiment phrase from one of the Shimelle patterned papers and place it inside the pocket. Next, use the cardboard backing from the Shimelle Roller Stamp. Cut out the phrase section and then cut out each individual phrase. Now you can adhere the phrases over your plastic packaging pocket. Cut a piece of White cardstock to 11.5x11.5 and mount it on the Salted Caramel background paper. Place a die cut in the background and then layer your plastic pocket and photo to the right hand side of the cut file. Embellish your layout by adding the Die Cut Cardstock Shapes, Enamel Dots, Wood Veneers, Wood Buttons and Thickers from the Shimelle collection around your plastic pocket and photo.

Supplies: Shimelle (370712) - Salted Caramel, Shimelle ( 370704) - Grey Floral, Shimelle (370714) - Darjeeling, Shimelle (370701) - Latte, Shimelle (370743) - Die Cut Cardstock Shapes, Shimelle (370745) - Wood Buttons, Shimelle (370735) - Enamel Dots, Shimelle (370741) - Wood Veneer, Shimelle (370729) - Hipster Thickers, Shimelle (370737) - Roller Stamp, Shimelle (368170) - Roller Date Stamp, Shimelle Packaging

https://www.etsy.com/shop/TheCutShoppe?show_panel=true

Thursday, April 23, 2015

Hip Kit Club | You Make Me Smile

It's Thursday, and that means it's time to share a new layout for Hip Kit Club, using the April 2015 Hip Kits & Add-On Kits.  I like to call this layout “basic, with controlled Mixed Media”!  HA!  If you’re interested in Mixed Media, but are worried about trying it directly on your layout, this is a great way to get comfortable with it.  I used one of the Heidi Swapp watercolor papers included in the April 2015 Color Add-On Kit, with the Prima watercolor pencils.  This technique lets you get creative with Mixed Media, but gives you the option of using it off the page and then adding it to your layout.


I used the watercolor pencils on the HS watercolor paper to create a rainbow look.  This is super simple!  Just color across the paper with the watercolors and then use a brush and water to spread the color!  Easy peasy, lemon squeezy!  Once the watercolor dried, I adhered the card to my background paper and machine stitched around the edges.


And adding the card, gave me a great base for the rest of my page design.  I decided to do a photo strip down the center of the layout, and then create a fun embellished look on the opposite side of the layout.  The Heidi Swapp Wood Veneers in the April 2015 Project Life Kit were perfect for the grid design that I wanted to create to the right of my photos.  I mixed in some of the patterned paper squares cut from the Webster’s Pages What A Day patterned paper included the April 2015 Embellishment Kit.  And, of course, I had to add some Black Color Shine splatters, once I completed the layout!  I love the contrast of the Black ink layered over the bright watercolors!

So if you’re thinking about trying Mixed Media, make sure you check out the monthly Color Add-Ons!  You definitely won’t be disappointed.  There are lots of fun ways to use the products, and when you receive stencils, mists or paint daubers you get a great value, because they can be used multiple times or last for a while!

https://www.etsy.com/shop/TheCutShoppe?show_panel=true

Saturday, April 18, 2015

American Crafts | Delighted

A couple of weeks ago, the American Crafts Design Team featured the new True Stories collection by Shimelle, on the Blog.  There are so many fun patterns in the collection and the colors are my favorite!  I thought it would be fun to fussy cut some of the designs from the papers, and use them to create a big impact on my layout.


How to: Start by fussy cutting 10 of the small Polaroid shapes from the Orange Pekoe patterned paper.  Place the Heart pattern mask in the center and a little to the left on your background paper and use a Black fine point pen to trace the heart shapes. Now place the small Polaroids randomly on each side of the Heart pattern. Stitch around each of the Polaroids. Add some spray mist over the Heart pattern before adding the other elements to your layout. Add a large die cut over the Heart pattern and place your photo and title to the right hand side of the die cut. Fussy cut the phrases from the Espresso patterned paper and layer them over the Polaroid shapes. Finish your layout by embellishing with the True Stories Die Cut Cardstock Shapes and Enamel Dots.

Supplies: True Stories (370711) - Decaf, True Stories (370721) - Orange Pekoe, True Stories (370718) - Mocha, True Stories (370707) - Espresso, True Stories (370750 - Pattern Masks, True Stories (370743) - Die Cut Cardstock Shapes, True Stories (370736) - Enamel Dots

https://www.etsy.com/shop/TheCutShoppe?show_panel=true

Friday, April 17, 2015

Hip Kit Club May 2015 Kit Reveal!

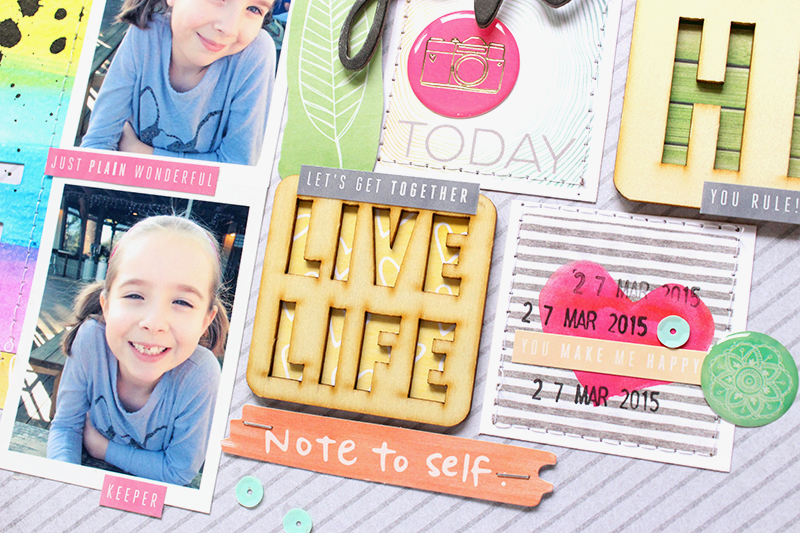
I've been sharing sneak peeks this week of the May 2015 Hip Kit & Add-On Kits from Hip Kit Club, and now the full Kits have been revealed!  YAY!  Here's a look at all of the Kits you will find in the Shop!

MAY 2015 HIP KIT (main kit)
Main
Hip Kit Club Member Price:  $29.95
(requires a 3 month minimum subscription)
CLICK HERE to join!
Individual Kit Purchase Price:  $34.95
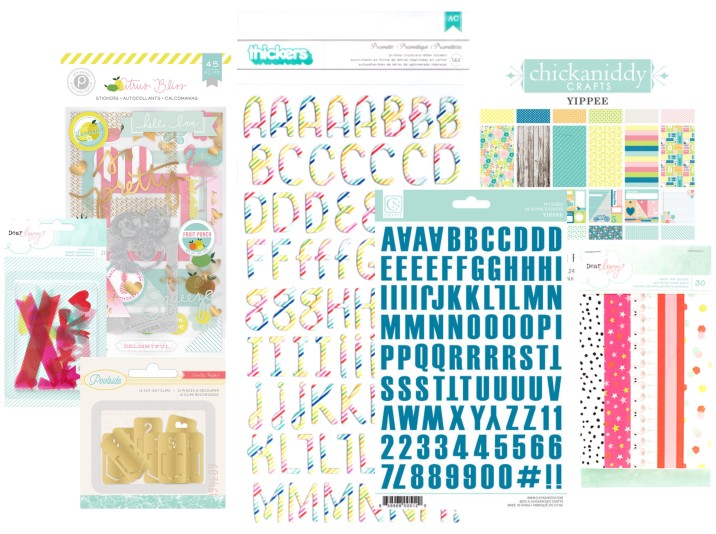
Products Included:
  • 1 sheet – Pink Paislee – Citrus Bliss – Squeeze Paper
  • 1 sheet – Pink Paislee – Citrus Bliss – Brunch Paper
  • 1 sheet – Pink Paislee – Citrus Bliss – Sour Paper
  • 1 sheet – Pink Paislee – Citrus Bliss – Lemonade Paper
  • 1 sheet – Pink Paislee – Citrus Bliss – Bloom Paper
  • 1 sheet – Dear Lizzy – Fine & Dandy – Cheerful Paper
  • 1 sheet – Dear Lizzy – Fine & Dandy – Let’s Party Paper
  • 1 sheet – Dear Lizzy – Fine & Dandy – Love Fest Paper
  • 1 sheet – Chickaniddy – Yippee – Picnic Paper
  • 1 sheet – Chickaniddy – Yippee – Here’s the Story Paper
  • 1 pkg. Dear Lizzy – Fine & Dandy – Woodland Black Foam Thickers
  • 1 pkg. Pink Paislee – Citrus Bliss – Ephemera
  • 1 pkg. Pebbles – Family Ties – Mini Alphabet Stickers
  • 1 pkg. Evalicious – Life’s Sweet – Wood Veneer Words
  • 1 pkg. Evalicious – Life’s Sweet – Puffy Stickers
  • 1 pkg. – Chickaniddy – Yippee – Enamel Words

HIP KIT CLUB – MAY 2015 – EMBELLISHMENT ADD-ON KIT
EmbellishmentPrice:  $28.95*
*Hip Kit Club members receive a 15% off on all Add-On Kit purchases

Product Included:
  • 1 pkg. – Pink Paislee Citrus Twist – Chipboard Accents
  • 1 pkg. – Dear Lizzy – Fine & Dandy – Acrylic Shapes
  • 1 pkg. Crate Paper – Poolside – Gold Paper Clips
  • 1 pkg. Pebbles – Fun in the Sun – Prismatic Thickers
  • 1 sheet – Chickaniddy – Yippee – Alphabet Stickers
  • Chickaniddy – Yippe – 6×6 Paper Pad (1 sheet of each design)
  • 1 pkg. Dear Lizzy – Fine & Dandy – Washi Tape Strips (8 sheets)

HIP KIT CLUB – MAY 2015 – PROJECT LIFE ADD-ON KIT
Project LifePrice:  $34.95*
*Hip Kit Club members receive a 15% off on all Add-On Kit purchases

Products Included:
  • 1 pkg. – Evalicious – Life’s Sweet Large Journaling Tags (set of 12)
  • 1 sheet – October Afternoon – Treasure Map – Label Stickers
  • 1 pkg. – Dear Lizzy – Fine & Dandy – Gold Rim Circle Tags
  • 1 sheet – Chickaniddy – 365 – Alphabet Stickers
  • 1 pkg. – Evalicious – Life’s Sweet – Puffy Stickers V2
  • 1 pkg. – Evalicious – Cork Alphabet Puffy Stickers
  • 1 Chickaniddy – 365 Clear Stamp Set
HIP KIT CLUB – MAY 2015 – COLOR ADD-ON KIT
Color
Price:  $23.95*
*Hip Kit Club members receive a 15% off on all Add-On Kit purchases

Products Included:
  • 1 pkg. – Amy Tangerine – Rise & Shine – Brooklyn Stencils (set of 6)
  • 1 Ranger – Paint Dabber – Lemon Twist
  • 1 Ranger – Paint Dabber – Electric Lime
  • 1 Tim Holtz – Lagoon Mermaid – Distress Ink Pad (3″x3″)

HIP KIT CLUB – MAY 2015 – PAPER ADD-ON KIT
Paper
Price:  $11.95*
*Hip Kit Club members receive a 15% off on all Add-On Kit purchases

Products Included:
  • 1 sheet – Pink Paislee – Citrus Bliss – Squeeze Paper
  • 1 sheet – Pink Paislee – Citrus Bliss – Brunch Paper
  • 1 sheet – Pink Paislee – Citrus Bliss – Sour Paper
  • 1 sheet – Pink Paislee – Citrus Bliss – Lemonade Paper
  • 1 sheet – Pink Paislee – Citrus Bliss – Bloom Paper
  • 1 sheet – Dear Lizzy – Fine & Dandy – Cheerful Paper
  • 1 sheet – Dear Lizzy – Fine & Dandy – Let’s Party Paper
  • 1 sheet – Dear Lizzy – Fine & Dandy – Love Fest Paper
  • 1 sheet – Chickaniddy – Yippee – Picnic Paper
  • 1 sheet – Chickaniddy – Yippee – Here’s the Story Paper
  • 1 sheet – Dear Lizzy – Fine & Dandy – Gold Foil Number Vellum

HIP KIT CLUB – MAY 2015 – CARDSTOCK ADD-ON KIT

Cardstock
Price:  $9.95*
*Hip Kit Club members receive a 15% off on all Add-On Kit purchases

Products Included:
  • 2 sheets – American Crafts – Marine Cardstock
  • 2 sheets – American Crafts – White Cardstock
  • 2 sheets – American Crafts – Light Kraft Cardstock
  • 2 sheets – American Crafts – White Vellum
  • 2 sheets – American Crafts – Peapod Cardstock
  • 2 sheets – American Crafts – Fountain Cardstock


https://www.etsy.com/shop/TheCutShoppe?show_panel=true

Thursday, April 16, 2015

Hip Kit Club | Puppy Love

I’m here today to share two new layouts with you, using the April 2015 Hip Kit & Add-On Kits.  You can probably tell from the title of my post, that these layouts will include some puppy photos!  I love that you can basically scrap any photo you want, with each month’s Hip Kit.  Every day photos are my favorites to scrap, and the Hip Kits always have just the right mix of products for creating the perfect layout.
 
First up, is a layout using a banner design across the top of the layout.


This layout was really easy to put together.  I used a mix of the patterned papers included in the April 2015 Main Kit, along with embellishments from the April 2015 Embellishment Kit.  I started out by cutting some of the patterned papers into banner shapes, and adding in a couple of tags from the Amy Tangerine Bits pack included in the Main Kit.  Once I had all of the papers in place, I stitched along the top with my sewing machine.  I created my title with a mix of Thickers from the Main Kit and the Embellishment Kit, and finished the layout by adding some chipboard pieces, epoxy stickers and word phrase stickers.

I have a new Process Video to go along with this layout, and I would love for you to check it out!


My second layout, is based on a previous design that I’ve worked with and loved!  There’s definitely not anything wrong with repeating a design, if you love it.  Like they say, if it ain’t broke, don’t fix it!


I knew I wanted to start out with the fun Claire patterned paper from Amy Tan, that’s included in the April 2015 Main Kit and the April 2015 Paper Add-On Kit.  I loved all of the colors it included, and knew it would work well with all of the embellishments in this month’s Kit.  I cut the paper to a point and added it to the White cardstock, that’s included in the April 2015 Cardstock Add-On Kit.  I also wanted to add another look to the patterned paper, so I stamped with the Diamond border stamp from the Elle’s Studio set, included in the April 2015 Color Add-On Kit.  Then I completed the layout design, by adding my photo to the center of the page, and angled my title along the lines of the patterned paper.

This month’s Kit is filled with lots of great colors, and I love how they all mix together!  If you didn’t get a chance to pick up the April Hip Kits, then make sure you stop by the Shop to get yours!

https://www.etsy.com/shop/TheCutShoppe?show_panel=true

Wednesday, April 15, 2015

A Flair for Buttons | Dogs & Cats

Call us crazy, but we decided to adopt a new puppy this past Easter weekend!  It's been about 10 years, since we had a pet, so it's been a little chaotic around here.  But he seems to fit in perfectly, and of course, I've had to snap some photos of him for scrapbook layouts!  There are some really cute pet themed Flair Buttons in the A Flair for Buttons shop, but I didn't have any on hand...yet.  So I decided to look through my sets, and see what I could find, that would work with the look I was going for.  I chose a mix of the Black and White Words 1 Flair, Be Mine Flair, and Best Friends Flair.


The Flair Buttons had a Black, White and Red color scheme, so I pulled out the Fine & Dandy collection from Dear Lizzy, to go along with the flair.  And, the collection also had a dog embellishment!  I created a banner across the bottom of the layout, and thought it would be fun to add the Flair Buttons to the center of the circles.

So even if you don't have the exact theme of Flair on hand, for your next layout, you can still make the ones you have work for you.  But I'll definitely be picking up some of the cute pet sets that are in the Shop!

Supplies:  Flair Buttons:  A Flair for Buttons; Patterned Paper, Bits, Stickers, Thickers & Banner:  American Crafts; Cut Files:  The Cut Shoppe; Die Cut Machine:  Silhouette Cameo, Color Shine:  Heidi Swapp; Word Phrases:  Studio Calico; Tiny Attacher:  Tim Holtz; Wood Veneers:  Elle's Studio; Enamel Dots:  My Mind's Eye

https://www.etsy.com/shop/TheCutShoppe?show_panel=true