Monday, August 29, 2016

Stretch Your Sketch Series Conclusion

It's Week 4 of the Stretch Your Sketch YouTube series, that Missy Whidden and I have been doing over this past month.  We're wrapping things up by altering the sketch this week.  If you haven't had a chance to check out the series, I hope you'll head over and subscribe to our channels and start with the Week 1 video.  You can also download the sketch we've been working with and a FREE Cut File set (the link is included in the comments section on each of the videos).


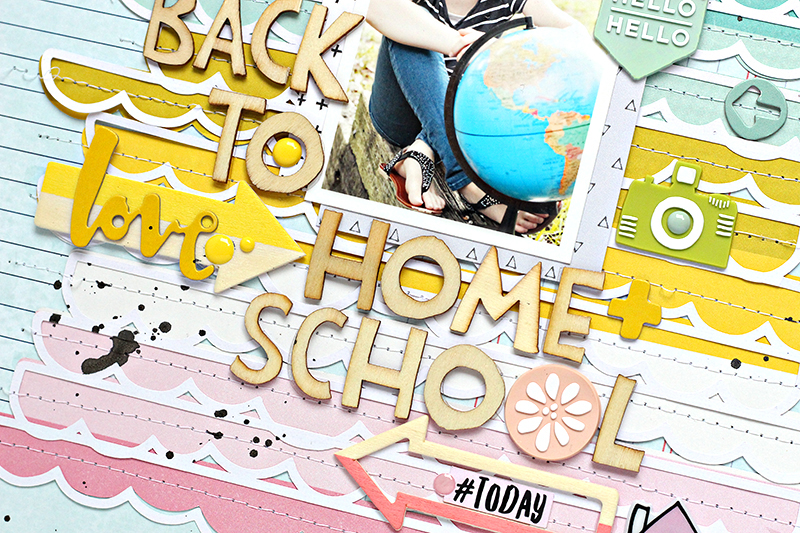
I used one large circle this week, to take the place of the multiple, smaller circles.  I wanted to use the heart/circle cut file in the center of the layout and place my photo behind the heart shape.  I have a short screen capture, showing how I altered the cut file in Silhouette Studio, so make sure you check out the video!


Since this is the final week, I wanted to post all of the layouts I created based on the sketch.  It's fun to see how the layouts changed a little each week, while still working with the same sketch design.

Week 1:  As Is


Week 2:  Flip It


Week 3:  Resize It


Week 4:  Alter It


You can find each week's video here:

Week 1
Week 2
Week 3
Week 4 

And make sure you visit Missy's channel to see all of her videos for the Series! 

Wednesday, August 24, 2016

Hip Kit Club | Hello Adventure

This is a personal blog. All editorial content and projects are intellectual property of ashleyhortondesigns.com. I do receive compensation and material product from Hip Kit Club to develop my craft posts, but all ideas and opinions are my own.

My new layout for Hip Kit Club this week is based on the August Mood Board.  I loved the circle garland on this month's Mood Board and the color scheme on the bottom left corner. So I put the two together, to create a fun design! I used a two inch punch to cut circles from the Crate Paper Cute Girl patterned paper. Then I placed the punched circles on a piece of White cardstock from the August Cardstock Add-On Kit. Once I had them in place, I added machine stitching to connect the circles. 


After adding my photo and some of the August cut files, I started embellishing the circles with a variety of embellishments from Crate Paper and our Hip Kit Club Exclusive ephemera pieces. For the title I combined more Crate Paper goodies and the Thickers from the Dear Lizzy Saturday collection. Then I finished things up with a few My Mind's Eye Hooray enamel dots and added the date with the Amy Tangerine Oh Happy Life stickers.


If you're inspired by our August Mood Board, you can play along with this week's Weekly Challenge by posting your layout on the Weekly Challenge thread in the Hip Kit Club Member Forum on Facebook!  

https://www.etsy.com/shop/TheCutShoppe 

Tuesday, August 23, 2016

Pink Paislee | Oh the Places You'll Go

This is a personal blog. All editorial content and projects are intellectual property of ashleyhortondesigns.com. I do receive compensation and material product from Pink Paislee to develop my craft posts, but all ideas and opinions are my own.

It's Travel week on the Pink Paislee Blog, and I kicked things off yesterday with a new layout using the Take Me Away collection by Paige Evans!  I love that this collection can be used in a variety of ways. It’s perfect for everyday layouts, but also has a mix of travel elements that are perfect for documenting road trips, vacations, etc. I decided to go with the US map paper, but wasn’t sure at first how I wanted to use it… then inspiration hit!


I had the idea to use the paper to document all of the places I’ve visited. I wanted the map as the full background, but thought it might be too busy and distract from my photo, title, and embellishments. To solve the problem, I added a sheet of vellum over the background paper to soften the look of the map. I stitched along the top of the page to secure the vellum to the background paper.


Then I used a second sheet of the map paper and cut out the states and countries I’ve visited and layered them over the coordinating spot on the map background. This was a fun effect because the fussy cut states and countries stand out from the softer states in the background.  It was a perfect way to highlight all of the places I’ve visited so far.


Since the focus of the layout was on the places I’ve been, I chose a selfie for my photo and placed it in the negative space around the places I’ve visited. I had a lot of room left at the top of the page, so it was the perfect spot for a large title. I chose the Dr. Seuss quote, “Oh the Places You’ll Go” and varied the colors in the Carefree Thickers. To complete the layout, I created a visual triangle using the Take Me Away wood ephemera pieces and chipboard pieces.


Make sure you stop by the Pink Paislee Blog all this week, for more travel inspiration from the Design Team!
 
https://www.etsy.com/shop/TheCutShoppe 

Monday, August 22, 2016

OAKLEY AVEUNE COLLECTION!

I am so excited have my first collection, Oakley Avenue, available through Pretty Little Studio!  This collection will make you fall in love with Fall, and also includes product that can be used to document everyday moments.

The collection is NOW AVAILABLE for Pre-Order on the Pretty Little Studio website.

http://www.plspapershop.com/default.asp

Here are a few items you can find in the collection:

20 patterned papers
Wood Veneers
Acrylic Pieces
Stickers
Die Cut Alphas
Cut Aparts
Die Cut Shapes
Sequins
Letter Stickers
AND MORE!!

Make sure you stop by the Pretty Little Studio website, and you can see the full collection and order your items early!!
 
https://www.etsy.com/shop/TheCutShoppe 

Friday, August 19, 2016

Crate Paper | Always Happy

This is a personal blog. All editorial content and projects are intellectual property of ashleyhortondesigns.com. I do receive compensation and material product from Crate Paper to develop my craft posts, but all ideas and opinions are my own.

I'm stopping in today to share a new layout for Crate Paper, using the gorgeous Gather collection by Maggie Holmes!  I love the colors and patterns in this collection, so I decided to use as many papers as I could on my layout.  I chose eight papers from the 6x6 paper pad to use with a string art cut file.


I wanted to add some texture to the cut files so I machine stitched around each one.  I also used the positive pieces of the heart shapes to fill in more of the background.  I used the largest cut file to place my photo.  I liked having the photo in a heart shape, so the space worked perfectly.


At this point, you're probably thinking I had plenty of hearts on the layout, but I found room for more!  I used a mix of hearts from the Gather Chipboard Sheet and Thickers sheet, to add dimension to the layout.


For the title, I also used pieces from the Gather Thickers.  I liked having the thicker look of the chipboard, to help it stand out against the background design.  I finished up the layout with the cute little bow and wood buttons from the Gather Embellishment pack.  If you haven't seen the full collection, make sure you head over to the Crate Paper Blog to check it out.  There's an awesome variety of products included in the collection!

https://www.etsy.com/shop/TheCutShoppe 
  

Thursday, August 18, 2016

A Flair for Buttons | You Are Loved

This is a personal blog. All editorial content and projects are intellectual property of ashleyhortondesigns.com. I do receive compensation and material product from A Flair for Buttons to develop my craft posts, but all ideas and opinions are my own.

Every once in a while, I like to create a layout that uses a lot of words or phrases.  This kind of layout, can make it a little tricky for me to choose a main title, so I decided to go with a Flair Button from the Just Words 2 Flair set from A Flair for Buttons as the title of this layout.  I chose the You Are Loved button and placed it on a tag, that I layered over my photo, to help it stand out.


I added all of the words and phrases on the left hand side of the layout, and placed the photo on the right hand side, with fewer embellishments.  I liked the way the You Are Loved button looked layered over the photo and I wanted one other Flair Button to place on the far right hand side of the photo.  This helped add balance around the photo area.

 
The photo Flair Button from the Arrows and Camera Flair 2 set was perfect, because it went with the theme of the layout and had neutral colors.  I created a cluster with the Flair Button, sticker and enamel dot to add interest around the photo, since the majority of embellishments were on the left side of the layout.


If you need some fresh inspiration for titles on your layouts, then make sure you check out all of the word and phrase flair in the A Flair for Buttons shop!!

https://www.etsy.com/shop/TheCutShoppe 


Wednesday, August 17, 2016

Hip Kit Club | Back to Homeschool

This is a personal blog. All editorial content and projects are intellectual property of ashleyhortondesigns.com. I do receive compensation and material product from Hip Kit Club to develop my craft posts, but all ideas and opinions are my own.

I'm stopping in today to share a new layout using the August 2016 Hip Kit & Add-On Kits from Hip Kit Club! Some of the products in this month's kit gave me a back to school vibe, so I decided to create a layout with one of our photos from a recent back to school photo shoot.


The Dear Lizzy notebook patterned paper from the Saturday‬ collection, was perfect for the back to school theme. I wanted to add pops of color over the notebook pattern, so I used the multi colored striped paper from the Crate Paper ‪Cute Girl‬ collection to back the scallop cut file, that I cut from White cardstock included in the August 2016 Cardstock Add-On Kit. The Play Thickers from Crate Paper made a great title for the layout, and I also used a couple of wood veneers from the Pink Paislee Take Me Away collection to go with the wood letters in the title. 


I really liked the rainbow effect of the striped patterned paper, so I chose coordinating embellishments to layer over the scallop die cut. Since I already had a good bit of layering going on, I wanted to add some layers behind my photo too. I used three of the Project Life cards from the August 2016 Project Life Kit behind my photo, to make it stand out from the background layers. I finished the layout with a bit of splattered Black Color Shine and My Mind's Eye enamel dots.


If you would like to see how the layout came together, check out the new Process Video on my YouTube channel!


I hope you've found a bit of inspiration today for using all of the goodies in your August Hip Kits!

https://www.etsy.com/shop/TheCutShoppe 
 

Tuesday, August 16, 2016

Crate Paper | Second Grade

This is a personal blog. All editorial content and projects are intellectual property of ashleyhortondesigns.com. I do receive compensation and material product from Crate Paper to develop my craft posts, but all ideas and opinions are my own.

Yesterday kicked off Back to School week on the Crate Paper Blog, and I was up with a new layout using the Cool Kid collection!  Summer activities are coming to an end and most of us are already sending the kiddos back to school or getting ready for their first day of school.  Since we homeschool, I try to take a beginning of the year photo for each of the kids.  Our son, who is the youngest, is going into Second Grade this year and I knew the Cool Kid collection would be perfect for a Back to School layout!


The Cool Kid collection is so versatile, and has products that can be used for everyday layouts, back to school layouts and even travel themed layouts!  I started with the Hooray patterned paper and used the notebook patterned side for my background.  I love this kind of patterned paper design, because it makes it really easy to line up your photos and embellishments.


Next I printed two photos and decided where I wanted them on the layout.  I usually like to place my photos and main embellishments without adhering them at first, to get a feel for the design of the layout before I make anything permanent.  I cut apart some of the designs from the Run & Jump patterned paper and mixed them in with my photos.  Before adhering any of the cut pieces, I machine stitched around the outside edge of each one to add texture.


After I finished placing the main elements on the layout, I started looking through the Cool Kid embellishments.  There are so many fun embellishments with this collection, which made it hard to choose what I wanted on my layout.  Since I had a collage look going on my layout, I was able to add a good variety of embellishments from the Accent Stickers, Pennants, Embellishments, Puffy Stickers, Ephemera Pieces, Wood Embellishments, Chipboard and Rubber Accents.


I used the awesome Play Wood Letter Stickers for my title.  Since I had a lot going on, I decided to keep the title simple and just went with Second Grade.  I love the handwritten look of the letters and how they stand out on the layout.


If you’re looking for ways to document Back to School photos, I hope you’ve found some inspiration today!  The Cool Kid collection would be great for documenting school photos throughout the year!

https://www.etsy.com/shop/TheCutShoppe 

Monday, August 15, 2016

The Cut Shoppe & Creative Scrappers!

This month, The Cut Shoppe Design Team is teaming up with Creative Scrappers for Sketch #297!  Today is the reveal for TCS Design Team.  I'm stopping in to share my layout here, and you can head over to the Creative Scrappers Blog to see the full reveal.  You can see the Creative Scrappers reveal HERE.


I used two cut file sets on my layout.  The Pop Caps cut file worked perfectly with the sketch design and I wanted to use the Open Letter Alpha for my title.

https://www.etsy.com/listing/209879498/the-pop-caps-cut-file-includes-6-icons?ref=shop_home_active_82

https://www.etsy.com/listing/287883843/the-open-letter-alpha-is-a-hand-drawn?ref=shop_home_active_15

We also have some fun things going on during the team up, that you won't want to miss!

You can download the FREE Inner Circle cut file set HERE.

https://app.box.com/s/6lh4zv9uignndj68pvirclwcbl2gu1w1

There's also a Discount Code for The Cut Shoppe Etsy store that is valid ALL month long!  Use TCSCS25 at checkout to save 25% off of your purchase!

https://www.etsy.com/shop/TheCutShoppe

And if you play along with Sketch #297, you can win a Gift Certificate to TCS Etsy store, by linking up on the Creative Scrappers Blog!  While you're there to link up, make sure you check out some of the new Cut Files that are being offered by Creative Scrappers!

https://creativescrappers.myshopify.com/


https://www.etsy.com/shop/TheCutShoppe 

Wednesday, August 10, 2016

Hip Kit Club | Hello Right Now

This is a personal blog. All editorial content and projects are intellectual property of ashleyhortondesigns.com. I do receive compensation and material product from Hip Kit Club to develop my craft posts, but all ideas and opinions are my own.

I'm here today with my first layout using the August 2016 Hip Kit & Add On Kits from Hip Kit Club! This month's Kits are amazing! If you're looking for new Crate Paper, Amy Tangerine and Dear Lizzy...then the August Kits are for you!! We've even got some awesome, exclusive ephemera pieces too this month. I decided to base my layout on our August Sketch, since it's the theme of this week's Weekly Challenge on the Hip Kit Club Member Forum on Facebook.


I grabbed a mix of Crate Paper, Amy Tangerine and Dear Lizzy patterned papers and used them for my background and layered "banner" pieces from the sketch. I used the DL Hello Thickers to create a large title under the photo. I created three embellishment clusters, based on the Sketch, and added in a mix of embellishments for varied texture and dimension.


I also cut two heart shapes from this month's cut file set, and added pop dots to make them stand out from the background. And no layout is complete without enamel dots and wood veneers! 


I hope you've found some inspiration today, for using your August Kits!

https://www.etsy.com/shop/TheCutShoppe