Friday, July 20, 2018

Traveler's Notebook Layouts

Post contains Affiliate links, which means at no additional cost to you, I will earn a commission if you click on a link and make a purchase.

Happy Friday, friends!  I've been working away in my July Studio Calico Great Escape Traveler's Notebook, and I've got several layouts to share with you today.  I am using the July TN to document July, but I will be using the August Golden Hour TN to document June.  And I'll have links for you, to the products I've been using from the SC shop!

HELLO SUNSHINE:  July Great Escape Traveler's Notebook Kit, 4x6 Summer Stamp,
Color Theory Lemon Zest Ink PadColor Theory Mint Hint Ink Pad


I love the pre-printed papers that are included in the TN insert!  They make it easy to just pick your favorite and what coordinates with your photo and start creating.  I also needed...wanted...had to have the 4x6 Summer stamp designed by bananafishstudio.  That Hello Sunshine sentiment was just too cute!


I kept this layout a little more on the simple side.  I wanted the photo layered over the pre-printed heart page, and kept the color scheme more neutral.  And, funny side story...the days of the week washi tape is a new one that I got a few weeks ago and my favorite ever.  Apparently Baxter really likes it too, because one of the kids left it on the floor in the bedroom, and he chewed up the whole roll!!

ON MY DESK:   July Great Escape Traveler's Notebook Kit


Since I'm documenting photos for the month in my SC TN inserts, I thought, hey I need to have a layout for the photo of my SC Printables too!  The Printables on this layout come from the monthly Workshop that goes along with each new TN Kit.   This layout came together quickly and I love the brightness of the layout!

SUNDAY LUNCH:  July Great Escape Traveler's Notebook Kit, 6x8 Max Outlined Alpha


It's hard to pick a favorite from all of the TN layouts I've done so far, but I think this one probably is the winner winner, chicken dinner!  This fruit paper in the TN insert is SO CUTE.  I thought it would be perfect for this photo of the kids entertaining themselves at the restaurant while we were waiting for our food.  And it was fun to mix the ink colors for my title, using the Max Outlined Alpha stamp.

WEEKEND STORIES:  July Great Escape Traveler's Notebook Kit, 4x6 Spread the Love Kraft Phrase Stickers, Icons and Arrow Stickers, Feed Your Craft Let's Eat Stamp


Surprise!  Another layout about food!!  Yes, I am one of "those" people who likes to take pictures of their food.  :)  This was a fun layout to put together, with all of the stamping on the left side of the TN.  I am not a stamper on my layouts, but I'm really loving it in the TN!

I hope you enjoyed checking out all of the layouts I've worked on over the past week, and that you've been inspired with some new ideas to try out on your projects!!  One of my favorite things about paper crafting, is the fact that ideas and inspiration are relevant to different projects, whether you're a scrapbooker, card maker, work in Traveler's Notebook, create home decor projects or whatever your favorite crafting hobby might be!

Friday, July 13, 2018

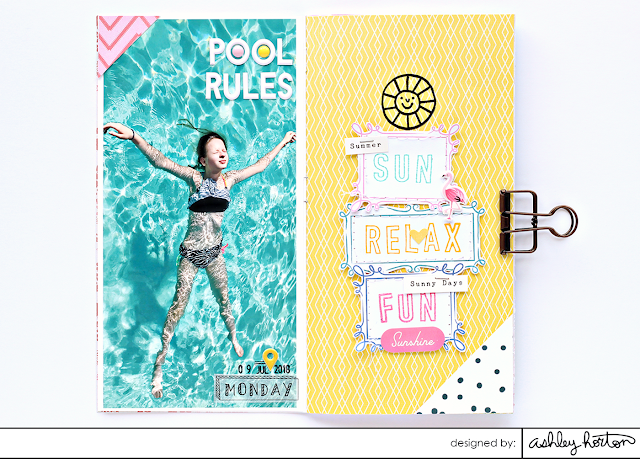
Traveler's Notebook | Pool Rules

Who's happy it's Friday??!!  I know I am!  We're half way through summer and we've taken a couple of trips over to the neighborhood pool.  Honestly, it's been too hot even to go to the pool!  HA!  I've made sure to take some photos of the kids while we've been there, because I love documenting summer layouts.  Today I have a new layout in my Traveler's Notebook, with a full page photo from one of our trips to the pool.


It's so fun to use a full page photo in the TN!  I loved this photo of our oldest daughter and the Teal color of the pool water.  I placed it next to a Yellow patterned from Pink Paislee to give a bright contrast.  I also incorporated the Crate Paper Oasis stamp set and some of the fun puffy stickers.  You can find some of the Oasis collection HERE in the Scrapbook.com store.


Before creating this layout, I had the idea in my head to fussy cut these cute frames from the Pick Me Up patterned paper from Pink Paislee and stamp inside each one.  After fussy cutting the frames, I machine stitched around each one before adding it to the layout.  I used three of my favorite Color Theory Inks from Studio Calico to stamp phrases inside each frame, with the Oasis alpha stamp. 


And like I said before, I am having so much fun using my stamps in the TN, so I had to bring in one more.  The sun design from the Studio Calico Alfresco 6x8 stamp worked perfectly with the theme of this layout.  I stamped it in Black ink to make it really stand out on the spread.   


I finished the layout with a few Oasis stickers, and added some texture with my tiny attacher.  And I used the White alpha stickers from the Pinkfresh Studio Simple & Sweet collection to add the title.  I found THIS fun Washi Tape from an Etsy shop and just had to have it!  I love the way it looks and placed it in the bottom corner, layered over my photo. 

What are your favorite moments to document?  Everyday moments are definitely my favorite!!

Thursday, July 12, 2018

The Cut Shoppe | Rest Stop

Post contains Affiliate links, which means at no additional cost to you, I will earn a commission if you click on a link and make a purchase.

Hey there!  Today I'm on The Cut Shoppe Blog with a layout using the new Tangled Triangles 8.5x11 cut file and the Super Star Alpha cut file.  I used the new Simple & Sweet collection from Pinkfresh Studio, which you can find HERE in the Scrapbook.com store!


https://www.etsy.com/listing/627789033/the-tangled-triangles-cut-file-can-be?ref=shop_home_feat_1

https://www.etsy.com/listing/627788449/the-super-star-alpha-can-be-used-for?ref=shop_home_feat_2


I used two of my favorite techniques on this layout, hand-stitching and backing a cut file.  I worked on my title first, and used the Silhouette Cameo sketch pens to draw out part of the title for hand-stitching.  And I wanted to use a large, vertical title on the layout to fill in the space next to the Tangled Triangles cut file.


After I finished my title, I worked on backing the cut file with some of the 6x6 papers from the Simple & Sweet collection.  I didn't want to fill in all of the triangle spaces, but I thought it would be fun to bring in some pops of color and pattern with a few of the papers.  


I used a larger than normal photo on the layout, and changed it to black & white because I really wanted it to stand out.  Then I placed embellishments around the Tangled Triangle cut file to add balance to the design.

I have a new Process Video on my YouTube Channel, too!  You can check it out here or head over to my channel and become a new subscriber!!


There are two other new cut file designs in The Cut Shoppe Etsy store.  You can visit the shop to pick up all four new designs!! 

https://www.etsy.com/shop/TheCutShoppe

Thanks for stopping in today!  I'll be back tomorrow with a new layout in my Traveler's Notebook!

Wednesday, July 11, 2018

Traveler's Notebook | There Goes My Hero

If you've had a chance to stop by my Blog this week, you're probably wondering if you're in the right place.  You normally expect to see 12x12 layouts when you stop by my Blog, but lately it's been all about Traveler's Notebooks!  You're definitely in the right place, and I'm excited to share new projects with you!

I have been away from posting on my Blog for the past couple of months, but I'm planning to be back on a more consistent basis.  There are two reasons for that:

1.  For a while, I was on several Design Teams and keeping up with my own DT and Etsy shop, that I just couldn't find the time.  And with all of the social media channels out there these days, sometimes certain ones get neglected.  Now that my DT commitments are more manageable, I have more time to focus on other areas of the crafty community.

2.  Because I am a WAHM and I consider paper crafting to be my favorite hobby, but also my at home job, I want to be able to share what I'm creating with you and the products I'm using.  I will never share anything with you, that I don't love myself.  Some of the products I use on my projects are purchased by me and some are provided from companies that I've worked with or purchased from for years.  You may run across affiliate links in my posts, which means I just make a commission if you click on a link and make a purchase while visiting that site.  And if you're like me, you probably can't resist awesome scrappy purchases every once in a while...or a few times a week!  HA!

So, with all of that out of the way, I've got a new Traveler's Notebook layout to share with you today.  And I'll tell you a little bit about why I'm so in love with documenting in a TN.

 
If you're wondering why the switch from 12x12 to Traveler's Notebooks, here's a few reasons:

1.  The size and they are self contained!  After so many years on Design Teams, I have accumulated quite the stack of layouts.  There were some months where I would be creating 15-20 layouts.  That means lots of Scrapbook albums.  I am not big on clutter, so having Scrapbook albums shoved in all parts of the house is just not appealing to me...currently the reason that almost all of them are at my husband's office.  I have a few at our new house, but they are not something I put on display, so having to store them in a closet just doesn't do it for me.  With Traveler's Notebooks, I could have 10 covers filled with inserts and not make a dent in storage space.

2.  I like to use my stamps in the TN.  You will not find much stamping on my 12x12 layouts.  I usually make a big mess when I'm stamping and just can't ever seem to work them into my layout designs very well.  But I love that they are so easy to use in my TN.  It's another flat embellishment I can add to my TN layout, that doesn't add bulk to the insert.

3.  Journaling.  I am not a journaler on my layouts.  I gave it a try back in the day when I first started, but it just wasn't something I enjoyed doing.  In the TN, I feel like they are easier for me to journal in.  It's just one of those things, it doesn't make sense to me either!  HA!

4.  Time.  Most of my 12x12 layouts are pretty time consuming.  It can take an hour or two to complete one layout.  Documenting in the TN is so much faster, but I still end up with a fun layout and the time to sit down and create.

5.  They are just fun!  

Hopefully this gives you a little more insight into the world of TN.  If you haven't tried it, I highly recommend it!

Now, onto some info about my Traveler's Notebook spread.  This notebook is one I am working in for Reese.  Right now, I have one for Madison, Emma, Reese, and an everyday insert that I created after watching a tutorial from Heba Alsibai.  For this layout, I used the center pages.  I wanted my photo to span across both pages.  I snapped this photo on my phone one afternoon, when we were heading home from our swim at the neighborhood pool.

    
For my title, I used a mix of alpha stickers from Pinkfresh Studio and the new Max Outlined Alpha from Studio Calico.  I used the stamp set on a scrap piece of patterned paper and fussy cut each letter to add to my layout.  I also used the Here & Now Stamp on a piece of White card stock and then cut it out, to layer over my photo.  To complete the layout, I grabbed the Wild Child collection from Pink Paislee and embellished with a few stickers.


Thanks for stopping by today, and I hope you enjoyed a look at my new Traveler's Notebook layout!

Tuesday, July 10, 2018

INSTAGRAM GIVEAWAY!!

Who loves a GIVEAWAY??!!  I've got an awesome Traveler's Notebook prize pack put together for TWO lucky winners, and it's posted on my Instagram feed today!  

It's easy to enter...

1.  You MUST follow me on Instagram - ashleyhorton75

2.  Tag a friend...or as many as you like (in separate comments).

3.  You can also share the Giveaway and tag me in your post.

ENTRIES ARE ONLY VALID ON THE INSTAGRAM POST!  Here's a look at what's included for both winners:

https://www.instagram.com/ashleyhorton75/


All of the details are included in the Instagram post!

Monday, July 9, 2018

Traveler's Notebook | Road Trip

Post contains Affiliate links, which means at no additional cost to you, I will earn a commission if you click on a link and make a purchase.

Hey friends!  It's been a while since I've had time to post on my Blog, but I'm back today with a layout in my Traveler's Notebook!  I have loved creating in my TN recently.  It was something I wanted to do, but just didn't have the time over the past year, so I'm back at it in full force!  For this layout, I used the NEW Road Trip Printable from The Cut Shoppe and the Born to Wander Digital from Studio Calico.


https://www.etsy.com/listing/626998923/the-road-trip-printable-can-be-used-for?ref=shop_home_feat_4

If you are new to the Print & Cut feature on your Die Cut Machine, let me tell you, that it's really fun!  Over the weekend Kelly Janes and I shared tutorials on our YouTube channels for Silhouette and Cricut Users.  You can check out my video HERE, and Kelly's video HERE.   

I used Canon Matte Photo Paper for the Printable, and made sure to select the highest quality for printing.  Once everything finished cutting on my Cameo, I decided which pieces I wanted to use in my layout.  Since I did the Studio Calico digital in Black & White, I wanted to bring in Black & White pieces from the Printable and a few pops of color.


This layout documented a recent weekend trip to Laurel, MS, home of the HGTV Hometown show hosted by Ben & Erin Napier.  It is the cutest little town, and we stayed in a Bed & Breakfast over Sweet Something's Bakery...highly recommended!  I used an outside photo of the bakery and one of the photos from inside our room on the layout.  I thought it would be fun to mix in small photos with the Road Trip Printable and SC Digital.  The photos are a little over 1 inch wide.


Before adding my embellishments to the right side of the layout, I used the stamp set from the Studio Calico Summer of Sketches class, to add some lines in the background.  I felt like it helped to ground the design, since I didn't use any patterned papers on this layout.  I used the stamp again on the left hand side, for my journaling, and to add balance to the layout.

Have you dipped your toes into the world of Traveler's Notebooks?  They are such a fun way to document your photos!!  I hope you've found some inspiration today, whether you're working in a TN, scrapooking or cardmaking!