Saturday, January 19, 2013

Cooking Up Fun with The Paper Bakery!


WOW!!  I have a fun announcement to share today...I was contacted this past Tuesday by Sarah Hill, owner of The Paper Bakery Kit Club.  Sarah had been chatting with my scrappy friends Tina Walker and Mary Ann Jenkins at CHA, and apparently they put in some good words for me.  Sarah messaged me and said she really liked my work and invited me to be a part of The Paper Bakery Team!  Happy Dance followed and I replied back and said, YES!!  I will start designing with the February Kit, which I hear is pretty awesome and I can't wait to get started!!

If you are looking for a Kit Club, The Paper Bakery might just be the place for you.  Sarah offers a variety of Kits...Scrapbooking, Mixed Media, and Project Kits.  AND...for all of you Silhouette junkies out there, The Paper Bakery is now offering exclusive cut files each month with their kits.  WOW!!  Who doesn't want new files for their Cameo??!!  I know I want as many as I can get!!  :)

I hope you will stop by and check out The Paper Bakery and stop by and see what the other Designers did with the January Kit in the January Gallery.


Friday, January 18, 2013

Sometimes It's Okay to be a Negative Nelly!!

It's another Friday in January and that means I am back with my second Guest Designer post for October Afternoon!  Today, I am using the Midway and Farm Girl collections, on a couple of layouts.  I am sure at some point in your life, you have heard the phrase, "Don't be a negative Nelly."  Well, that may be true in every day life, but what about in Scrapbooking?  I say, it's okay to be negative in your Scrapbooking...or better yet, to use negatives in your Scrapbooking!  The use of Negative Cuts has become a popular trend, with the release of many electronic die cut machines, so here are a couple of ways to use this fun trend..

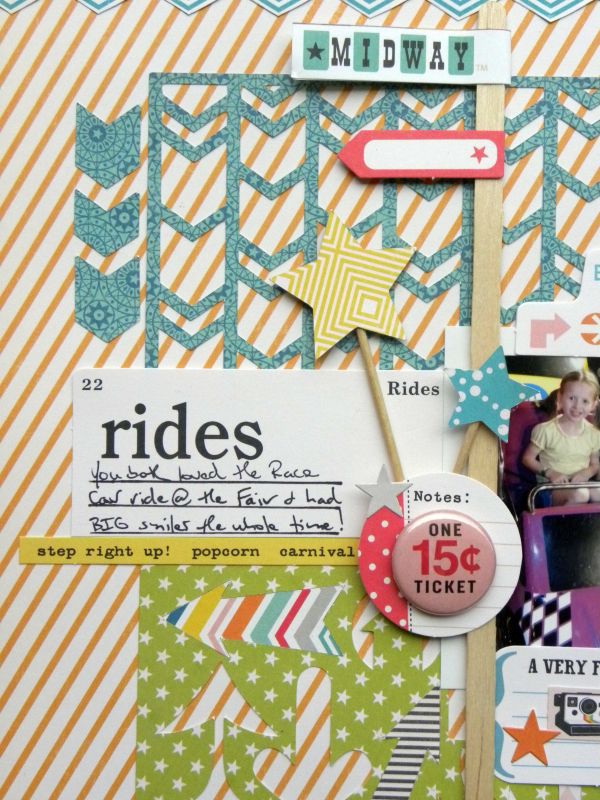
On my first layout using the Midway collection, I decided to use my Silhouette Cameo for some fun background action on my layout.  I thought it would be fun to use 4 different background cut files to create some negative effects on my page.  I cut two Chevron patterns, a rounded square pattern, and an arrow pattern.  Once I had each of the backgrounds cut at 4.5x4.5, I arranged them in a grid design on my layout.  To make the rounded square pattern stand out a little more, I backed it with the Neon Lights patterned paper.  I also added some of the positive cut arrows to the Balloons & Darts patterned paper, that I used to cut the arrow background.  And, of course, that is one of the great things about negatives...you also get positives.  I used some of the positive shaped arrows from the Balloons & Darts patterned paper to embellish my layout.  Adding pop dot adhesive gave them just the right amount of dimension.  And here is a look at how all of the negative cuts came together on the layout:


I wanted to share a fun little tip for using the OA Washi Tape.  To create the border strip at the bottom of my layout, I used the Midway Talk Bubbles Washi Tape and backed it with a piece of the Tilt-A-Whirl patterned paper.  I love how the bright Blue background shows through the transparent Washi Tape!


I also did a second layout using the Negative Cut technique, with the Farm Girl collection.  Instead of focusing on background cuts for this layout, I decided to use the Negative Cuts for Text.  The area that we live in has a lot of open Farm land and I love driving in the area, because it's always so breath taking every time you look out of the window.  While we were out driving to lunch one day, we drove past one of my favorite Farm areas and I snapped a couple of photos of two of my favorite spots...don't worry, hubby was driving at the time.  :)  I knew the Farm Girl collection was a perfect fit for these photos.  I wanted to add some "word art" to my page, so I used the Cameo to cut several words and then used them at the top of my layout.  I backed a few of the words, to help them stand out.  And, I used the same technique to create the title for my layout on a banner pennant.  


I used a fairly basic design for this layout and the Grid patterned background worked perfectly for lining up my photos.  I embellished, by using the Designer Brads, Journal Card, Word Stickers and Shape Stickers.  And I will share a little secret...October is my favorite month of the year, and anytime I work on a layout with photos from October and I'm using October Afternoon product, I always try to work in the OA logo from the bottom of the patterned papers!!  On this layout, I was able to add it to the cluster around the corner of my bottom photo:


So don't be afraid to try the Negative Cut trend on your next layout or project.  It's a fun way to use some of the amazing patterned papers that October Afternoon puts out with every collection.  Whether you use it for creating backgrounds or Text, just make sure you have fun and let your imagination do the work!  And don't miss out next Friday...I'll be back, to share my final Guest Designer post with you!!


Thursday, January 17, 2013

Doughnut Run

Get It Scrapped! had a great article go up yesterday, with ideas for using Doilies on your layouts.  Have you tried the Doily trend?  I've used them several times and really love the look they add to my pages.  Here is how I decided to incorporate them for our assignment at Get It Scrapped!:

When I think of Doilies, it reminds me of Diners and Coffee shops...just that touch of nostalgia from using them under coffee/tea cups or under your desserts.  I knew they would be a perfect accent, for a page of our kids' first visit to Krispy Kreme.  I like to use them on my layouts, as a way to highlight my title.  So for this page, I used part of a doily under my photos as a base for the title.  Then I was able to use the "extra" piece at the top of my photo strip.  I also added one more doily behind the focal photo on my layout, to create a visual triangle around the photos and title.  If you don't have any store bought doilies on hand, you could use an Electronic Die cut machine to cut your own or use Edger scissors (that cut different edges in your papers) on the outside edges of a coffee filter to get the same effect.


Even though, you've seen plenty of layouts lately, where I've used my Cameo...this is the first page, that I officially used it on.  I was in the process of working on this layout, when my machine arrived, and I figured that I might as well break it out and see how it works!  I used it to cut the word Doughnut for my title and couldn't believe, that it was able to make such intricate cuts.  I also used it for the circle design on my page.

If you are looking for more ideas on how to use Doilies on your pages, make sure you come over to Get It Scrapped! and see how the other Creative Team members took on this assignment.

Supplies:  Patterned Paper, Wood Veneers, & Spray Mist:  Studio Calico; Thickers:  Pebbles; Washi Tape:  Love My Tapes; Flair Button:  Boscie Joscie; Buttons:  Stampin' Up; Baker's Twine:  The Twinery; Punch:  EK Success; Doilies:  Hobby Lobby


Wednesday, January 16, 2013

Time to Get In Shape!

Well, at least, to get your Washi Tape in shape!!  Have you checked out our new challenge this month at Love My Tapes?  Here are the details, for what's happening this month:

1.  Create a Layout or Card that used washi/lace/fabric tape as a decorate shape.  Think outside the box and let's get creative.  Please let us know how you were inspired. 

2. The challenge is open until January 27, 2013.

3. A randomly chosen winner will win some LMT goodies.
 
I got to play along with our challenge this month, to help give you a little inspiration and here is what I created.


I used several different Washi Tapes and layered them over White cardstock.  Then I used my Cameo to cut Circle shapes for my page.  Once I had the Circles on my layout, I stitched each one and added a few embellishments to each of the shapes.  I even took the challenge one step further and used the same technique, to cut out the title letters for my page.

So if you would like the chance to win some Love My Tapes goodies, make sure you come over to the Blog and link up your layout or project!  We would love to see what you create!

Products Used:  Santa Baby Kit from Paper Issues; Washi Tape:  Love My Tapes & Recollections; Wood Veneers & Spray Mist:  Studio Calico 


Tuesday, January 15, 2013

Two Peas Feautured Project!!

Hi all!  Just wanted to pop in and share a little happy news for today...since my Modem finally decided to start working, after being out half the morning (UGH)!!  Thankfully, my phone was working and I discovered, that my How Does UR Garden Grow Mini Album was chosen as the Featured Project today at Two Peas in a Bucket.  I did this mini as one of my projects for the Guest Designer spot at October Afternoon for this month, so I am pretty excited that it was chosen!!  If you would like to pop over and check it out, just click HERE.


ScrapFIT Workout #84-Color Inspiration

Workout #84- Diana – Color Inspiration 
 
Diana our Creative Trainer at ScrapFIT has created the most calming color combo for you!  To get the best results you may want to listen to the sounds of waves on the beach and light a lavender candle while your creating your layout.   Let's see your calming creativity!
 
We are offing up another fabulous FITkit from Paper Issues for one lucky winner who joins in this Workout! 


Remember you can always snag your from the Paper Issues Shop today!


Monday, January 14, 2013

Happily Ever After Together

It's a new week and a new layout for Artful Delight!  We are moving closer to Valentine's Day and this Kit has some great papers and embellishments for your Valentine's or loved themed pages.  I took more of an every day approach to this week's layout, using a photo of my hubby with two of our kids.  And there is something very rare about this layout...I used the Black cardstock as my full background.  That rarely happens, because I always feel like I can't make the Black work, but I loved the effect on this page.


I love the doily patterned paper that is included in this kit, because it is great for fussy cutting!  I cut out several of the shapes and placed them around my layout.  The only extras, not included in the kit, are the Baker's Twine, flair button, and the mist that I used to color the "XOXO" chipboard piece.

Don't forget, to check out the Artful Delight Blog and see what the other Team members are doing with this month's Kit!