Friday, December 29, 2017

Pinkfresh Studio Playing Favorites Blog Hop


Welcome to the Pinkfresh Studio Playing Favorites Blog Hop!  You should have arrived here from the talented Bea Valint's BlogThe Design Team has some fun inspiration for you, as we all share our favorite things!  I decided to focus on two favorite things...the Dream On collection from Pinkfresh Studio and Disney World (our favorite vacation spot)!  


The Dream On collection is great for everyday layouts!  I love all of the bright, happy colors, and they were a perfect match for our photo with Mickey and Minnie!  Since the collection itself, didn't I have a Disney theme, I decided to create my own Disney look with a large stitched Mickey outline shape.  I used Black embroidery floss for my stitching, so the image would stand out from the background paper.


Once I was finished with the stitching, I placed my photo in the center of the Mickey shape.  Then I started filling in all of the inside space with embellishments from the collection.  I mixed the ephemera pieces, leatherette pieces, chipboard pieces and puffy stickers, to create a lot of dimension and texture on the layout.


I hoped you enjoyed visiting my Blog along the way, and that you've found some new inspiration for using your favorite Pinkfresh Studio products!


To be eligible for one of 4 Gift Certificates, you must visit and comment at each Blog on the Hop.   Comments will close at 11:59PM CST on Friday, January 5th, 2018.  Random winners will be announced Monday, January 8th, 2018.

It's time to continue along the Hop, and up next you're heading to the talented Anna Kossakovskaya's Blog.  In case you get lost along the way, or you're just getting started at my Blog, here's the full Hop order to follow.

ASHLEY HORTON <----------------> You Are Here.

Monday, December 18, 2017

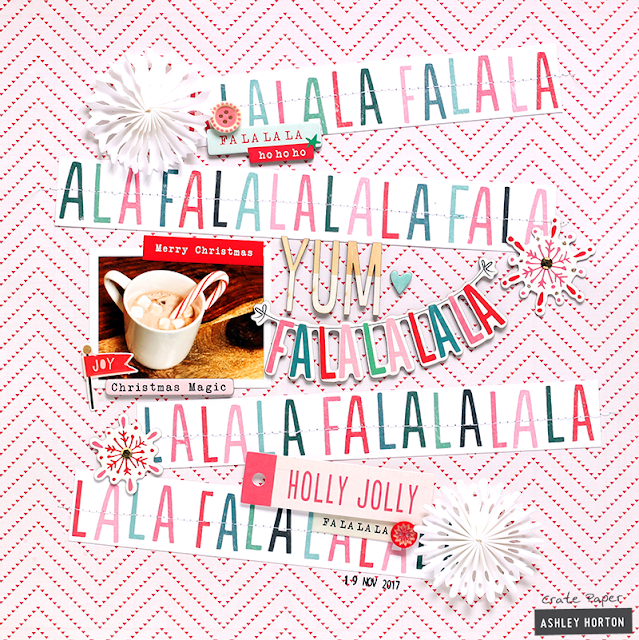
Crate Paper | Yum

Having hot chocolate is the perfect way to warm up on a cold night!  We don't get many of those this far south, so we have to take advantage of the opportunities when the cold weather makes it down to us.  Thankfully, we had a cold night in November and we all had a cup of hot chocolate.  Since it was a pretty cute cup of hot chocolate, I snapped a photo and documented it with the fun FaLaLa collection from Crate Paper!


I wanted to create a banner look, so I cut the FaLaLa words from the Festive paper and arranged them on the background paper at an angle.  Once I had them in place, I machine stitched through each one to add some texture.  I loved the FaLaLa banner in the Chipboard Stickers, so I placed it in the center of the page, next to the photo.


The Snowflakes embellishments are one of my favorite things from this collection!  Sadly, I've already used them all up!  HA!  I placed one at the end of the FaLaLa paper strips, on the left and right side, to anchor the look of the banner.  I also used two of the snowflakes from the Chipboard Stickers to add at the end of the other two paper strips.  I wanted less dimension on the Chipboard Sticker snowflakes, so I peeled away several layers of chipboard on the back side, to make the embellishment sit flatter on the layout.


I finished the layout with the title, "YUM", using the Joy Thickers.  Then I added several pieces from the Ephemera Pieces, Stickers and a few more Chipboard Stickers.  

You can find the FaLaLa collection in some of your favorite online shops!  It's perfect for documenting all of your upcoming holiday photos!

Friday, December 15, 2017

Pinkfresh Studio December Days Blog Hop

Hello, and welcome to the Pinkfresh Studio December Days Blog Hop!!  You should have arrived here from the talented, Anna Kossakovskaya's Blog.  Make sure you visit all of the Blogs along the Hop to check out amazing inspiration from the Design Team and for the chance to win a great prize pack from Pinkfresh Studio!

The Design Team will be showcasing the gorgeous December Days collection, along the Hop!  We recently had SNOW in southern Alabama...yes, real live snow!  I couldn't wait to document one of the photos, and I knew the December Days collection would work great with it!


The Christmas Magic patterned paper is great for giving you a head start on your layout!  I love that it already has the "Christmas Magic" sentiment and cute ornament printed on the paper.  I placed my photo near the ornament and under the words, which helped me with the placement of all of the other elements on the layout.


I kept everything else on the layout in a diagonal design.  Since I love to use cut files on my layouts, I cut some snowflakes to embellish the layout.  I used one of the papers from the 6x6 paper pad for the larger snowflake and some White card stock for the smaller ones.  I layered the large snowflake under my photo and scattered the smaller ones throughout the rest of the design.


I combined the Chipboard Alpha Stickers, Foiled Woodgrain Sticker and a die cut word for the title.  I love to mix different alphas and textures to add interest to my titles.  I finished the layout with a few ephemera pieces, wood buttons and puffy stickers!


To be entered in the GIVEAWAY, you MUST leave a comment on each Blog participating in the Hop.  One random winner will be selected from the comments left on the Blogs.   Comments will close at 11.59PM CST, on Friday, December 22, 2017.

Winner Announcement : Saturday, December 23, 2017

Now, it's time to continue along on the Hop!  You are off to visit the talented Beata Valint's Blog!  Just in case you need it, here's the full Hop order list to follow, if this is your first stop.

Monday, November 27, 2017

Crate Paper | Good Vibes

Happy Monday!  It's always good to start off the week, with a fun new collection from Crate Paper!  The Good Vibes collection has some awesome patterned papers and embellishments and I used them to create a cute, girly layout with a photo of our daughters from a recent trip to Disney World.


The patterned paper that I chose for my background, did most of the work for me on this layout.  It already has a mixed media kind of look, and I loved the mix of colors too.  You could turn this paper in any direction and it would still look awesome!


The rest of the layout was really easy to put together.  I wanted it to have a free-form kind of design.  I decided where I wanted the photo and then went with the rest of the design from there.  The large ampersand from the Ephemera Pieces adds a great contrast and texture, being placed near the photo.  And I used it to complete the title of the layout.

  
I completed the look of the layout, by alternating different types of embellishments from the collection, such as ephemera, chipboard, and stickers.  I also placed pop dots behind some of the embellishments to add dimension. 

If you haven't had a chance to check out the Good Vibes collection, now's a great time...and just in time to put it on this year's Christmas wish list!! 

Wednesday, October 25, 2017

Altenew October 2017 Release Blog Hop + Giveaway)

https://altenew.com/

Welcome to the Altenew October 2017 Release Blog Hop!  I am excited to join in with fellow Scrapbookers and bring you inspiration using the new "Our Family" Scrapbook collection.  You should have arrived here from the talented Erum Tasneem's Blog.  If you're just now joining in the Hop, you can also visit the Altenew Scrapbook Blog or Card Blog to get started.

I loved working with the new "Our Family" Scrapbook collection.  There are so many fun, bright colors and lots of embellishments to work with.  I used the collection to create a layout with a photo of our oldest daughter, from a recent weekend trip.


I loved the color and diagonal stripe on this patterned paper, so I knew it was perfect for my background paper.  It's always fun to follow a diagonal design, and I love the way it turned out on this layout.  I mixed some of the wood pieces, chipboard pieces, die cuts, enamel dots and stickers to complete my layout.  I love to mix a bit of everything!!


You can find the NEW releases HERE.

Our Family Scrapbook Collection
  • Description:
This scrapbook collection is right on trend with fresh colors, watercolored elements, geometric designs, and florals (of course!).  The papers and embellishments have been designed to help you document your precious family memories, but are versatile enough to use on any layout, journal, or card project. 
The kit contains: 
  • 18 sheets of premium 12x12 double-sided patterned papers (36 designs)

  • One 3"x4" photopolymer stamp set
  • 12 3"x4" watercolor journaling cards
  • One 8.5"x11" sheet of 20 cardstock stickers
  • One 8.5"x11" sheet of 15 cardstock die cuts
  • One 8.5"x11" sheet of 16 chipboard stickers
  • Two 6"x12" sheets of chipboard alphabet stickers
  • One 5"x6" sheet of 17 adhesive wood veneers
  • One 4"x6" sheet of adhesive enamel dots
  • One metal die (approx. 3.5"x4.5")
  • One roll of washi tape (15mm x 10m)

GIVEAWAY:
To celebrate this release, Altenew is giving away a $50 gift certificate to SIX lucky winners! Please leave a comment on the Altenew Card Blog and Altenew Scrapbook Blog by Thursday, November 2nd for a chance to win. Six winners will be announced on the Altenew Card Blog and Altenew Scrapbook Blog on Saturday, November 4th.

Now you are off to visit the talented Debby Hughes Blog. And just in case you get lost along the way, or need to start from the beginning of the Hop, here's the full Blog Hop order.

Wednesday, October 11, 2017

Crate Paper | Fun Times

Fall is my favorite!  And one of our favorite fall family activities is the fair!  The kids love the rides and the fair food is always so good...even if it isn't good for you.  The Crate Paper Carousel collection by Maggie Holmes, is made for documenting fair photos.  I combined it with a fun cut file, to create multi-patterned paper look on my layout, today.


I cut the cut file design in two different sizes, and then backed each of the open spaces with a different patterned paper.  Once I had that finished, I layered the two cut files, adhering the smaller one with pop dots for dimension.  I placed my photo near the bottom right-hand corner, and layered it with the title.  Then I tucked in a few other embellishments to draw attention to the photo.


I created a second cluster area at the top left-hand corner of the layout, to give the page balance.  Those cut flags from the chipboard sheet were a must have on the layout!  And I couldn't leave off the adorable ferris wheel chipboard embellishment!  I also worked in some of the puffy stickers, to add more interest to the layout.


When I thought I had everything finished, I spied the cute Sticky Note Banner Shapes and had to find a way to incorporate them.  The scalloped half circles fit right in, tucked under the edge of the outer circle, and I love the way it turned out!

You can also find ways to use the Carousel collection for everyday photos and special occasions.  It would be great for a girly themed birthday layout!

Tuesday, September 26, 2017

Crate Paper | Capture Today

The Crate Paper Gather collection by Maggie Holmes, is still one of my favorites for fall layouts.  The calendar says it's fall here, but our temperatures do not!  But I don't let that stop me from documenting my favorite season!


You can never go wrong with a wood grain paper for your background.  It gives you a great pattern and color, but it's subtle enough not to overwhelm the rest of your layout.  I had to have leaves, since the theme of my layout was fall, so I used a cut file from The Cut Shoppe Etsy store.  Then, I backed the leaves with three different papers from the Gather collection.


For the design of the layout, I used the leaves on the cut file to create a visual triangle.  I placed my title at the top, an embellishment cluster to the center right and my photo at the bottom.  I added interest to each area with a variety of embellishments from the collection.


Whatever season it feels like where you are, you can always document your favorite with all of the Crate Paper collections, from Christmas to Halloween or special occasion to everyday!

Wednesday, August 30, 2017

Pinkfresh Studio Boys Fort Blog Hop!


Welcome to the Pinkfresh Studio Boys Fort Blog Hop!  Today, the Scrapbook Design Team will share projects using the Boys Fort collection, which is perfect for the boys and men in your life!  You should have arrived at my Blog from the talented Amanda Baldwin's Blog.  Make sure you follow along the hop and leave a comment on each Designer's post, to be eligible for the Boy's Fort collection giveaway.


I love the mix of neutral colors and masculine colors in this collection.  I used a patterned paper for the background of my layout, that had a more subtle pattern than some of the others in the collection.  I wanted to add a large stitched title, and have it stand out by using Black embroidery floss against the neutral background.


When I started the layout, I printed a color photo and a Black & White photo.  Then I couldn't decide which one I wanted to use, so I ended up using both of them.  I loved the effect of the two different sized photos and the contrast of having one in color and one in Black & White.


I finished up the design, with different embellishments from the collection!


TWO WINNERS WILL BE CHOSEN TO WIN THE ENTIRE BOYS FORT COLLECTION!

You must comment on each Designer's Blog to be entered in the Giveaway. 

Comments will close at 11.59pm CST on Friday, Sept 8th, 2017.

Winner Announcement : Wednesday, September 14th, 2017

Now, it's time to continue on the Hop.  You are headed to the talented Flora Farkas' Blog!  And if you're just now joining in the Hop, here's the full hop order for you to follow. 


ASHLEY HORTON  <-------------- YOU ARE HERE

Have fun visiting all of the Design Team Blogs, and don't forget to comment while you're there! 

Tuesday, August 15, 2017

Crate Paper | Happy Together

I always love to create layouts, that include my favorite things!  Those favorite things include, hand-stitching, wood grain, my Silhouette Cameo, and the Crate Paper Chasing Dreams collection by Maggie Holmes!  This layout came together just as I envisioned it and it was quick and easy.


I started this layout by drawing a large ampersand with the Silhouette Sketch Pens on a wood grain paper.  Then I stitched over the lines with a dark Pink embroidery floss.  I wanted to add my photo and embellishments inside the ampersand shape, so I placed my photo first.


Next, I started adding a mix of embellishments from the Chasing Dreams collection to the layout.  I mixed chipboard, ephemera pieces, stickers, and buttons to fill in all of the space inside the ampersand.  I love the look of the bright colors from the collection, against the wood grain background!


What are some of your favorite things to do or use on a layout?  I always feel so much more creative when I'm working with techniques and products, that I really love!!

Friday, August 11, 2017

Pinkfresh Studio Design Team Line Up & Escape the Ordinary Blog Hop!


Hello, and welcome to the Pinkfresh Studio Design Team Blog Hop!  I had the privilege of being on the first Pinkfresh Studio Design Team, and I'm so excited to be back.  I have always loved the unique designs of the PF embellishments and papers, and I look forward to sharing monthly inspiration with you!  You should have arrived here from the very talented Beata Valint's Blog.  Let's get to the Hop, and make sure you read all the way through for an awesome GIVEAWAY!!

Today the designers are sharing layouts and projects with the new Escape the Ordinary collection.  This collection is filled with embellishments and papers that can be used for feminine or masculine layouts.  I created a masculine layout for my post today.


The initial inspiration for this layout, was a geometric/origami heart shape.  I checked around on Pinterest for an origami heart tutorial and created mine from one of the papers in the 6x6 paper pad.  Once I had the heart folded, I used my sewing machine to sew a zig zag stitch down the center.


Next, I cut a large geometric shaped heart on my Silhouette Cameo.  Then I layered the smaller origami heart in the center of the larger one.  I mixed the Golden Foil and Leatherette Alpha Stickers to create the title for my layout, wrapping it around the outside edge of the heart.  


I finished the layout, by adding some of the puffy stickers, ephemera pieces and chipboard stickers.  All of the embellishments were perfect for completing the design around the rest of the heart.  I also layered a few other embellishments around the origami heart, to help draw the eye to the center of the layout.


We are giving away the entire Escape the Ordinary collection to one lucky winner and stamps/dies totaling more than $100.00 to one winner.

The Winners will be selected randomly from comments left on each of the DT Blogs.  YOU MUST COMMENT ON EACH BLOG THROUGHOUT THE HOP, TO BE ENTERED AS A RANDOM WINNER.

Comments will close at 11:59PM CST on Friday, August 18th, 2017.

Winner Announcement: Friday, August 25th, 2017

Now, it's time to continue on the Hop!  You are off to visit the talented Julia Stainton's Blog.  And here is the full Hop order, just in case you're just now getting started:


Thanks so much for joining in the Hop!  Make sure you are following Pinkfresh Studio and all of the designers on Social Media, for all of the inspiration you need using all of the amazing Pinkfresh products!