Vellum was a pretty big trend a few years back and then it kind of seemed to go away. It has been making a comeback and I was so excited to get a whole package of the 8.5x11 sheets. I thought some embossed Vellum circles would add a nice touch to the look of this layout. And if you have been on the wood veneer bandwagon, you know, that the Wood Veneer Stars from Studio Calico are a precious commodity. I have managed to build up a sizable stash, so I decided to let go of my hoarding tendencies and pull some out of the box for this page. I used Heidi Swapp Tinsel Color Shine to spray over the Stars. And I saw the most fun technique on Studio Calico's Instagram the other day...using the Stars to stamp! How fun is that??!! I knew I had to give it a try. I added some Black Stampin' Up ink to the Stars and just randomly stamped them on my page. Not all of them were perfectly stamped, but hey, perfectionism is a lost cause in Scrapbooking! :) I really liked playing around with this technique, and on top of that I have a few pre-misted wood veneer stars for whenever I need them for a page.
Monday, March 25, 2013
The Last One for March!
Today is Monday and it's also the last Monday of the month, so I will be sharing my last layout for this month using the March Artful Delight Kit. I decided to take a little bit of a different approach with this layout and use a muted color scheme on solid Black cardstock. I mixed in a few extras, not included in the Kit...vellum, Wood Veneers, Flair Button, Color Shine, and a doily.
Vellum was a pretty big trend a few years back and then it kind of seemed to go away. It has been making a comeback and I was so excited to get a whole package of the 8.5x11 sheets. I thought some embossed Vellum circles would add a nice touch to the look of this layout. And if you have been on the wood veneer bandwagon, you know, that the Wood Veneer Stars from Studio Calico are a precious commodity. I have managed to build up a sizable stash, so I decided to let go of my hoarding tendencies and pull some out of the box for this page. I used Heidi Swapp Tinsel Color Shine to spray over the Stars. And I saw the most fun technique on Studio Calico's Instagram the other day...using the Stars to stamp! How fun is that??!! I knew I had to give it a try. I added some Black Stampin' Up ink to the Stars and just randomly stamped them on my page. Not all of them were perfectly stamped, but hey, perfectionism is a lost cause in Scrapbooking! :) I really liked playing around with this technique, and on top of that I have a few pre-misted wood veneer stars for whenever I need them for a page.
Sunday, March 24, 2013
Paper Issues: Up In the Clouds!
Today starts a new theme at Paper Issues and you can come link up for the chance to win from Some Odd Girl Stamps!!
Here's all the info., you need to know:
This week the DT girls got to play with some stamps from Some Odd Girl.
They were very cloud-tastic!
Follow the Hop to see what they made!
They were very cloud-tastic!
Follow the Hop to see what they made!
Kristy at Some Odd Girl would like for YOU to have some of her amazing stamps, too!
She is giving away a set to 3 lucky winners!
Here are "rules":
1. Like Paper Issues on Facebook.
2. Like Some Odd Girl on Facebook.
3. Leave a Comment on THIS POST at Paper Issues saying that you did both.
2. Like Some Odd Girl on Facebook.
3. Leave a Comment on THIS POST at Paper Issues saying that you did both.
Bonus! Link up a project at Paper Issues! {You do not have to use a SOG stamp}
Any project with clouds, planes, birds, stars, rainbows...RAINBOWS!
You get the idea...link it up!
Any project with clouds, planes, birds, stars, rainbows...RAINBOWS!
You get the idea...link it up!
You have until April 6 to link up!
AND...DON'T FORGET, IF YOU'RE SHOPPING FOR NEW GOODIES IN THE PAPER ISSUES ETSY SHOP, USE THE CODE ASHLEY75, TO SAVE 20% ON YOUR ORDER!!
Saturday, March 23, 2013
Little Red Ladybug
Happy Saturday Blog readers!! I hope you had a chance this past week to check out The Paper Bakery's Team Up with Elle's Studio! If you would like to see all of the amazing projects created by The Paper Baker Team Members and the Elle's Studio Design Team, you can visit The Paper Bakery Blog HERE and the Elle's Studio Blog HERE. I am still blown away to be a part of this Team and work with the talented Ladies, who create such beautiful projects. On Thursday, a few of my projects were shared on the Elle's Studio Blog and on The Paper Bakery Blog. Today, I have a tag to share with you that I created using the March Scrapbook Kit, Soda Shop. I thought it would be fun, to share a little tutorial with you, on how I created my tag, using the exclusive Cut Files in the March Kit. The Triangle Cut File is so fun and versatile. Here's a look at what I did with it.
1. Start out by cutting the Triangle Cut File on your Cameo and then gather your tag and a few supplies from the Kit, that you want to work with on your tag.
2. Cover you shipping tag with one of the patterned papers from the Kit, then lay your Cut File over the tag. Choose your Spray Mist and spray over your Triangle Mask.
3. Before you remove your mask, take a fine point Sharpie and trace around the Triangles.
4. Remove the mask and choose a second, coordinating Spray Mist and spray lightly over your tag.
And then, comes the rest of the fun...start layering your Tag! I used the cute Lady Bug card that was included in the Kit Sarah sent to me and mixed in some of the fun Elle's Studio Tags. Here is a look at the completed Tag:
Now you have a completed Tag all ready for your next layout, to send as a gift, or to display in your Craft space or home. Make sure when you're creating your Tag, that you grab one of the cute Custom Flair Buttons included in your Kit!! And did you know, that you can purchase some Exclusive Elle's Studio Flair created especially for this month??!! Head over to the Shop and pick up your very own pack!
Thursday, March 21, 2013
Hip to be Square
Yesterday, Get It Scrapped! shared an article for using Square photos on your layouts. If you are like me, and LOVE Instagram, then you are probably using a lot of Square photos on your layouts lately. Here is how I took on the assignment and make sure you visit Get It Scrapped! for more ideas from the Creative Team for using Square photos:
I took these photos of our son, at a local Dog Show, but since they were close ups, I wanted to use them for an everyday layout rather than based on the theme of where we were that day. I have been working with Square photos very consistently on my pages. With the popularity of Instagram and other photo apps, square photos are easy to upload and print from your home computer or through photo printing services. One of the big advantages to designing with square photos, is that most of us are already designing on a square...12x12 sheets of paper. This makes setting up the design of your page very easy and Square photos are perfect for grid designs. I created a grid design by pairing two Square photos with two square pieces, cut from patterned paper. Square photos can also work for adding a lot of photos to your layout. If you printed your photos at 2 inches or 2.5 inches, you could make a single page layout that included many photos, rather than having to spread them out over a double page format.
Supplies: Patterned Paper, Wood Veneers & Spray Mist: Studio Calico; Chevron Mask: The Crafter's Workshop; Tin Pin: October Afternoon; Washi Tape: Love My Tapes; Punch: EK Success; Font: CK Chloe; Pen: Zig Memory System
I took these photos of our son, at a local Dog Show, but since they were close ups, I wanted to use them for an everyday layout rather than based on the theme of where we were that day. I have been working with Square photos very consistently on my pages. With the popularity of Instagram and other photo apps, square photos are easy to upload and print from your home computer or through photo printing services. One of the big advantages to designing with square photos, is that most of us are already designing on a square...12x12 sheets of paper. This makes setting up the design of your page very easy and Square photos are perfect for grid designs. I created a grid design by pairing two Square photos with two square pieces, cut from patterned paper. Square photos can also work for adding a lot of photos to your layout. If you printed your photos at 2 inches or 2.5 inches, you could make a single page layout that included many photos, rather than having to spread them out over a double page format.
Supplies: Patterned Paper, Wood Veneers & Spray Mist: Studio Calico; Chevron Mask: The Crafter's Workshop; Tin Pin: October Afternoon; Washi Tape: Love My Tapes; Punch: EK Success; Font: CK Chloe; Pen: Zig Memory System
Wednesday, March 20, 2013
Recipe for Fun!
Hi everyone! I am here today to share my take on the March Recipe Challenge at Love My Tapes!! Have you had a chance to play along yet? You still have until March 27, to link up for your chance to win some fun Love My Tapes goodies. Here are the details for the challenge:
2. The challenge is open until March 27, 2013.
Supplies: Patterned Paper & Chalkboard Stickers: Pebbles Inc.; Arrows & Color Shine: Heidi Swapp; Wood Veneers, Triangle Mask & Spray Mist: Studio Calico; Washi Tape: Love My Tapes & Glitz Design; Flair Buttons: Ormolu & The Paper Bakery Kit Club; Roller Doodle Stamp: Glitz Design; Font: Brady Bunch
And, before I go, I wanted to share an exciting announcement...I will be joining the Let's Get Sketchy Design Team starting in April. I will be creating with the Sketches, but also providing some of the weekly Sketches for the Team to work with. I am looking forward to getting started and working with the talented Ladies on the Design Team. If you haven't been over to Let's Get Sketchy head over and check them out. Their March Sponsor is The Paper Bakery Kit Club!!
1. Create a Layout or Card that uses the following 'ingredients'. All ingredients need to be used. Basic supplies, such as card-stock, patterned paper, misting, stitching, etc. can also be used. Think outside the box and let's get creative. Please let us know how you were inspired.
3. A randomly chosen winner will win some LMT goodies.
4. Link up your projects below.
To get y'all started, here is a layout I created using the RECIPE!
1. Use a negative(s)
2. Use 5 different washi tapes
3. Use ONE word
4. Use handstitching
5. Use an envelope
Here is my take on the Recipe Challenge:
I incorporated my Washi Tapes with the Negative, by adding them behind the Triangles I cut on my Cameo. Then I decided to add the handstitching around the outer edge of the larger triangles. Using one word was a little tough for me, because I am a fan of long titles, but I think the word "Adorable" was a perfect one word title for this page. And I decided that the envelope would make a great spot for tucking in my journaling.
If you would like to play a long with us this month, make sure you follow the Recipe Challenge above and link up your project HERE.
Supplies: Patterned Paper & Chalkboard Stickers: Pebbles Inc.; Arrows & Color Shine: Heidi Swapp; Wood Veneers, Triangle Mask & Spray Mist: Studio Calico; Washi Tape: Love My Tapes & Glitz Design; Flair Buttons: Ormolu & The Paper Bakery Kit Club; Roller Doodle Stamp: Glitz Design; Font: Brady Bunch
And, before I go, I wanted to share an exciting announcement...I will be joining the Let's Get Sketchy Design Team starting in April. I will be creating with the Sketches, but also providing some of the weekly Sketches for the Team to work with. I am looking forward to getting started and working with the talented Ladies on the Design Team. If you haven't been over to Let's Get Sketchy head over and check them out. Their March Sponsor is The Paper Bakery Kit Club!!
Tuesday, March 19, 2013
It's Time to Tear Things Up!
Have you ever used Tearing on your layouts?...now don't get that confused, with tearing up your layouts!! I've known some scrappy friends, who have done that very thing, with layouts they weren't pleased with. I say, just go with it and make it work. But, back to Tearing. This is a fun technique you can use, to add some texture and interest to your layouts...and best of all, it's really easy. Get It Scrapped! is sharing some thoughts on Tearing in today's article.
While out running errands, we found these great barrels in front of the Feed Store, and snapped some cute photos of the kids. I really loved the rural, farm feel in these photos, created by the barrels and the red from the aluminum building. This led me to chose the cute Farm Girl collection from October Afternoon, and I wanted to tear the edge of a few of the papers to create a rustic look on the page. When I tear the edge of the paper, I like to tear some of the paper forward and some back. This creates two different edges on the tear. When you tear the paper forward, it will pull more of the color away and reveal the White paper in the center. Tearing towards the back, keeps the paper from pulling the color away. Once I finish tearing and adhere my paper to the page, I like to roll and tear the edges a little more for added texture. If you wanted to take your tearing one more step further, it's fun to add inking to the edges for added dimension.
Supplies: Patterned Paper, Buttons, Brads, Stickers, Chipboard: October Afternoon; Modeling Paste: Liquitex; Chevron Mask: The Crafter's Workshop; Spray Mist: Studio Calico; Font: Abadi MT Condensed Extra Bold & Pacifico; Flair Button: Bluebirdchic.com
While out running errands, we found these great barrels in front of the Feed Store, and snapped some cute photos of the kids. I really loved the rural, farm feel in these photos, created by the barrels and the red from the aluminum building. This led me to chose the cute Farm Girl collection from October Afternoon, and I wanted to tear the edge of a few of the papers to create a rustic look on the page. When I tear the edge of the paper, I like to tear some of the paper forward and some back. This creates two different edges on the tear. When you tear the paper forward, it will pull more of the color away and reveal the White paper in the center. Tearing towards the back, keeps the paper from pulling the color away. Once I finish tearing and adhere my paper to the page, I like to roll and tear the edges a little more for added texture. If you wanted to take your tearing one more step further, it's fun to add inking to the edges for added dimension.
Supplies: Patterned Paper, Buttons, Brads, Stickers, Chipboard: October Afternoon; Modeling Paste: Liquitex; Chevron Mask: The Crafter's Workshop; Spray Mist: Studio Calico; Font: Abadi MT Condensed Extra Bold & Pacifico; Flair Button: Bluebirdchic.com
Monday, March 18, 2013
A Little Vintage Touch
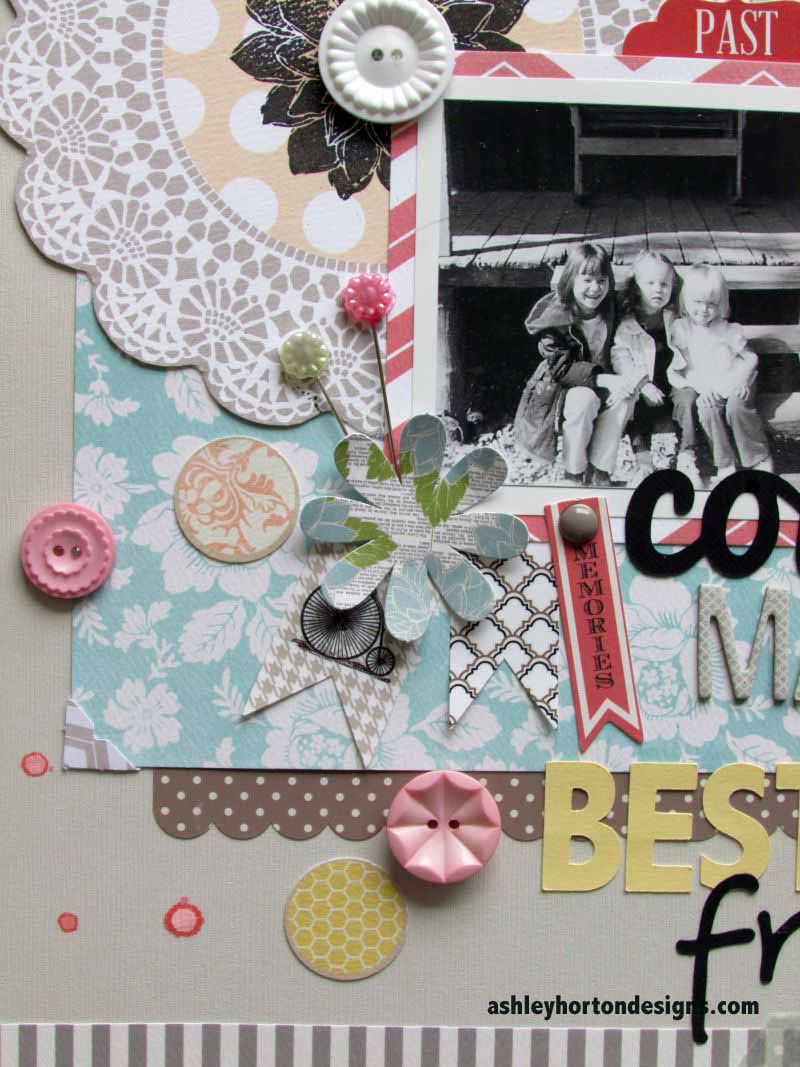
I am back today, with a new layout for Artful Delight...only one more reveal for this month, using the March Kit! It's flown by!!! The Teresa Collins lines in this month's Kit has given me lots of variety to work with. The first two layouts were on the fun side, so I decided to go for a different approach on today's layout. I used the doily patterned paper, to fussy cut one of the large doilies, and added some of the stick pins and buttons to give my layout a vintage touch to go along with the b&w photo of me and my sister, with our cousin...circa early 1980's.
I really love the She Said stamp set, that was included in the Kit and I used the large flower stamp in the center of the fussy cut doily. And some of the sticker pieces from the Memories collection were perfect for creating a mixed banner beneath my photo. One of my favorite things about this page, is the long Title. I love mixing alphas/Fonts to create long titles. I added a few extras to this layout: shipping tag for journaling, Amy Tan Thickers, and Flair button from A Flair for Buttons, and Sprinklers from October Afternoon. And don't forget, you still have time to play along with our Layout and Card sketches this month, for the chance to be an Artful Delight Guest Designer!
Subscribe to:
Posts (Atom)