Tuesday, December 9, 2014

Echo Park | Life Is Delicious

Today, I'm stopping in to share a card using the fun Made From Scratch collection from Echo Park!  If you love to cook, then this collection is perfect for creating layouts about your love of cooking.  But it’s not just for layouts!  You can also use the collection to make fun, creative cards for your friends and family. I thought it would be fun to use the Apple Die Set, to create a dimensional look on my card.


I created a quick tutorial showing how I created the dimensional look on my card with the Apple Die Set from Echo Park.  If you would like to check it out, you can find it on the Echo Park Blog, HERE.

Supplies:
Made From Scratch 6x6 Paper PadDesigner Die Apple Die Set
Made From Scratch Alpha StickersMade From Scratch Element Stickers


https://www.etsy.com/shop/TheCutShoppe?ref=ss_profile

Thursday, December 4, 2014

Hip Kit Club | Under the Tree

I can't believe I'm already sharing my last two projects with the November 2014 Hip Kit & Add-On Kits!  But, that means that my new December 2014 Hip Kit & Add-On Kits is on the way from Hip Kit Club!!  I had so much fun using the November Kit and I can't wait to start creating with the December Kit!  I wanted to stop in today and share the layout and card that I created with the November Kit.


It's always fun to think outside the box, when you are cutting your patterned papers. I decided to cut several chevron pieces from the papers in the November 2014 Hip Kit & Add-On Kits, using my paper trimmer. After laying them out on the White cardstock background, I decided to turn them into a Christmas tree! The design went right along with my photo and title. After I adhered each of the chevron pieces, I machine stitched each one and added some stars, for tree decorations. And I wanted to add a pop to the Studio Calico wood veneer numbers, that I used for the date on my layout, so I painted them with the Sweet Cherry Color Shine, that came in one of the previous Hip Kits! I finished my layout, by adding several of the tags from the Elle's Studio Good Cheer collection.


Pink and Red is one of my favorite Christmas color combos, so I decided to use some of these colors from the products in the November 2014 Hip Kit & Add-On Kits for my card. I started with the Red cardstock from the Cardstock Add-On Kit for my base. Then I layered several elements from the Elle's Studio Good Cheer collection to the front of my card. And to finish my sentiment, I used the Silver Buckaroo Thickers and overlapped some of them, to create a fun dimensional look on my card!

Be on the look out for new projects using the December 2014 Hip Kit & Add-On Kits!  I'll be sharing my first layout and card next week!!

https://www.etsy.com/shop/TheCutShoppe?ref=ss_profile
 

Wednesday, December 3, 2014

American Crafts | Silhouette Love Frame

This week it's Silhouette week on the American Crafts Blog!  I love using my Cameo, and using it with my American Crafts products, makes it even more fun!  I created a framed home decor piece using the Love cut file from American Crafts, in the Silhouette Store.


And I also have a tutorial to share with you, showing how I put the frame together!

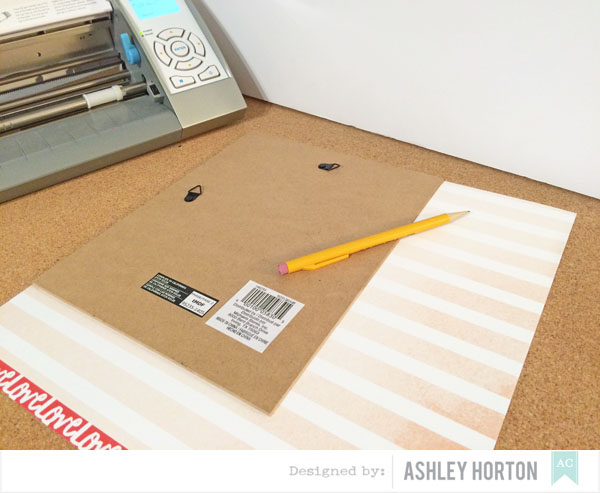
1. Remove the glass and backing from an 8x10 white frame.


2. Mark the 8x10 guidelines on your patterned paper - that will serve as the main cut out for the inside of your frame. You can make sure your marks match up on your Silhouette cutting mat.


3. In Silhouette Studio, repeat the Love phrase over and over in your 8x10 cutting space. The "Love" die cut can be found in the American Crafts artists folder in the Silhouette Store.


4. After all of your Love words are in place and lined up, delete the alternating words. This will give you a negative and positive effect once your frame is completed. Cut away!


5. When the machine has finished cutting, remove your paper and trim it to the 8x10 size on your paper trimmer.


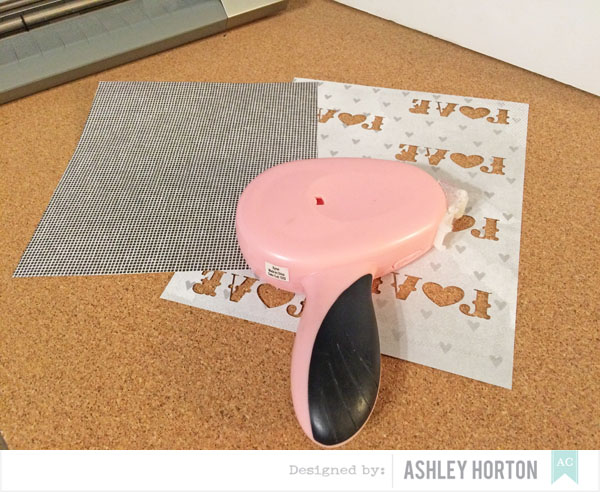
6. Now you will want to cover the backside of your Love cut paper. Make sure the pattern you want to see is facing forward when you adhere it to the back of your paper.


7. Now, you can go back into Silhouette Studio and cut the word "Love" from two different patterned papers. I cut 4 words on each pattern from the 6x6 Paper Pad. Then add the words to your 8x10 background piece by alternating each of the patterns.


8. Once all of your words are in place, use a strong adhesive around the backing of the frame and adhere your 8x10 paper to it.


9. Now you can close the tabs on the back of the frame and embellish your frame with stickers, Garland, and patterned paper from the Stitched collection!


And the great thing about this frame is that it could be adapted for boy decor, a baby's room, or how about even for your own room - the possibilities are endless!

Supplies: Stitched (368954) - Applique, Stitched (368958) - Felted, Stitched (368962) - Dobby, Stitched (368965) - 6x6 Paper Pad, Stitched (368979) - Garland, Stitched - Accent & Phrase Stickers, Stitched (368978) - Enamel Dots, Stitched (368972) - Matte Puffy Accents, Love Cut File

Monday, December 1, 2014

Shimelle 5 Things with Die Cuts

I hope everyone enjoyed Thanksgiving weekend!  Now, it's just a few more Mondays until Christmas, and I'm pretty excited!  But today I'm taking a break from Christmas themed layouts and projects, and sharing the last layout I created for the Shimelle Blog.  This was the first layout I created out of the five, and I love that Shimelle's collection is so versatile!  It works for masculine layouts, feminine layouts, travel layouts and everyday layouts.  I created a masculine look on this layout, with a cute photo of our son from a recent day at the park.


I love the look that tone on tone die cuts create. I used a heart shape on the Keller paper, to create a tone on tone look at the top of the layout. It adds a subtle look to my page, to balance out the busier bottom half, that includes my photo, embellishments and bright colors.

I really hope you've enjoyed the layouts I've shared from the Shimelle post!  If you haven't had a chance to pick up this collection, make sure you add it to your Christmas wish list!  You definitely won't be disappointed!

And if Santa is bringing you a Die Cut machine this Christmas, make sure you stop by The Cut Shoppe today and pick up some awesome Cut Files to use on your paper craft projects!  You can get 40% off of your purchase TODAY ONLY for CYBER MONDAY!!

https://www.etsy.com/shop/TheCutShoppe?ref=ss_profile

https://www.etsy.com/shop/TheCutShoppe?ref=ss_profile

Saturday, November 29, 2014

American Crafts | Absolutely Thankful

Thanksgiving has come and gone, and I know we all have photos of our family and our favorite foods to document!  This past week on the American Crafts Blog, the Design Team shared Thanksgiving inspiration, and my layout was on the Blog yesterday.  If you missed any of this past week's posts, make sure you stop by and check out ideas for cards, layouts and projects for this year's Thanksgiving photos or ideas to pin for next Thanksgiving!  Here's a look at what I created!


How to: Start out by cutting triangle shapes on your die cut machine or hand cut some triangle shapes.  Arrange the triangles on a dark woodgrain background paper and adhere. Once your triangles are in place, choose several of your shapes and add machine stitching. Use a Shimelle photo overlay and layer it behind your photo. Place your photo and mat on the upper left hand corner of the page. Create your title using the die set from the Shimelle collection and stamp the phrase Absolutely on your die cut banner. Finish your title with the Gold Fitzgerald Thickers. Add a date above your photo using the Dunbar Thickers. Embellish around your photo using the Shimelle Cork Stickers, Wood Veneers, and Bits pieces. Add journaling strips to finish your layout.

Supplies: Haunted Hollow (368673) - Haunted Forest, Shimelle (368136) - Goodall, Shimelle (368159) - Winlock, Shimelle (368145) - Herschel, Thickers (368162) - Fitzgerald, Thickers (368163) - Dunbar, Shimelle (368166) - Accent & Phrase Stickers, Shimelle (368169) - Acrylic Stamps, Shimelle (368171) - Photo Overlays, Shimelle (368173) - Ephemera Die Cuts, Shimelle (368175) - Wood Veneer Shapes, Shimelle (368179) - Nesting Dies

https://www.etsy.com/shop/TheCutShoppe?ref=ss_profile

Thursday, November 27, 2014

Wednesday, November 26, 2014

Hip Kit Club | Bubble Lights

It's time to share a little more Christmas cheer, with a new layout and card for Hip Kit Club, using the November 2014 Hip Kit and Add-On Kits!  This Kit makes it so easy to scrap your holiday photos and if you love to make hand-made Christmas cards, then you've got plenty of goodies to create some amazing cards!


The November 2014 Hip Kit & Add-On Kits, includes one of my favorite layout accessories...TAGS! I decided to mix the American Crafts Bits Tags and Elle's Studio Good Cheer Tags, to create a banner look across my page. I laid out the tags, to find out a size for my photo and once I had my photo printed, I attached the tags and photo across the page. Then I used my sewing machine to stitch across the top of each tag. I embellished with some of the Elle's Studio wood veneers, Pink Paislee stickers, Studio Calico rub-ons and one of the Evalicious Flair Buttons. And I used the American Crafts Candy Cane Thickers, for the title of my page.


I'm always so excited to see the alpha options in each month's new Hip Kit! The November 2014 Hip Kit & Add-On Kits, includes four alpha options. I thought it would be fun to mix them for the sentiment on my card. I used the Candy Cane and Buckaroo Thickers, along with the Elle's Studio Gray letter stickers, to create the Ho Ho Ho Merry Christmas sentiment on my card. I cut my White cardstock base at 4.5x9 inches, to create a square shaped card. And to add a little twinkle, I layered some of the Studio Calico star rub-ons in the background, before adding my Thickers and letter stickers.

And if you're excited for the December 2014 Hip Kit & Add-On Kits, then the wait is up!  It's been revealed and is so awesome!  It's packed with lots of American Crafts goodies, including the new Amy Tan Stitched collection and Dear Lizzy Serendipity collection!


You can find the December 2014 Hip Kit Main Kit, along with all of the Add-On Kits in the Hip Kit Store!

https://www.etsy.com/shop/TheCutShoppe?ref=ss_profile