This is a personal blog. All editorial content and projects are intellectual property of ashleyhortondesigns.com. I do receive compensation and material product from Hip Kit Club to develop my craft posts, but all ideas and opinions are my own.
I'm stopping in today, with a new layout for Hip Kit Club, using the May 2016 Hip Kit & Add-On Kits! I mixed the May Kit with one of the free May cut files, and created a stitching template on my layout. I chose White cardstock from the May Cardstock Add-On Kit as my background. I wanted a clean background, so the stitching and embellishments would stand out.
You can check out my new process video that goes along with the layout, to see how I stitched the Love cut file.
Once I finished stitching, I placed my photo at the top of the layout, so it wouldn't get lost in all of the embellishing. I like to call this type of layout, an everything but the kitchen sink layout, because I added just a little bit of everything from the May Kits. I used a lot of Hip Kit Club Exclusives and mixed them with Bella Blvd enamel hearts, Jillibean Soup wood veneers, Simple Stories frame, and Echo Park Paper enamel dots.
Even though my photo was small, I highlighted it with a few of the fussy cut triangles from one of the exclusive papers designed by Kim Watson, and several embellishments from the May Embellishment Kit and the May Project Life Kit.
Thanks for stopping in today!
Showing posts with label Echo Park. Show all posts
Wednesday, June 8, 2016
Saturday, April 16, 2016
Hip Kit Club | May Kit Reveal
This is a personal blog. All editorial content and projects are intellectual property of ashleyhortondesigns.com. I do receive compensation and material product from Hip Kit Club to develop my craft posts, but all ideas and opinions are my own.
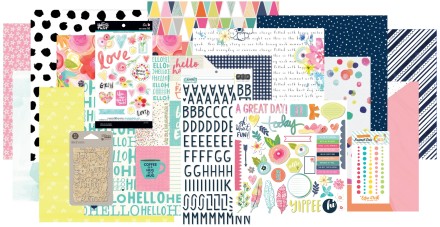
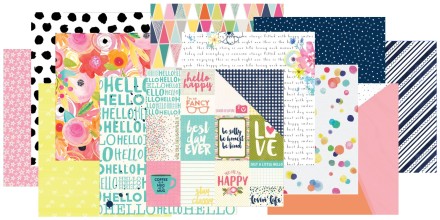
The May Hip Kit reveal went up on the Hip Kit Blog yesterday, and they are amazing!! If you love color and lots of great exclusives, then you'll definitely want to get your hands on the May kits!
Products Included:
Products Included:
Products Included:
Products Included:
Products Included:
Products Included:
The May Hip Kit reveal went up on the Hip Kit Blog yesterday, and they are amazing!! If you love color and lots of great exclusives, then you'll definitely want to get your hands on the May kits!
HIP KIT CLUB – MAY 2016- MAIN KIT

Hip Kit Club Member Price: $29.95 (requires a 3 month minimum subscription)
CLICK HERE to join!
Individual Kit Purchase Price: $34.95

Hip Kit Club Member Price: $29.95 (requires a 3 month minimum subscription)
CLICK HERE to join!
Individual Kit Purchase Price: $34.95
Products Included:
- 1 sheet – HKC Exclusive – Meadowbrook – Frolic Paper – designed by Kimberly Hutchison
- 1 sheet – HKC Exclusive – Meadowbrook – Lazy Days – designed by Kim Watson
- 1 sheet – HKC Exclusive – Meadowbrook – Summer Breeze – designed by Kim Watson
- 1 sheet – HKC Exclusive – Meadowbrook – Lucy In The Sky – designed by Kim Watson
- 1 sheet – HKC Exclusive – Meadowbrook – Notes from Home – designed by Kim Watson
- 1 pkg. – HKC Exclusive – Meadowbrook – Navy Puffy Alphabet Stickers – designed by Kimberly Hutchison
- 1 pkg – HKC Exclusive – Meadowbrook – Ephemera – designed by Kim Watson
- 1 sheet – Jillibean Soup – Healthy Hello Soup – Bite Paper
- 1 sheet – Jillibean Soup – Healthy Hello Soup – Jar of Jambo Paper
- 1 sheet – Jillibean Soup – Healthy Hello Soup – Cup of Ciao Paper
- 1 pkg. – Jillibean Soup – Healthy Hello Soup – Wood Veneer
- 1 sheet – Bella Blvd – Faith Illustrated – She Blooms Paper
- 1 pkg – Bella Blvd – Faith Illustrated – She Blooms – Chipboard Icons
- 1 pkg. – Echo Park – Summer Party – Enamel Dots
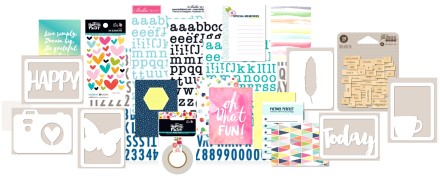
HIP KIT CLUB – MAY 2016 – PROJECT LIFE ADD-ON KIT

Price: $29.95*
*Hip Kit Club members receive a 15% off on all Add-On Kit purchases

Price: $29.95*
*Hip Kit Club members receive a 15% off on all Add-On Kit purchases
Products Included:
- 24 HKC – Exclusive Project Life Cards (not all shown) – designed by Kim Watson & Kimberly Hutchison
- 1 pkg. – Jillibean Soup – Healthy Hello Soup – Mini Placemats
- 1 pkg – Jillibean Soup – Life Wordfetti – Wood Veneer
- 1 sheet (12×12) Bella Blvd. – Rainy Day Alphabet Stickers
- 1 pkg. Bella Blvd. – Faith Illustrated – She Blooms Enamel Hearts
- 1 roll Bella Blvd.- Faith Illustrated – She Blooms – Bloom Washi Tape
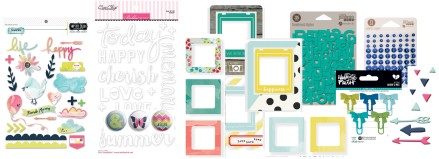
HIP KIT CLUB – MAY 2016 EMBELLISHMENT ADD-ON KIT

Price: $29.95*
*Hip Kit Club members receive a 15% off on all Add-On Kit purchases

Price: $29.95*
*Hip Kit Club members receive a 15% off on all Add-On Kit purchases
Products Included:
- 1 pkg. – HKC Exclusive – Meadowbrook – Puffy Stickers designed by Kim Watson
- 3 HKC Exclusive – Meadowbrook – Flair Buttons designed by Kimberly Hutchison
- 3 HKC Exclusive – Meadowbrook – Acrylic Arrows
- 15 pieces – HKC Exclusive – Meadowbrook – Triangle Acrylic Shapes
- 1 pkg. Bella Blvd – Today Chipboard Word Stickers
- 1 pkg. Bella Blvd – Faith Illustrated – Adam’s Mix Cute Clips
- 1 pkg. Jillibean Soup – Navy Blueberry Self Adhesive Sequins
- 1 pkg. Jillibean Soup – Tart Teal Thin Chip Alphabet
- 1 pkg. – Simple Stories – Life in Color – Chipboard Frames
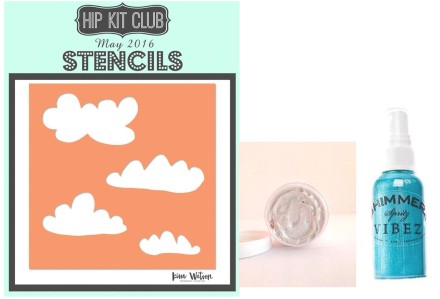
HIP KIT CLUB – MAY 2016 COLOR ADD-ON KIT

Price: $21.95*
*Hip Kit Club members receive a 15% off on all Add-On Kit purchases

Price: $21.95*
*Hip Kit Club members receive a 15% off on all Add-On Kit purchases
Products Included:
- 1 HKC Exclusive – Cloud Stencil designed by Kim Watson
- 1 jar – Shimmerz – Dazzlerz – Spun Sugar Texture Paste
- 1 bottle – Shimmerz – Vibez – Jeni B Bleu
HIP KIT CLUB – MAY 2016 PAPER ADD-ON KIT

Price: $13.95*
*Hip Kit Club members receive a 15% off on all Add-On Kit purchases

Price: $13.95*
*Hip Kit Club members receive a 15% off on all Add-On Kit purchases
Products Included:
- 1 sheet – HKC Exclusive – Meadowbrook – Frolic Paper – designed by Kimberly Hutchison
- 1 sheet – HKC Exclusive – Meadowbrook – Lazy Days – designed by Kim Watson
- 1 sheet – HKC Exclusive – Meadowbrook – Summer Breeze – designed by Kim Watson
- 1 sheet – HKC Exclusive – Meadowbrook – Lucy In The Sky – designed by Kim Watson
- 1 sheet – HKC Exclusive – Meadowbrook – Notes from Home – designed by Kim Watson
- 1 sheet – Jillibean Soup – Healthy Hello Soup – Bite Paper
- 1 sheet – Jillibean Soup – Healthy Hello Soup – Jar of Jambo Paper
- 1 sheet – Jillibean Soup – Healthy Hello Soup – Cup of Ciao Paper
- 1 sheet – Bella Blvd – Faith Illustrated – She Blooms Paper
HIP KIT CLUB – MAY 2016 – CARDSTOCK ADD-ON KIT

Price: $11.95*
*Hip Kit Club members receive a 15% off on all Add-On Kit purchases

Price: $11.95*
*Hip Kit Club members receive a 15% off on all Add-On Kit purchases
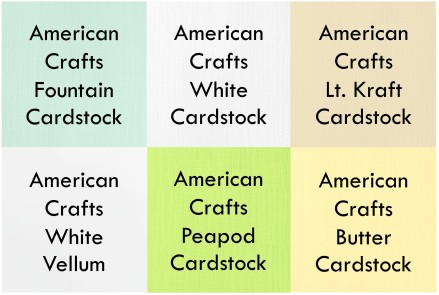
Products Included:
- 2 sheets American Crafts – Fountain Cardstock
- 2 sheets – American Crafts – White Cardstock
- 2 sheets – American Crafts – Lt. Kraft Cardstock
- 2 sheets – American Crafts – White Vellum
- 2 sheets – American Crafts – Peapod Cardstock
- 2 sheets – American Crafts – Butter Cardstock
Sunday, March 29, 2015
The Rubber Cafe Guest Desinger
Today, I'm stopping in to share my last two cards for my Guest Spot with The Rubber Cafe! The Creative Kit of the Month, Spring Is Here, will definitely get you in the mood for spring, whether you're still having winter weather or it already feels like summer!
I wanted to do something fun with the ribbon included in this month's Kit, so I decided to use each color on my first card.
I covered my card base with the text patterned paper included in the Echo Park 6x6 paper pad. Then I used four pieces of double sided tape to adhere the ribbon to the card. I just folded each color of ribbon over accordion style and then used my sewing machine to stitch each strip down. I wanted to add a little bit more interest to the text paper, so I stamped the Welcome Spring sentiment in Black ink.
On my second card, I kept a White card base and stamped the cute bunny on one of the 6x6 papers from the Echo Park paper pad.
After I stamped each of the bunnies, I fussy cut each one and added pop dots behind each one to give some dimension to the card. For the sentiment, I stamped Happy Easter across the center, using Yellow ink. And for a pop of color, I cut two strips of the striped paper from the Echo Park 6x6 paper pad and added it to the top and bottom of the card.
Supplies:
Stamps: The Rubber Cafe - Creative Kit of the Month; Spring Is Here
Paper: The Rubber Cafe - Creative Kit of the Month; Spring Is Here
Embellishments: The Rubber Cafe - Creative Kit of the Month; Spring Is Here
I wanted to do something fun with the ribbon included in this month's Kit, so I decided to use each color on my first card.
I covered my card base with the text patterned paper included in the Echo Park 6x6 paper pad. Then I used four pieces of double sided tape to adhere the ribbon to the card. I just folded each color of ribbon over accordion style and then used my sewing machine to stitch each strip down. I wanted to add a little bit more interest to the text paper, so I stamped the Welcome Spring sentiment in Black ink.
On my second card, I kept a White card base and stamped the cute bunny on one of the 6x6 papers from the Echo Park paper pad.
After I stamped each of the bunnies, I fussy cut each one and added pop dots behind each one to give some dimension to the card. For the sentiment, I stamped Happy Easter across the center, using Yellow ink. And for a pop of color, I cut two strips of the striped paper from the Echo Park 6x6 paper pad and added it to the top and bottom of the card.
Supplies:
Stamps: The Rubber Cafe - Creative Kit of the Month; Spring Is Here
Paper: The Rubber Cafe - Creative Kit of the Month; Spring Is Here
Embellishments: The Rubber Cafe - Creative Kit of the Month; Spring Is Here
Monday, January 26, 2015
Echo Park | Hello Sweetheart
Happy Monday everyone! Hopefully you all enjoyed a great weekend! I spent pretty much the entire weekend, exploring the world of creating process videos. I have past video editing experience, but getting the camera set up just right, making my old computer cooperate with video editing software, and adding voice over has all been a challenge. But I have managed to get two videos completed...I am persistent! HA! I will have my first video posted this Wednesday, and I will share it on the Blog on Thursday. It was pretty much the guinea pig video, and more of a what not to do when your video taping kind of video. But I am definitely working on improving them. If you would like to Subscribe, you can visit MY CHANNEL on YouTube!
Now on to a new card that I created for Echo Park, using the Lucky In Love collection. If you are looking for a way to incorporate multiple patterned papers onto your card, then I’ve got a quick tutorial to share with you, showing how I layered patterned paper behind the Love Confetti Die.
Begin by cutting the Love Confetti Die from the Be Mine patterned paper.
After running the die through your Die Cut machine, you will need to trim around the edges to have even spacing around your word.
Now you can flip your paper over and adhere different patterned papers behind each letter.
This technique would also look great repeated on a layout, and would really add a pop of interest to your layout!
Supplies:
Love Confetti DieSweet Hearts Patterned PaperLove This Patterned PaperLovely Circles Patterned Paper
Be Mine Patterned Paper
Pink Hearts Patterned PaperAlpha Stickers Sheet
Now on to a new card that I created for Echo Park, using the Lucky In Love collection. If you are looking for a way to incorporate multiple patterned papers onto your card, then I’ve got a quick tutorial to share with you, showing how I layered patterned paper behind the Love Confetti Die.
Begin by cutting the Love Confetti Die from the Be Mine patterned paper.
Supplies:
Love Confetti DieSweet Hearts Patterned PaperLove This Patterned PaperLovely Circles Patterned Paper
Be Mine Patterned Paper
Pink Hearts Patterned PaperAlpha Stickers Sheet
Tuesday, January 20, 2015
Echo Park | I Love Your Face
It seems like forever since my last post..when it's really only been since last Thursday! HA! But I've got some new posts this week, starting with this layout for Echo Park using the Lucky in Love collection! This is a great collection for all of your Valentine’s layouts, projects and cards, but it can also be used for everyday layouts. I combined the collection with the Designer Dies, to create an everyday layout, with a Black & White photo of our middle daughter.
I wanted to create a focal title under my photo, so I layered the Designer Dies, to draw attention to the title of my page. I cut the Talk Bubble Heart from four different patterned papers and placed them on the background paper in a grid design. Then I cut the word Love and layered it over the Talk Bubble Hearts and finished my title, with letter stickers from the Alpha Stickers Sheet.
There are a lot of fun ways to use the Designer Dies that coordinate with the Lucky In Love collection! The Talk Bubble Hearts would be perfect for hand-made Valentines!
Monday, January 12, 2015
Echo Park | Roll Call
Today I'm stopping in to share a layout for Echo Park, created with the Through the Year collection!
This is such fun collection, because it gives you a little bit of all the seasons in one pack. You could easily use this collection, to create a variety of cards, pocket scrapbook pages, or a layout, like I’m sharing today!
I used a mix of the patterned papers and stickers on my layout, and I wanted to create an interactive element on my page, using the coordinating Designer Dies. The File Tab Die Set caught my eye, and I decided to create a mini file folder to add to my page. You can stop by the Echo Park Blog, to see a tutorial of the steps for creating the file folder.
Supplies:
File Tab Die Set
November Patterned Paper
January to April Patterned Paper
Days of the Week Patterned Paper
Apples Patterned Paper
Month Border Strips Patterned Paper
Snowflake Flurry Patterned Paper
Element Stickers Sheet
Alpha Stickers Sheet
This is such fun collection, because it gives you a little bit of all the seasons in one pack. You could easily use this collection, to create a variety of cards, pocket scrapbook pages, or a layout, like I’m sharing today!
I used a mix of the patterned papers and stickers on my layout, and I wanted to create an interactive element on my page, using the coordinating Designer Dies. The File Tab Die Set caught my eye, and I decided to create a mini file folder to add to my page. You can stop by the Echo Park Blog, to see a tutorial of the steps for creating the file folder.
Supplies:
File Tab Die Set
November Patterned Paper
January to April Patterned Paper
Days of the Week Patterned Paper
Apples Patterned Paper
Month Border Strips Patterned Paper
Snowflake Flurry Patterned Paper
Element Stickers Sheet
Alpha Stickers Sheet
Friday, December 19, 2014
Echo Park | Christmas Packaging
Well, we can officially say there is less than a week until Christmas! And do I have any gifts wrapped? Nope, not a one!! But I do have two cute Christmas Packaging ideas to share with you today, using a mix of the Christmas Cheer and Home For the Holidays collections from Echo Park.
I used my Silhouette Cameo to cut the Pillow Box and Gift Bag, using patterned papers from the Christmas Cheer collection. Then it was easy peasy to decorate the outside of my wrapping, using Decorative Brads and the sticker sheets from the Christmas Cheer collection.
My family always gets together on Christmas Eve, to exchange presents and eat lots of yummy food! These gift wrap ideas would work perfectly for packaging Gift Cards and small items for my family members.
And these fun packages could also be adapted for other holidays or events! You could change your papers and embellishments to create packaging for teacher gifts, birthday gifts, and they would be perfect for Valentine’s Day gifts…which will be here before you know it!
Supplies:
Cozy Quilt Patterned PaperHoliday Plaid Patterned PaperSnow Globes Patterned PaperChristmas Cheer Decorative BradsChristmas Cheer Flair Buttons
Home for the Holidays Decorative BradsTwine
Wood Veneer Star
Silhouette Cameo
I used my Silhouette Cameo to cut the Pillow Box and Gift Bag, using patterned papers from the Christmas Cheer collection. Then it was easy peasy to decorate the outside of my wrapping, using Decorative Brads and the sticker sheets from the Christmas Cheer collection.
My family always gets together on Christmas Eve, to exchange presents and eat lots of yummy food! These gift wrap ideas would work perfectly for packaging Gift Cards and small items for my family members.
And these fun packages could also be adapted for other holidays or events! You could change your papers and embellishments to create packaging for teacher gifts, birthday gifts, and they would be perfect for Valentine’s Day gifts…which will be here before you know it!
Supplies:
Cozy Quilt Patterned PaperHoliday Plaid Patterned PaperSnow Globes Patterned PaperChristmas Cheer Decorative BradsChristmas Cheer Flair Buttons
Home for the Holidays Decorative BradsTwine
Wood Veneer Star
Silhouette Cameo
Tuesday, December 9, 2014
Echo Park | Life Is Delicious
Today, I'm stopping in to share a card using the fun Made From Scratch collection from Echo Park! If you love to cook, then this collection is perfect for creating layouts about your love of cooking. But it’s not just for layouts! You can also use the collection to make fun, creative cards for your friends and family. I thought it would be fun to use the Apple Die Set, to create a dimensional look on my card.
I created a quick tutorial showing how I created the dimensional look on my card with the Apple Die Set from Echo Park. If you would like to check it out, you can find it on the Echo Park Blog, HERE.
Supplies:
Made From Scratch 6x6 Paper PadDesigner Die Apple Die Set
Made From Scratch Alpha StickersMade From Scratch Element Stickers
I created a quick tutorial showing how I created the dimensional look on my card with the Apple Die Set from Echo Park. If you would like to check it out, you can find it on the Echo Park Blog, HERE.
Supplies:
Made From Scratch 6x6 Paper PadDesigner Die Apple Die Set
Made From Scratch Alpha StickersMade From Scratch Element Stickers
Sunday, November 23, 2014
Echo Park | Give Thanks
Hi everyone! I'm stopping in today to share a Thanksgiving card with you, that I created using a mix of Echo Park collections. A card for Thanksgiving may not always be the first thing that comes to mind, but what better time of year to show your gratitude and thankfulness, than Thanksgiving!!
Here’s a helpful tip, when you are creating a Thanksgiving card, but don’t have any specific Thanksgiving supplies on hand…pull supplies from some of your existing collections. I tend to think of Brown, Yellow, Orange, Red and Green for Thanksgiving, so I found papers that I could use from the Walking on Sunshine collection and Stickers from the I Heart Fall Mini Theme collection. Once I put these supplies together, I knew they would work perfectly for a Thanksgiving card theme!
And don’t miss out on other ways to get crafty for Thanksgiving. You could use your Echo Park collections to create Thanksgiving themed table décor or what about fun craft projects for the kids to put together.
Supplies:
Walking on Sunshine Beach Balls Patterned PaperWalking on Sunshine Whales Patterned Paper
Walking on Sunshine Beach Stripe Patterned Paper
I Heart Fall Sticker AccentsI Heart Fall Journaling Patterned PaperI Heart Fall Leaves Patterned Paper
Here’s a helpful tip, when you are creating a Thanksgiving card, but don’t have any specific Thanksgiving supplies on hand…pull supplies from some of your existing collections. I tend to think of Brown, Yellow, Orange, Red and Green for Thanksgiving, so I found papers that I could use from the Walking on Sunshine collection and Stickers from the I Heart Fall Mini Theme collection. Once I put these supplies together, I knew they would work perfectly for a Thanksgiving card theme!
And don’t miss out on other ways to get crafty for Thanksgiving. You could use your Echo Park collections to create Thanksgiving themed table décor or what about fun craft projects for the kids to put together.
Supplies:
Walking on Sunshine Beach Balls Patterned PaperWalking on Sunshine Whales Patterned Paper
Walking on Sunshine Beach Stripe Patterned Paper
I Heart Fall Sticker AccentsI Heart Fall Journaling Patterned PaperI Heart Fall Leaves Patterned Paper
Monday, November 10, 2014
Echo Park | Tradition
It's time to share a new layout for Echo Park using the Home for the Holidays collection! I love how quick and easy it is to put together a layout with the Echo Park collections, and I put this layout together in just over 30 minutes!
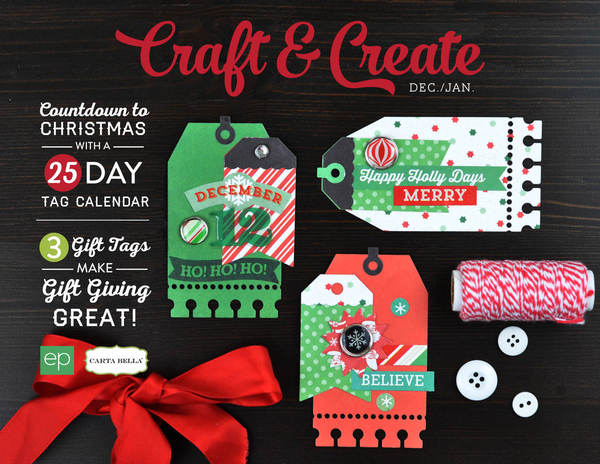
I decided to use several strips of paper on my layout, to give me a starting point for my page design. Then I wanted to work with the Holiday Tag Die Set, to add a fun design element to my page. I cut three of the tags in different patterned papers from the 6x6 Paper Pad. The tags were perfect for embellishing with the Chipboard Accents and stickers from the collection kit.
If you still need to get those Christmas photos scrapped from last year, check out the Home for the Holidays collection and the Christmas Cheer collection from EchoPark! You can also find the coordinating Designer Dies on the Echo Park Blog, under Products.
And if you're looking for even more holiday inspiration, make sure you check out the new Dec./Jan. Idea Book from Echo Park. It's a FREE Download and you can find it HERE on the Echo Park Blog!
Supplies:
Good Tiding Words Merry Icons Gold
Element Stickers
Alpha Stickers Decorative Brads Holidays
Holidays 6x12 Chipboard
Holiday Tag Designer Die
I decided to use several strips of paper on my layout, to give me a starting point for my page design. Then I wanted to work with the Holiday Tag Die Set, to add a fun design element to my page. I cut three of the tags in different patterned papers from the 6x6 Paper Pad. The tags were perfect for embellishing with the Chipboard Accents and stickers from the collection kit.
If you still need to get those Christmas photos scrapped from last year, check out the Home for the Holidays collection and the Christmas Cheer collection from EchoPark! You can also find the coordinating Designer Dies on the Echo Park Blog, under Products.
And if you're looking for even more holiday inspiration, make sure you check out the new Dec./Jan. Idea Book from Echo Park. It's a FREE Download and you can find it HERE on the Echo Park Blog!
Supplies:
Good Tiding Words Merry Icons Gold
Element Stickers
Alpha Stickers Decorative Brads Holidays
Holidays 6x12 Chipboard
Holiday Tag Designer Die
Sunday, November 2, 2014
Echo Park | Joy
Now that Halloween is over, it's time to look forward to Thanksgiving and Christmas! And Echo Park is making it easy to get ready for the Christmas holidays! Whether you like to create layouts, cards or altered projects, there's something for everyone and you can find easy how to instructions and supplies under the Inspiration tab on the Echo Park Blog. There are tons of FREE downloads, that can help you re-create any project! Today, I'm stopping in to share a layout, that is available for FREE download in PDF version on the Echo Park Blog.
For the supply list and easy instructions for this layout, download the Free PDF. You can find it HERE!
Wednesday, October 15, 2014
A Flair for Buttons | He Calls It "Yogrit"
I've got a new layout to share today for A Flair for Buttons! Do you like creating fun titles on your layouts? Ever think about using your kid's quotes as the title of your layout? That's exactly what I did on my new layout today! When we're scrapbooking memories, we tend to focus on the photos, but it's fun to document the cute things our kids say. I wanted to incorporate one of my Flair Buttons in my quote title, on this layout, and here's what I came up with!!
The Creative Agenda collection from Echo Park, had a fun circle sticker, so I knew it would be a great substitute for the "O" in the word "Yogrit", and then I placed my Flair Button, from the I Love Arrows Flair set, in the center of the sticker. I wanted to add a couple of more Flair Buttons that coordinated with the colors on my page so I chose the star from the My Life Flair Set 4 and the Enjoy Flair Button from the Chalk Words 2 Flair.
So next time you are looking for a fun title for your layout, think about some funny kids quotes you can use. And look for fun ways to incorporate your Flair Buttons into the title, to add even more impact!
You can find the Flair Button sets I used, in the A Flair for Buttons Etsy store!
I Love Arrows Flair

My Life Flair Set 4

Chalk Words 2 Flair

Supplies: Flair Buttons: A Flair for Buttons; Patterned Paper, Chipboard & Stickers: Echo Park; Target Practice Cut File: The Cut Shoppe: Color Shine: Heidi Swapp, Enamel Dots: My Mind's Eye; Die Cut Machine: Silhouette Cameo
The Creative Agenda collection from Echo Park, had a fun circle sticker, so I knew it would be a great substitute for the "O" in the word "Yogrit", and then I placed my Flair Button, from the I Love Arrows Flair set, in the center of the sticker. I wanted to add a couple of more Flair Buttons that coordinated with the colors on my page so I chose the star from the My Life Flair Set 4 and the Enjoy Flair Button from the Chalk Words 2 Flair.
So next time you are looking for a fun title for your layout, think about some funny kids quotes you can use. And look for fun ways to incorporate your Flair Buttons into the title, to add even more impact!
You can find the Flair Button sets I used, in the A Flair for Buttons Etsy store!
I Love Arrows Flair
My Life Flair Set 4
Chalk Words 2 Flair
Supplies: Flair Buttons: A Flair for Buttons; Patterned Paper, Chipboard & Stickers: Echo Park; Target Practice Cut File: The Cut Shoppe: Color Shine: Heidi Swapp, Enamel Dots: My Mind's Eye; Die Cut Machine: Silhouette Cameo
Friday, September 19, 2014
Echo Park | Creative Agenda Cards
Earlier this week, I was up on the Echo Park Blog with two cards featuring the Creative Agenda collection! This is one of my new favorites! I love all of the fun colors and the awesome embellishments that go along with the collection! This collection is perfect for creating everyday cards for the special people in your life. And you can add an extra wow factor to your cards, by using the coordinating Designer Dies!
On my second card, I repeated a similar technique using the heart shape from the Sweet Memories Die/Stamp Set. I layered five hearts over my card base, and added the “Is It Friday Yet?” talk bubble, as the sentiment for my card. Then I used the days of the week stickers from the Alpha Stickers Sheet, to embellish each of the heart shapes.
I love to use the Designer Dies on my projects, because you can create so many different looks each time you use them. And you can pair them with the coordinating stamps to create even more fun looks!
Check out the Products page on the Echo Park Blog to see all of the fun Designer Dies and Stamps, that coordinate with the Echo Park collections!
I used the cute stamp handle Designer Die from the Sweet Memories Die/Stamp Set on my first card. I cut the die four times on different patterned papers and then arranged them in a grid on my card base. I added a sentiment sticker under each of the stamp handles and finished my card by stamping the “Noted” sentiment, and adding stickers from the Element Stickers Sheet for my card sentiment.
I love to use the Designer Dies on my projects, because you can create so many different looks each time you use them. And you can pair them with the coordinating stamps to create even more fun looks!
Check out the Products page on the Echo Park Blog to see all of the fun Designer Dies and Stamps, that coordinate with the Echo Park collections!
Subscribe to:
Posts (Atom)