***If you are looking for the American Crafts Valentine's Day Blog Hop, please visit HERE.***
Last week, I had a new layout and tutorial on the Echo Park Blog, using the new collection, That's My Boy! I love the fun colors and stickers included in this collection. They are perfect for our little guy's photos!
I wanted to create a big impact on my background, so I used a large, layered star shape. If you would like to see how I created the layered, stitched stars, you can visit my post HERE on the Echo Park Blog for more information.
Supplies: That's My Boy Collection Pack: Echo Park; Color Shine: Heidi Swapp; Wood Veneers: Studio Calico; Stamps: Chic Tags; Button: October Afternoon; Die Cut Machine & Sketch Pens: CAMEO
Monday, February 17, 2014
Sunday, February 16, 2014
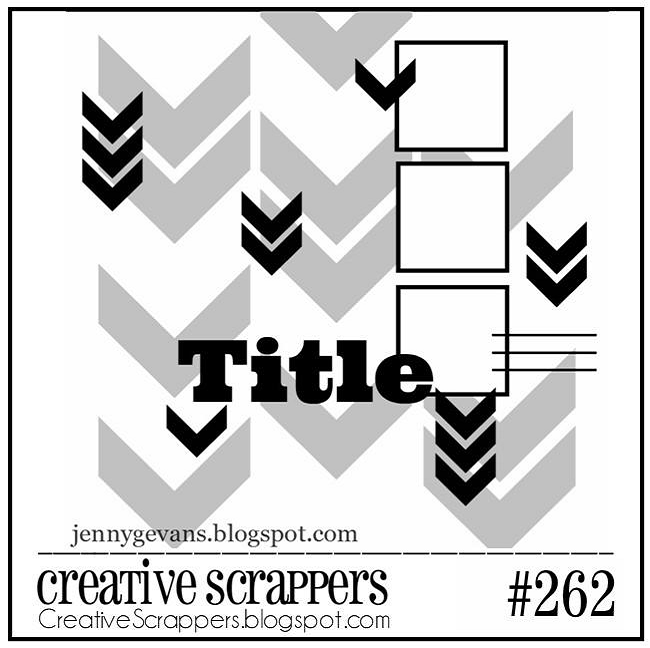
Creative Scrappers Sketch #262 | Heart Breaker
***If you are looking for the American Crafts Valentine's Day Blog Hop, please visit HERE.***
Today we have a new reveal for Creative Scrappers featuring a fun Sketch from Jenny Evans! The Chevron pattern design is really awesome and I took a simpler approach to my embellishing and layering this time, so the Chevron pattern would stand out.
I used the new Everyday Moments collection from Elle's Studio, and chose papers that used Teal, Gray, Kraft and Yellow to create a masculine color palette for my page. The large Chevron shapes were cut on my Cameo and I cut down the center of each one, and then mixed the Teal and Kraft pieces together on my background. I stitched with embroidery floss on the smaller Chevrons to create some texture on my page, and then finished by adding some SC Spray Mist, a few wood veneers and some enamel dots!
Now, it's your turn to play along with us! To win a prize from our Sponsor, Paper Camellia, all you need to do is create a layout and enter the challenges using our inlinkz widget at the end of the reveals for Sketch 261-262.
Today we have a new reveal for Creative Scrappers featuring a fun Sketch from Jenny Evans! The Chevron pattern design is really awesome and I took a simpler approach to my embellishing and layering this time, so the Chevron pattern would stand out.
I used the new Everyday Moments collection from Elle's Studio, and chose papers that used Teal, Gray, Kraft and Yellow to create a masculine color palette for my page. The large Chevron shapes were cut on my Cameo and I cut down the center of each one, and then mixed the Teal and Kraft pieces together on my background. I stitched with embroidery floss on the smaller Chevrons to create some texture on my page, and then finished by adding some SC Spray Mist, a few wood veneers and some enamel dots!
Now, it's your turn to play along with us! To win a prize from our Sponsor, Paper Camellia, all you need to do is create a layout and enter the challenges using our inlinkz widget at the end of the reveals for Sketch 261-262.
Deadline to submit your layout is February 28th at Midnight EST.
Supplies: Patterned Paper & Tags: Elle's Studio; Wood Veneers & Spray Mist: Studio Calico; Thickers & Date Stamp: American Crafts; Enamel Dots: My Mind's Eye; Die Cut Machine: CAMEO
Friday, February 14, 2014
American Crafts Valentine's Day Blog Hop
Happy Valentine's Day friends and welcome to the American Crafts Valentine's Day Blog Hop! The AC Design Team, has a ton of inspiration for you today, so make sure you visit each of the Blogs to see what they created and for the chance to win some prizes!!
As the Blog Hop was in the planning stage, I received the new Winter CHA collections and knew I would dig into the Plus One collection from Amy Tangerine to create my layout. I wanted to use a photo of our family together, because it is few and far between, that all 5 of us are in a picture together.
The watercolor Pink background immediately jumped out at me, when I looked through my papers. It had the word "Love" pre-printed which I used as part of my title, and added the word "This" from the Twins Thicker pack. One of the new products I love in this collection, is the Metal Die set. I used the XOXO piece and cut it from White cardstock and layered it over some die cut hearts on my page.
I hope my layout has helped add a little love to your Valentine's Day!! And you are definitely going to want to visit each of the Design Team members Blogs, to see their "love"ly work!! Here is a list of all the Blogs, you can visit along the way:
And while you are here, I have a little giveaway of my own!! Just leave a comment or become a new follower and let me know you did, for the chance to win some of the new DIY Shop collection! I will announce a winner on Tuesday, February 18th.
Supplies: Companion (366824) - Plus One, Twins (366837) - Thickers, Twosome (366820) - Plus One, Bits (366849) - Die Cut Cardstock Shapes, Flair (366906) - Adhesive Badges, Accomplice (366822) - Plus One, Accompany (366856) - Stamps, Us (366842) - Remarks, Elements (366852) - Fabric Brads, Mixtape (366839) - Washi Tape, Associate (366860) - Dies
Thursday, February 13, 2014
Hip Kit Club | Frozen Fun & Be Mine Card
This is my last post using the January 2014 Hip Kit & Add-On Kits! I love that I was able to create so many different looks with this Kit! So let's get right to my layout!!
I loved the diagonal pattern on the Crate Paper Teal wood grain paper in the January kit. It gave me the idea to step out of my comfort zone, and design my photos and title on a diagonal. Once my photos were in place, I added some strips of washi tape and patterned paper above and below them. The color of the Cherish Thickers worked perfectly for the Frozen theme of my page. I also used my CAMEO to cut a few snowflakes to add a frosty feel to my page. Once my page was finished, I took some White acrylic paint and used my finger to smudge it around the photo and title area, to help blend some of the background color out.
The Crate Paper Stand Outs in the January Kit, make awesome embellishments. I thought the Be Mine Stand Out would be perfect for the front of a card. I gently removed the bottom layer of the Stand Out, so it only included the pleated piece and sentiment. I added a die cut view master behind the Stand Out, which I cut from the Kraft cardstock included in the Kit. And I thought it would be fun to finish it off, with one of the positive shaped hearts adhered to a tooth pick and tucked behind the Stand Out.
With the January Kits coming to a close, don't forget that the new Creative Team will start sharing projects with the February 2014 Hip Kit & Add-On Kits coming up soon! You won't want to miss them! Make sure you stop by the Hip Kit Club website to check out all of the info!
And before I go, I wanted to share a Sketch with you. The Sweet Smiles layout I shared last week, was created using this Sketch, and I thought I would share it for those of you who might like to use it! Enjoy!!
I loved the diagonal pattern on the Crate Paper Teal wood grain paper in the January kit. It gave me the idea to step out of my comfort zone, and design my photos and title on a diagonal. Once my photos were in place, I added some strips of washi tape and patterned paper above and below them. The color of the Cherish Thickers worked perfectly for the Frozen theme of my page. I also used my CAMEO to cut a few snowflakes to add a frosty feel to my page. Once my page was finished, I took some White acrylic paint and used my finger to smudge it around the photo and title area, to help blend some of the background color out.
The Crate Paper Stand Outs in the January Kit, make awesome embellishments. I thought the Be Mine Stand Out would be perfect for the front of a card. I gently removed the bottom layer of the Stand Out, so it only included the pleated piece and sentiment. I added a die cut view master behind the Stand Out, which I cut from the Kraft cardstock included in the Kit. And I thought it would be fun to finish it off, with one of the positive shaped hearts adhered to a tooth pick and tucked behind the Stand Out.
With the January Kits coming to a close, don't forget that the new Creative Team will start sharing projects with the February 2014 Hip Kit & Add-On Kits coming up soon! You won't want to miss them! Make sure you stop by the Hip Kit Club website to check out all of the info!
And before I go, I wanted to share a Sketch with you. The Sweet Smiles layout I shared last week, was created using this Sketch, and I thought I would share it for those of you who might like to use it! Enjoy!!
Wednesday, February 12, 2014
Silhouette | I Love You 365 Days of the Year
I am stopping in today, to share a new layout for Silhouette. Over so many years of creating layouts, sometimes I get stuck for a good title for my pages. When this happens, I love to visit the Silhouette Store and check out the Phrases category. I always find just the perfect thing!! As I was browsing the new shapes last week, I came across this phrase in the store, and knew that it would be perfect for an everyday photo of our son, that didn’t have a specific theme.
Supplies: Cardstock: Carta Bella; Patterned Paper & Tags: Elle's Studio; Phrase, Sketch Pens & Die Cut Machine: CAMEO; Washi Tape: Recollections; Wood Veneers: Studio Calico; Enamel Dots: My Mind's Eye; Color Shine: Heidi Swapp
I started out my page, by cutting the phrase on my CAMEO, and once it was finished, I used scrap pieces of patterned papers behind each word. Using the White cardstock for my background, gave the patterned papers a great pop behind the words! I also wanted to incorporate my Sketch Pens on this page, so I opened a heart shape in Studio and changed it to 5 different sizes. I ran it through the CAMEO, using the Gray Sketch Pen and then sent it through again, to cut the heart shapes out. Then
I just randomly scattered and adhered them to my page.
So next time you are having trouble finding just the right title for your page, make sure you check out all of the fun phrases in the Store! And you can also download some great fonts, that save right to your computer! Once they are downloaded, you can use them with any of the programs on your computer!!
Shapes:
Supplies: Cardstock: Carta Bella; Patterned Paper & Tags: Elle's Studio; Phrase, Sketch Pens & Die Cut Machine: CAMEO; Washi Tape: Recollections; Wood Veneers: Studio Calico; Enamel Dots: My Mind's Eye; Color Shine: Heidi Swapp
Tuesday, February 11, 2014
Get It Scrapped! | 2 the Moon & Back
Today, the Get It Scrapped! Team is sharing inspiration for using Constellation motifs on your layouts. Stars and Constellation designs have been very popular and there are many different ways to incorporate this motif into your layouts. I blended a mix of stars, constellation designs, and a planet cut file to create my page.
It's rare to get a photo of all three kids, smiling and looking at the camera, but this one was as close as it usually gets. I thought it would be a great photo to use with a Constellation motif, and the title 2 the Moon & Back. I wanted to carry the constellation look into my title for a big impact, so I used a large Ampersand cut file with a geometric pattern, that resembled a constellation pattern.
If you are interested in finding out more about using the Constellation motif on your layouts, stop by the Get It Scrapped! Blog, to see some more ideas from the Creative Team!
Supplies: Patterned Paper, Cardstock, Phrase Stamp, Chipboard & Thickers: American Crafts; Cut Files & Printables; Two Peas in a Bucket; Sequins & Wood Veneers: Studio Calico; Color Shine: Heidi Swapp; Glitter & Adhesive Paper: Silhouette; Mini Market Stickers: October Afternoon; Die Cut Machine: Silhouette CAMEO
It's rare to get a photo of all three kids, smiling and looking at the camera, but this one was as close as it usually gets. I thought it would be a great photo to use with a Constellation motif, and the title 2 the Moon & Back. I wanted to carry the constellation look into my title for a big impact, so I used a large Ampersand cut file with a geometric pattern, that resembled a constellation pattern.
If you are interested in finding out more about using the Constellation motif on your layouts, stop by the Get It Scrapped! Blog, to see some more ideas from the Creative Team!
Supplies: Patterned Paper, Cardstock, Phrase Stamp, Chipboard & Thickers: American Crafts; Cut Files & Printables; Two Peas in a Bucket; Sequins & Wood Veneers: Studio Calico; Color Shine: Heidi Swapp; Glitter & Adhesive Paper: Silhouette; Mini Market Stickers: October Afternoon; Die Cut Machine: Silhouette CAMEO
Friday, February 7, 2014
Surprise Baby Boy Card Hop for Jinny!
My Blog friend Jinny Newlin and family, recently welcomed a brand new baby boy, and some of us wanted to get together for a surprise Card Blog Hop to celebrate their new bundle of joy! I created a simple card (for mailing purposes) using the Head Over Heels collection from Echo Park and the wood veneer alphas from Studio Calico.
Here is a list of the other Ladies, that are participating in the Hop, if you would like to visit their Blogs to see the adorable cards created for Jinny and the new baby!!
Lynn Mangan - www.themangoboysandme. blogspot.com
Laurie Willison -www.soapboxcreations. blogspot.com
Angi Barrs - http://cokiepopaper.blogspot. com
Jennifer Turner - www.withlovefromsophienme. blogspot.com
Tracey McNeely - http://inmycreativeopinion. blogspot.ca
Annette Allen - myclevercreations.blogspot.com
Lisa Elton - http://mypapertales.blogspot. com/
Miriam Prantner - http://mprantner.blogspot.com
Monika Davis - www.stampnmad.typepad.com
Leslie Germain - thememorynest.blogspot.com
Julie Tucker-Wolek - http://thetuckerwolekclan. blogspot.com/
Laurie Willison -www.soapboxcreations.
Angi Barrs - http://cokiepopaper.blogspot.
Jennifer Turner - www.withlovefromsophienme.
Tracey McNeely - http://inmycreativeopinion.
Annette Allen - myclevercreations.blogspot.com
Lisa Elton - http://mypapertales.blogspot.
Miriam Prantner - http://mprantner.blogspot.com
Monika Davis - www.stampnmad.typepad.com
Leslie Germain - thememorynest.blogspot.com
Julie Tucker-Wolek - http://thetuckerwolekclan.
Subscribe to:
Posts (Atom)