Monday, December 17, 2012

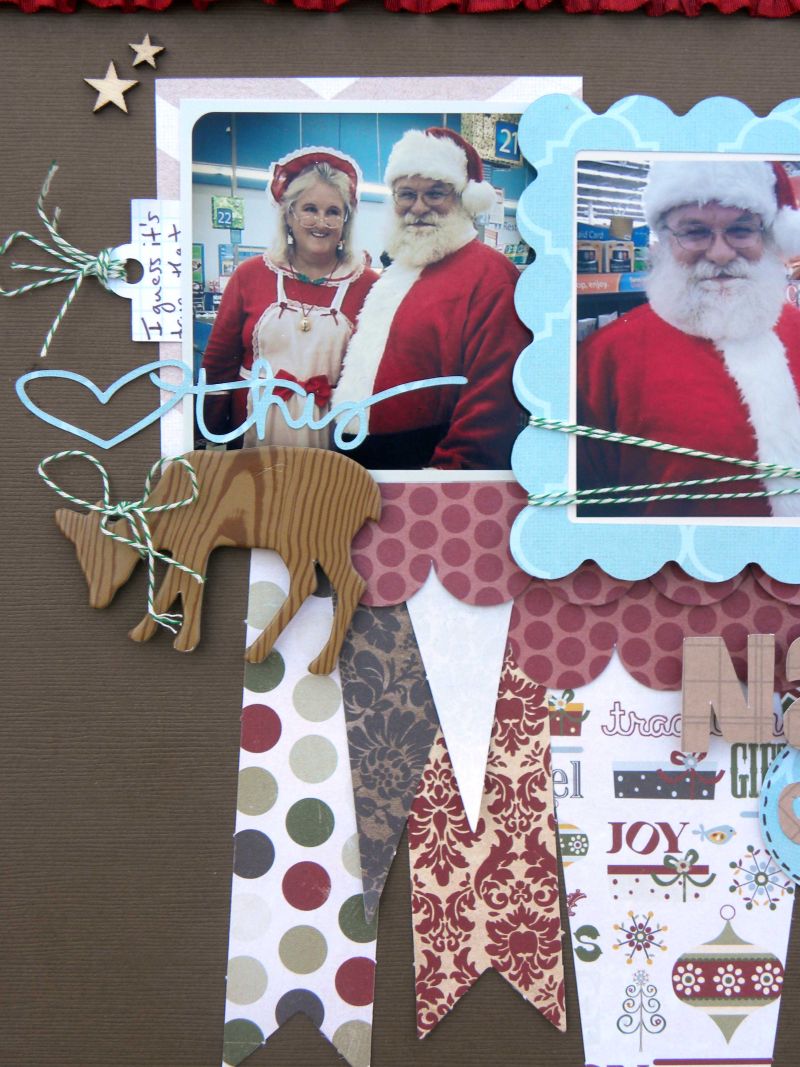
Naughty or Nice?!

Can you believe, that Christmas Eve is a week away!  WOW!!  We've been able to do a lot of fun stuff so far this month, like going to parades, visiting Santa, going to Christmas parties and being with family.  So needless to say, I have a lot of Christmas photos just waiting to go on layouts.  That's why I was so happy to receive the December Kit from Artful Delight.  It has been perfect for getting all of my Christmas photos scrapped.

The photos on this layout, are of me with Santa...yep, you heard right!  :)  Believe it or not, I ran into Santa and Mrs. Claus in the checkout line at Wal-Mart...I guess it's true, that everybody shops at Wal-Mart!!  :)  I asked if I could take their photo together, to show the kids when I got home and they kindly agreed.  Mrs. Claus asked if I would like to get my picture taken with Santa and I said YES, of course!!  Such a fun experience to end my day of Christmas shopping!!


When I started working on this layout, I really struggled with the page design.  I took it in several different directions and didn't like any of them.  I even cut out a background on the Cameo and decided I didn't like that either, so I just stuck it back in with my kit and decided to save it for later.  Once I moved the photos to the top of the page, I realized I could use the banner punch out pieces from the Fancy Pants Home for the Holidays collection.  And once I got that part of the basic design set up, the rest of the page came together quickly.

I hope you are snapping lots of photos this month, to use for your Christmas layouts!  And don't be overwhelmed by all of the holiday photos...just scrap them when you can and however you want.  Remember, there are no rules in Scrapbooking!!    


Sunday, December 16, 2012

Creative Scrappers Sketch #239

I decided to combine two of my favorite things for today's cute sketch by Heather Leopard over at Creative Scrappers...Elephants and Amy Tan's Ready.Set.Go collection!  Every year for my hubby's birthday, we usually make a visit to the Zoo in Gulf Breeze, FL or to the Audubon in New Orleans.  This year, we decided to go to the Audubon and I could spend the whole visit, just standing there looking at the Elephants!!  :)  


Heather's sketch was so fabulous, that I didn't alter anything on it!!  It worked perfectly for my photos.  I have become addicted to this chevron mask from The Crafter's Workshop.  I haven't actually used it as a mask for misting yet, but I love outlining the design onto my pages.


You can come join us and link up your layout for the chance to win from our December Sponsor, Deena Zielger!

Products Used:  Patterned Paper, Bits, Thickers & Flair:  Amy Tangerine; Wood Veneers & Spray Mist:  Studio Calico; Chunky Chevron Mask:  The Crafter's Workshop; DIY Thickers:  American Crafts; Crystal Candy Dot:  Pebbles


Saturday, December 15, 2012

ScrapFIT Workout #82 - Diana's Sketch

We've got another fun Workout today at ScrapFIT!!  I hope you are finding some time during this busy month to squeeze in a little crafting, or maybe you'll have some upcoming days off that you can set aside for scrapbooking!

#82- Diana - Sketch
Diana our Creative Trainer has really taken into account your ever growing pile of scraps with this sketch – love those strips in the back ground of this sketch. Dig into your scraps and show us how you can Workout this sketch!
 
We all know it's Christmas, but since I scrap out of sequence, I did a Halloween layout for this sketch.  I am sure I will still be posting Christmas layouts during Easter, so don't worry!!  :)


Come play along with us and you'll have the chance to win the LowCal FITkit, Times Square, from Paper Issues!

 
Products Used:  Patterned Paper, Tin Pins, Stickers, Buttons:  October Afternoon; Cardstock:  American Crafts; Thickers:  American Crafts:  Spray  Mist::  Studio Calico; Brads:  The Paper Studio; Mini Round Gems:  Recollections; Punch:  EK Success; Other:  Ribbon & Ric Rac

Friday, December 14, 2012

Fish Food

Get It Scrapped! has been sharing some great articles this week.  I hope you will head over this weekend, when you have some free time to check them out.   One of the articles posted yesterday, shares Ideas for Scrapbooking your Baking and Cooking Traditions.  I am sure we all have some of those kind of traditions during this time of the year.  My layout focused on cooking in general, not just holiday cooking.  I have always been a picky eater, but have "expanded my horizons" over the last 10-15 years.  The layout I created, shares the story of learning to love seafood and even getting brave, by deciding to cook fish at home...something I thought I would never do.


I wanted to create a layout, telling the story of my dislike for seafood in my earlier days, but shifting to loving it and cooking it once I reached my mid 20's.  The photos I selected are of two of the different types of fish that I enjoy cooking.  I used my phone to snap a quick photo of each of the dishes before sitting down to eat dinner.  I have found that using my phone for photos and uploading to Instagram, makes it quick and easy to have access to daily photos.  I decided I didn't want to use theme papers or embellishments to go along with the theme of my photos.  So, I chose a collection, that could be used for every day photos and repeated the "home/house" pattern, to reference that I enjoy cooking these meals at home.

If you would like more ideas on scrapbooking baking and cooking, make sure you check out what the other Creative Team members did at Get It Scrapped!
 
Supplies - Cardstock:  DCWV; Patterned Paper, Thickers, Bits & Flair Amy Tangerine; Thickers:  American Crafts; Wood Veneers:  Studio Calico; Flair Button:  A Flair for Buttons; Punch:  Anna Griffn; Other:  Embroidery Floss

Thursday, December 13, 2012

December Daily Part 2

Things are still running smoothly with the December Daily!  Most days I have been able to get each page done on that day.  I had to carry over last night's photo to today and get it in the album, because we went to visit Santa and then came home with sick kiddos.  So I didn't have time to get the page done last night.  So, I am back today to share pages from December 6 through December 12.


One of the great things about the binder albums is that you can add in bits and pieces.  I was able to add our Christmas card for this year, right into the album.


This was a happy surprise, while I was out shopping for some Christmas gifts.  I ran into Santa and Mrs. Claus at Wal-Mart!!  I guess it's true, that every body shops at Wal-Mart.


If you are working on a December Daily this year, I hope you are having as much fun as I am.  I plan on being back  next Thursday with the next installment of pages.
 

Wednesday, December 12, 2012

Putting Together a Patchwork

Nope, I haven't started sewing...that would definitely be a nightmare for me and any material involved!!  But did you know, that you can create a Patchwork effect on your paper crafts?  That's exactly what today's article is all about, at Get It Scrapped!  Patchwork styles are trendy in fashion and home décor, so let's take a look at how we can incorporate it into the crafty world.


Fall is my favorite season of the year and I love driving around and snapping photos that capture the season.  To create the patchwork look at the bottom of my page, I cut rectangles at 1 in. x 2 in.  Then I placed the first rectangle on the page at a diagonal angle and worked from there, in adding all of the other pieces for the pattern.  I left the rectangles unfilled, because I wanted the patterned papers to be visible, but I did add some stitching around several of the shapes.  When I think of patchwork, comforting and homey are words that come to mind.  I thought this pattern would work perfectly with my photos, because those are the same feelings that Fall brings home for me.

Supplies - Patterned Paper & Mister Huey's Spray Mist:  Studio Calico; Buttons:  Stampin' Up; Thickers:  American Crafts; Font:  Brush Script; Modeling Paste:  Liquitex; Mask: The Crafter's Workshop; Other:  Embroidery Floss


Tuesday, December 11, 2012

Merry Makers

I love working on holiday layouts, while that holiday is actually taking place!  It's just more fun to do your Halloween layouts during Halloween, your Christmas layouts during Christmas, your Easter layouts during Easter...well, you get the idea!!  :)  With so much going on during Christmas, I've already had plenty of layouts to work on.  And I decided to do a Christmas layout for Step Class #11, this month at ScrapFIT.  This month's class, is to create a Pretty Poinsettia.  Here is the layout I created and the steps I used, for creating the Poinsettia:


Putting the Poinsettia together:


1.  I started out, by cutting the pattern for my Poinsettia.  If you have a Cameo, this Poinsettia cut file is available in the Silhouette shop.  If you don't have access to a die cut machine, you could print out a Poinsettia pattern and trace and cut out your pieces.  And if you don't have access to printing a pattern, just go old school and hand draw your Poinsettia and cut it out.


2.  Take the smallest piece for your Poinsettia and add some stitching down the center of each of the Petals.  Then use adhesive around the edges of the Petals and Leaves to add a little shine, with some Glitter.


3.  Layer all of your pieces together and finish off the center.  I used Pearls from Kaisercraft, but you could also use a brad, button, or whatever you have on hand

I would love for you to play along with this month's Step Class at ScrapFIT!  You could be featured in our FITGirl Spotlight, so come over and play along with us!

Products Used:  Patterned Paper:  Echo Park, Studio Calico, & October Afternoon; Washi Tape:  Love My Tapes; Glitter:  Stampendous; Pearls:  Kaisercraft; Envelope:  K&Company; Thickers, Brads & Snowflake Stickers:  American Crafts; Font:  Abadi MT Condensed; Baker's Twine:  The Twinery; Poinsettia Die Cut:  Silhouette; Flair Button:  Bossy Joscie