Do you ever know exactly what product you want to use, but just can’t figure out how to place it on the page? That’s exactly what happened with the layout I’m sharing today, using the April 2015 Hip Kit & Add-On Kits. I had all of the product on my desk, and moved it around on the page three times, before I finally decided on my final design.
There was one simple technique, that made the light bulb go off, and that was adding some Yellow in the background using the Prima watercolor pencils, included in the April 2015 Color Add-On. That pop of color gave me a base layer for adding my photo and embellishments and everything fell into place from there. I just used the Yellow pencil to draw on the White cardstock, from the April 2015 Cardstock Add-On Kit, and added some water to my brush to blend it.
So next time you are feeling stuck on a design, don’t give up. There could be that one idea that totally turns around the page design for you!!
Showing posts with label Prima. Show all posts
Thursday, April 30, 2015
Thursday, April 23, 2015
Hip Kit Club | You Make Me Smile
It's Thursday, and that means it's time to share a new layout for Hip Kit Club, using the April 2015 Hip Kits & Add-On Kits. I like to call this layout “basic, with controlled Mixed Media”! HA! If you’re interested in Mixed Media, but are worried about trying it directly on your layout, this is a great way to get comfortable with it. I used one of the Heidi Swapp watercolor papers included in the April 2015 Color Add-On Kit, with the Prima watercolor pencils. This technique lets you get creative with Mixed Media, but gives you the option of using it off the page and then adding it to your layout.
I used the watercolor pencils on the HS watercolor paper to create a rainbow look. This is super simple! Just color across the paper with the watercolors and then use a brush and water to spread the color! Easy peasy, lemon squeezy! Once the watercolor dried, I adhered the card to my background paper and machine stitched around the edges.
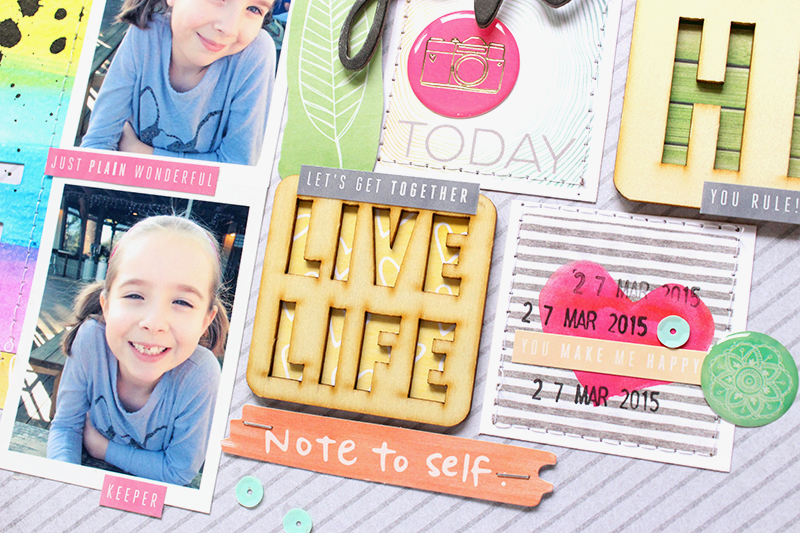
And adding the card, gave me a great base for the rest of my page design. I decided to do a photo strip down the center of the layout, and then create a fun embellished look on the opposite side of the layout. The Heidi Swapp Wood Veneers in the April 2015 Project Life Kit were perfect for the grid design that I wanted to create to the right of my photos. I mixed in some of the patterned paper squares cut from the Webster’s Pages What A Day patterned paper included the April 2015 Embellishment Kit. And, of course, I had to add some Black Color Shine splatters, once I completed the layout! I love the contrast of the Black ink layered over the bright watercolors!
So if you’re thinking about trying Mixed Media, make sure you check out the monthly Color Add-Ons! You definitely won’t be disappointed. There are lots of fun ways to use the products, and when you receive stencils, mists or paint daubers you get a great value, because they can be used multiple times or last for a while!
I used the watercolor pencils on the HS watercolor paper to create a rainbow look. This is super simple! Just color across the paper with the watercolors and then use a brush and water to spread the color! Easy peasy, lemon squeezy! Once the watercolor dried, I adhered the card to my background paper and machine stitched around the edges.
And adding the card, gave me a great base for the rest of my page design. I decided to do a photo strip down the center of the layout, and then create a fun embellished look on the opposite side of the layout. The Heidi Swapp Wood Veneers in the April 2015 Project Life Kit were perfect for the grid design that I wanted to create to the right of my photos. I mixed in some of the patterned paper squares cut from the Webster’s Pages What A Day patterned paper included the April 2015 Embellishment Kit. And, of course, I had to add some Black Color Shine splatters, once I completed the layout! I love the contrast of the Black ink layered over the bright watercolors!
So if you’re thinking about trying Mixed Media, make sure you check out the monthly Color Add-Ons! You definitely won’t be disappointed. There are lots of fun ways to use the products, and when you receive stencils, mists or paint daubers you get a great value, because they can be used multiple times or last for a while!
Thursday, April 9, 2015
Hip Kit Club | My Happy Place
I’m stopping in today to share my first layout with the April 2015 Hip Kit & Add-On Kits! The colors in this month’s Kits are so bright and fun…perfect for a beach photo! I had to have the April Color Add-On Kit, because I wanted to try out the Prima Watercolor Pencils. And they worked great on the Heidi Swapp Die Cut Watercolor Paper!
I thought the HS Die Cut Watercolor Paper, would be perfect for my title and also as a focal point for adding my photo. Before I adhered it to the Cienna patterned paper, that I used for my background, I used the Prima Watercolor Pencils to add some Pink and Yellow to the Die Cut. Then I placed the Die Cut in the center of the background and stitched across the phrase.
I wanted to continue the Pink and Yellow color scheme, so I chose embellishments and Thickers from the Main Kit and the Embellishment Add-On Kit. I framed my photo with the large Yellow chipboard frame from the Rise & Shine collection from Amy Tangerine, and added several embellishments from the Bits and Chipboard pieces, also from the Rise & Shine collection. After I had everything in place, I added some splatters of Black Color Shine to contrast the minimal color scheme.
I can’t wait to create some more layouts with this month’s kit! There are so many different options, with the various patterned papers and fun embellishments! If you haven’t had a chance to get your April Kits, make sure you stop by the Shop to check them out.
I thought the HS Die Cut Watercolor Paper, would be perfect for my title and also as a focal point for adding my photo. Before I adhered it to the Cienna patterned paper, that I used for my background, I used the Prima Watercolor Pencils to add some Pink and Yellow to the Die Cut. Then I placed the Die Cut in the center of the background and stitched across the phrase.
I wanted to continue the Pink and Yellow color scheme, so I chose embellishments and Thickers from the Main Kit and the Embellishment Add-On Kit. I framed my photo with the large Yellow chipboard frame from the Rise & Shine collection from Amy Tangerine, and added several embellishments from the Bits and Chipboard pieces, also from the Rise & Shine collection. After I had everything in place, I added some splatters of Black Color Shine to contrast the minimal color scheme.
I can’t wait to create some more layouts with this month’s kit! There are so many different options, with the various patterned papers and fun embellishments! If you haven’t had a chance to get your April Kits, make sure you stop by the Shop to check them out.
Subscribe to:
Posts (Atom)


