Showing posts with label watercolors. Show all posts

Wednesday, May 18, 2016

Hip Kit Club | Love Life & June 2016 Hip Kit Reveal!

This is a personal blog. All editorial content and projects are intellectual property of ashleyhortondesigns.com. I do receive compensation and material product from Hip Kit Club to develop my craft posts, but all ideas and opinions are my own.

Today, I'm stopping in to share my first layout, using the May 2016 Hip Kit & Add-On Kits from Hip Kit Club!  We've got some great cut files for May, that work perfectly with the kits, and I just had to go with the feather cut file. I did three cuts for the feathers. I cut some from White cardstock from the May Cardstock Add-On, so I could add watercolors that coordinate with the colors in this month's kit. Then I cut another set of White feathers and a set from a mix of patterned papers that could be layered over one another. I used some of our Hip Kit Club exclusive papers designed by Kim Watson, Jillibean Soup‬ and Bella Blvd papers.


The exclusive Touch the Sky patterned paper from the May 2016 Main Kit and May Paper Add-On kit was just what I needed for my background. It continued the watercolor effect from the painted feathers and was subtle enough not to overpower the rest of the layout.


I kept the embellishing to a minimum and just added a few of our Hip Kit Club exclusive embellishments from the May Main Kit, May 2016 Project Life Kit and the May 2016 Embellishment Kit. Once my embellishing was finished, I sprinkled on a bit of Black Color Shine from my stash, to complete the messy, artsy look of the layout.

You can also check out my new Process Video, on how the layout came together!


The June 2016 Hip Kit Reveal went up on the Blog yesterday!  Here's a look at what you will find in the June Kits.

HIP KIT CLUB – JUNE 2016- MAIN KIT
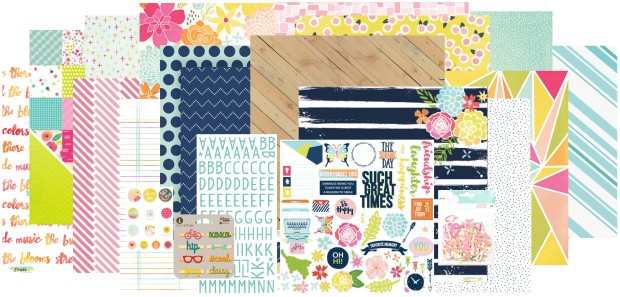
Main
Hip Kit Club Member Price:  $29.95 (requires a 3 month minimum subscription)
CLICK HERE to join!
Individual Kit Purchase Price:  $34.95
Products Included:
  • 1 sheet – HKC Exclusive Paper – Everyday Making Music – designed by Kim Watson
    1 sheet  – HKC Exclusive Paper – Everyday Homegrown Blooms – designed by Kim Watson
  • 1 sheet – HKC Exclusive Paper – Everyday Skipping Through the Park – designed by Kim Watson
  • 1 sheet – HKC Exclusive Paper – Everyday Laughter & Smiles – designed by Kim Watson
  • 1 sheet – Simple Stories – Sunshine & Happiness – Happy Day Paper
  • 1 sheet – Simple Stories – Sunshine & Happiness – High Five Paper
  • 1 sheet – Pebbles – Jen Hadfield – Everyday – Dotted Chevron Paper
  • 1 sheet – American Crafts – Dear Lizzy Happy Place – Darling Daisy Paper
  • 1 sheet – Pink Paislee – Fancy Free – Paper 06
  • 1 pkg. – HKC Exclusive Everyday Day Ephemera – designed by Kim Watson
  • 1 pkg – HKC Exclusive Aqua Puffy Alphabet Stickers – designed by Kimberly Hutchison
  • 1 pkg – Simple Stories – Sunshine & Happiness – Self Adhesive Brads
  • 1 pkg – Jillibean Soup – Fancy Clothes Pins
  • 1 pkg – American Crafts – Dear Lizzy  Happy Place – Watercolor Die Cut Phrases


HIP KIT CLUB – JUNE 2016 – PROJECT LIFE ADD-ON KIT
Project LifeHip Kit Club Member Price:  $29.95 (requires a 3 month minimum subscription)
CLICK HERE to join!
Individual Kit Purchase Price:  $34.95
Hip Kit Club subscribers can purchase individual Project Life Kits for the member price. ($29.95)
Products Included:
  • 21 HKC – Exclusive Project Life Cards – designed by Kim Watson
  • 1 pkg – Simple Stories – Sunshine & Happiness – Enamel Dots
  • 1 sheet – Simple Stories – Sunshine & Happiness – Alphabet & Word Stickers
  • 1/2 pkg – Simple Stories – Carpe Diem  – Clear Stickers
  • 1 pkg – Heidi Swapp – Silver Glitter Puffy Shape Stickers
  • 1 pkg.  – Heidi Swapp – Hello Chipboard Stickers
  • 1 pkg. – Jillibean Soup – Wood Veneer – Today Words


HIP KIT CLUB – JUNE  2016 EMBELLISHMENT ADD-ON KITEmbellishment
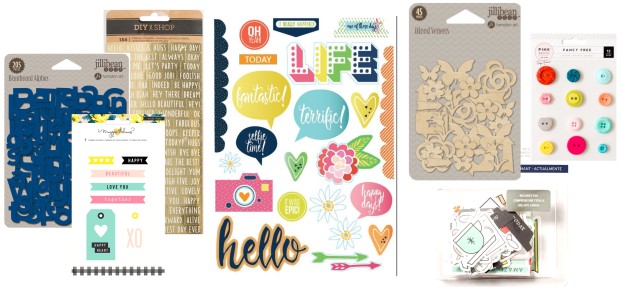
Price:  $29.95*
*Hip Kit Club members receive a 15% off on all Add-On Kit purchases
Products Included:
  • 1 pkg. – HKC Exclusive – Everyday – Puffy Stickers designed by Kim Watson
  • 1 pkg. – Crate Paper – Maggie Holmes Bloom – Rubber Shape Stickers
  • 1 pkg. – American Crafts – DIY Shop – Gold Foil Word Stickers
  • 1 pkg. – Jillibean Soup – Red Raspberry Soup – Wood Veneer Shapes
  • 1 pkg – Jillibean Soup – Navy Thin Chip Beanboard Alphabet
  • 1 pkg. – Pink Paislee – Fancy Free – Decorative Buttons
  • 1 pkg – American Crafts – Project Life – Currently Chipboard Ephemera

HIP KIT CLUB – JUNE 2016 COLOR ADD-ON KIT
Color
Price:  $23.95*
*Hip Kit Club members receive a 15% off on all Add-On Kit purchases
Products Included:
  • 1 HKC Exclusive – Triangle Stencil designed by Kim Watson
  • 1 bottle – Shimmerz – Coloringz – Pink Stilettos vibrant non-shimmering mist
  • 1 bottle – Shimmerz – Coloringz – Mandarin Mai Tai vibrant non-shimmering mist
  • 1 pkg. – Jillibean Soup – Best Day Ever Mini Placemats

HIP KIT CLUB – JUNE 2016 PAPER ADD-ON KIT
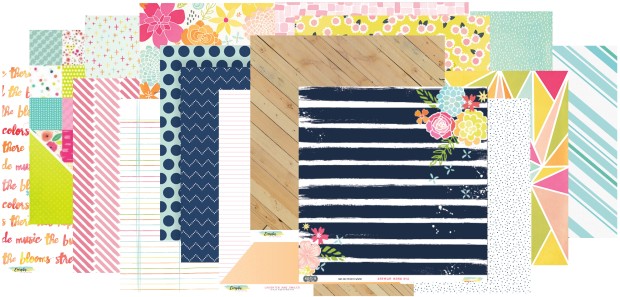
Paper
Price:  $13.95*
*Hip Kit Club members receive a 15% off on all Add-On Kit purchases
Products Included:
  • 1 sheet – HKC Exclusive Paper – Everyday Making Music – designed by Kim Watson
    1 sheet  – HKC Exclusive Paper – Everyday Homegrown Blooms – designed by Kim Watson
  • 1 sheet – HKC Exclusive Paper – Everyday Skipping Through the Park – designed by Kim Watson
  • 1 sheet – HKC Exclusive Paper – Everyday Laughter & Smiles – designed by Kim Watson
  • 1 sheet – Simple Stories – Sunshine & Happiness – Happy Day Paper
  • 1 sheet – Simple Stories – Sunshine & Happiness – High Five Paper
  • 1 sheet – Pebbles – Jen Hadfield – Everyday – Dotted Chevron Paper
  • 1 sheet – American Crafts – Dear Lizzy Happy Place – Darling Daisy Paper
  • 1 sheet – Pink Paislee – Fancy Free – Paper 06

HIP KIT CLUB – JUNE 2016 – CARDSTOCK ADD-ON KIT
Cardstock
Price:  $11.95*
*Hip Kit Club members receive a 15% off on all Add-On Kit purchases
Products Included:
  • 8 sheets – American Crafts – White Cardstock
  • 2 sheets – American Crafts – Lt. Kraft Cardstock
  • 2 sheets – American Crafts – White Vellum
https://www.etsy.com/shop/TheCutShoppe
 

Friday, May 13, 2016

Pink Paislee | Embrace Life

This is a personal blog. All editorial content and projects are intellectual property of ashleyhortondesigns.com. I do receive compensation and material product from Pink Paislee to develop my craft posts, but all ideas and opinions are my own. 

It's Mixed Media week on the Pink Paislee Blog!  Mixed Media can be really fun or really intimidating for some people.  I had a layout on the Blog on Wednesday, that shares a fun technique for expert or beginner Mixed Media users. 


I thought it would be fun to add watercolors to a cut file, and match the watercolors to the Fancy Free collection by Paige Evans.  I started the layout, by cutting the Sassy Circles cut file from The Cut Shoppe, which is a cut and fold design.  I cut the design from White cardstock, and before folding the circles to the front, I painted each one with watercolor paints.  This way, I could paint the circle halves without getting any paint on the front side of the layout.


Once the paint dried, I folded each of the circle halves over and then adding stitching with my sewing machine.  I wanted to balance the circle design at the top of the page, so I punched the fun circles from one of the Fancy Free papers and added them to the bottom portion of the layout.  I also wanted to continue the stitching, so I hand stitched around each of the punched patterned paper circles, with White embroidery floss.


After the background work was finished, I was ready to add my photo and embellishments.  I wanted to keep the photo and embellishments clustered, to keep from covering up too much of the background.  I also chose to do a Black & White photo, because I really love the contrast with the bright colors from the Fancy Free collection.  


I hope you will give this watercolor technique a try on your next layout!  It's fun and easy to coordinate your watercolors with a scrapbook collection, and create a unique Mixed Media look!

https://www.etsy.com/shop/TheCutShoppe

Tuesday, March 22, 2016

Crate Paper | You Are Loved Little One

This is a personal blog. All editorial content and projects are intellectual property of ashleyhortondesigns.com. I do receive compensation and material product from Crate Paper to develop my craft posts, but all ideas and opinions are my own.

My kids have moved beyond the baby stage (thank goodness), but I just had to use the Little You Boy collection from Crate Paper, with one of their baby photos.  I had a chance to use the Little You Girl collection last month, so I wanted to switch it up to the boy collection this month.

   
I wanted to do something different with the title on this layout, so I drew it out with the Silhouette Sketch pens on my Cameo.  Then I stitched over the lines, using an embroidery floss color that coordinated with the colors in the Little You collection.


Since the title was placed on a tilt, I had the perfect spot to add my photo.  I love the cute little clips that are included with the collection, and just had to add the fox to my photo...though anyone of them would have been perfect.  


I kept the embellishing to a minimum, because I wanted the focus to be on the title.  So I placed a few embellishments from the Little You Ephemera Pack and Chipboard sheet in a diagonal design on the layout.


I waited to add the watercolors to the title, once I had everything else on the layout finished.  Sometimes when you add a wet medium, it can make it more difficult to add your embellishments, because of the mixed media warping of the paper.  I love the look of the matching watercolors and embroidery floss, and the pop that the colors add to the softer colors in the collection!

And these collections can also be adapted for everyday layouts, or to go with photos of older children.  It's always fun to challenge yourself to use a collection, in a different way!

Supplies:  Little One (680370), Chipboard Stickers (680388), Accent Stickers (680392), Embellishments (680396), 6x6 Paper Pad (680384), Clips (680400), Ephemera Pack (680390), Acrylic Stamps (680399)


https://www.etsy.com/shop/TheCutShoppe

Wednesday, November 18, 2015

A Flair for Buttons | Selfie Smiles

This is a personal blog. All editorial content and projects are intellectual property of ashleyhortondesigns.com. I do receive compensation and material product from A Flair for Buttons and American Crafts to develop my craft posts, but all ideas and opinions are my own.

You can't go wrong with Gold!  It matches everything, and that's why I decided to use the LOVE Gold Foil Flair set from A Flair for Buttons on the layout I'm sharing today.  I wanted to incorporate the Flair Buttons into my background design, so I cut the All Heart cut file from The Cut Shoppe on White cardstock.  Then I backed each section of the hearts with various patterned papers from the Finders Keepers collection from Amy Tangerine.


Before adding the Flair Buttons and embellishments, I machine stitched through each row of hearts.  Then I placed my photo in the center of the die cut.  Once the photo was in place, I added the Flair, spacing them out around the heart die cut.  I wanted the Flair Buttons placed on the larger hearts on the outside edges of the die cut, to leave room for smaller embellishments toward the center of the die cut.


I decided to place the title close to the photo, to avoid covering a lot of the background detail.  I chose coordinating Thickers from the Finders Keepers collection for the title.  As a finishing touch to the layout, I stamped the plus sign from the Finders Keepers stamp set in Black ink, in some of the White space of the die cut.  Then I used matching water colors, to add color to the stamped images.


Whether you're looking for Flair Buttons that will match any theme or color scheme, or if you're looking for a specific set to fit your needs, the A Flair for Buttons shop has just what you need!  Stop by for a visit and check out all of the great designs, including the LOVE Gold Foil Flair, I used on today's layout!

https://www.etsy.com/listing/237987944/love-gold-foil-flair?ref=shop_home_active_2


Supplies:  Flair Buttons:  A Flair for Buttons; Patterned Paper, Thickers, Enamel Dots, Flair, Stamp Set & Bits:  American Crafts; Wood Veneers:  Studio Calico; Phrase Stickers:  Tim Holtz; All Heart Cut File:  The Cut Shoppe; Die Cut Machine:  Silhouette Cameo 


https://www.etsy.com/shop/TheCutShoppe

Thursday, October 8, 2015

Hip Kit Club | Fabulously Fallish

This is a personal blog. All editorial content and projects are intellectual property of ashleyhortondesigns.com. I do receive compensation and material product from Hip Kit Club to develop my craft posts, but all ideas and opinions are my own.

The October 2015 Hip Kit & Add-On Kits from Hip Kit Club landed on my doorstep this past weekend, so Fall can officially begin!  There are so many fun Fall goodies in this month's Kits, and I am kind of giddy since Fall is my favorite season.  Granted, sometimes Fall just kind of passes us by down here in the south, but I'm determined to enjoy any little bit of it.  While I was out enjoying the nice weather this past Saturday, a squirrel was visiting and snacking on some flowers.  I snapped a few photos of him and knew I wanted to use the picture on my first layout this month!


I started the layout by layering a couple of cards from the October 2015 Project Life Kit behind my photo.  Before adding the photo to the background paper from the October 2015 Main Kit, I used a brown pen to trace the plus sign design from the stencil included in the October 2015 Color Add-On.  Then I cut a few leaves on my Silhouette Cameo, and added coordinating water colors to the background paper, before stitching the leaves down.


I used a mix of the Evalicious Navy Puffy Alphabet Stickers and Dear Lizzy Thickers from the Project Life and Main Kits for my title.  I always love to mix typography in my titles.  And the mix of embellishments from the October 2015 Embellishment Kit, Project Life Kit and Main Kit, were perfect for adding the finishing touches to my layout!


I can't wait to get started on more layouts, with this month's Kits!  And we also have new Cut Files and Printables to go along with the Kit this month.  Make sure you visit the Hip Kit Club Website and sign up for a FREE account to have access to each month's downloads!

https://www.etsy.com/shop/TheCutShoppe

Friday, September 25, 2015

Illustrated Faith | Journaling Bible

This is a personal blog. All editorial content and projects are intellectual property of ashleyhortondesigns.com. I do receive compensation and material product from Illustrated Faith to develop my craft posts, but all ideas and opinions are my own.

It's been busy around the Blog, but I was up last week with two post on the Illustrated Faith Blog and wanted to share them here, too!  There are so many new stamps and products to play with in your Journaling Bible or your layouts, so make sure you visit the Illustrated Faith Etsy Shop to check them out!

Matthew 5:13

It's always great to hear a sermon on a verse or chapter you're pretty familiar with.  I think God always has something new for us to hear, no matter whether it's a Scripture or story we've heard 50 times or more. 

Several weeks ago our Pastor's sermon was on Matthew 5:13, "You are the salt of the earth, but if salt has lost it's taste, how shall its saltiness be restored?  It is no longer good for anything except to be thrown out and trampled under people's feet."  I have heard this verse countless times through other sermons, Sunday School, camps, Vacation Bible School...you name it, I've heard it.


As I was taking notes, one of the points Pastor Chris shared during the sermon, was "Don't let your inability to do everything, keep you from doing something."  This really stood out, because a lot of times I feel like it's impossible to accomplish anything for God, because I can't possibly change everything.  But this message reminded me that I don't have to change everything.  Any little bit of what I do for God counts.  It's worth something. 

And I think, right now, Illustrated Faith is my something.  Being a stay at home mom, I don't always have a lot of interaction outside of my crazy kids!  And when you ask God for opportunities to share with others, He always brings those opportunities to you, despite your circumstances.  God is funny that way!!  I'm glad He put this in my path and the chance to get to know and share with so many Ladies all around the world, some who I may have the chance to meet one day and some that will just continue to be my internet friends.  


I hope God shows you what your something is, and that you can be the salt to those around you!

Supplies:  Homespun Alpha Stamp Set, Whatever Is Lovely Stickers, Wordfetti White Stickers, Genesis Kit, Send Me Stamp Set, Watercolors, Washi Tape, You Rule Bible Mat 


_________________________________________________

Psalm 23


It's funny where inspiration comes from, or what God might use to just send you a little message here or there.  When I received my newest happy mail from Illustrated Faith it included the Explore Stamp Set.  I'm not a big stamper, but the mountain image in the set kept calling my name, so I knew I wanted to use it.


I recently read The Road to Becoming by Jenny Simmons, former lead singer of Addison Road.  She talked about difficult moments that happened in the life of the band and her family, which led her to a place of feeling lost in God's plan.  Spiritually, none of us want to be in the desert, the valley, the wilderness.  It's a place we feel lonely, scared, trapped and forgotten.  We want to be back on the mountain ASAP, where God has something awesome in store for us.

But when I am in the valley, I tend to forget that God isn't waiting for me on the mountain top.  He's right there with me in the valley.  And if I spent more time listening to Him, than worrying about trying to get out of the valley, I might actually hear and learn something from God.  Our time in the valley can change us, grow us and teach us.  Psalm 23 is God's comfort to us, when we are in the valley.  He is our Shepherd, our Restorer, and our Comforter. 


Sometimes I think the mountain top can be more dangerous for Christians, than the valley.  The mountain top can become comfortable, and we forget to depend on God.  And that's when a trip to the valley slaps us in the face!  If we are depending on God on the mountain top, the walk through the valley might not be so hard.  It doesn't mean that there won't be hard things to face, but knowing that Jesus is there with us, gives us hope of seeing the mountain top at the end of the journey.

Supplies:  You Rule Bible Mat, Explore Stamp Set, Wordfetti White, Mini Olive You, Typed Practice What You Peach, Mini Mint to Be, Mini Bless Her Heart, Big & Bold Black Eyed Pea, Genesis Kit,
Watercolors

https://www.etsy.com/shop/TheCutShoppe

Wednesday, September 23, 2015

American Crafts | Watercolor Wall Art

This is a personal blog. All editorial content and projects are intellectual property of ashleyhortondesigns.com. I do receive financial compensation and material product from American Crafts to develop my craft posts, but all ideas and opinions are my own.

It's Watercolors Week on the American Crafts Blog and I created a custom wall decor piece, using a set of watercolor paints along with some of my American Crafts products.  This is a quick and easy project and can be customized for any room in your home!


How to:

1.  Grab a 12x12 piece of American Crafts White cardstock and a set of watercolors.  You could also use watercolor paper, if you are worried about the watercolors causing wrinkling on your paper.


2.  Before adding the watercolors to your background paper, use the Silhouette Cameo sketch pens to draw a large heart on your cardstock or watercolor paper.  If you don't have a Cameo, you can trace a printed heart shape or free hand your own heart shape.

 
3.  After you have the heart shape drawn, start adding the watercolors to your background.  I used a rainbow color scheme and a wide brush for the watercolors.


4.  Once the watercolor paint is dry, use a paper piercer to punch holes around the heart shape. I space the holes at around 1/4 inch.   


5.  Next choose an embroidery floss color and back stitch around the outline of the heart shape.

 
6.  After you have finished stitching around the edge of the heart, create a string art look, stitching from one hole to another on the heart shape.  I used 6 different embroidery floss colors to create the string art effect.


7.  Once you have finished the string art stitching, use a mix of Thickers and embellishments from Dear Lizzy and Finders Keepers to create a sentiment for your watercolor wall art!

 
Now you're ready to find the perfect spot in your home, for your custom wall art! 


Supplies:  Finders Keepers (340234) - Today Thickers, Finders Keepers (340243) - Printed Cardstock and Acetate Shapes with Gold Foil, Documentary (340199) - Snapshots Thickers, Documentary (340207) - Wood Buttons, Documentary (340204) - Die Cut Cardstock Shapes, Dear Lizzy (370086) - Woodland Thickers 


https://www.etsy.com/shop/TheCutShoppe

Friday, August 21, 2015

Illustrated Faith | John 3:16

In my last post on the Illustrated Faith Blog, I created a layout using the Bella Blvd. Whatever Is Lovely collection, and talked about child like faith.  And that post kind of led me to what I wanted to do for today's post!  Almost all of us that attend Sunday School as a child, learn John 3:16.  And I think I sometimes think of that verse as a "children's verse", but when you focus on it, it's the whole foundation of what we as Christians believe and what we are continually told throughout the Bible.


I wanted to use some of the Whatever Is Lovely 3x4s, to create a little flip book at the beginning of my Bible.  I started with the True Love card, and added some of the Say It stickers to add John 3:16 to the first card.  I thought having something like this at the beginning of my Bible would be a fun idea.  I have a focus verse on the "cover" of my flip book and then I have a few blank cards and the backside of the cards, that can later hold other verses or notes.


The flip book would be great for any of the pages in your Bible, that have White space.  You could use it for notes, prayers, or just to add some of your favorite verses. 

Supplies:
Bella Blvd. Whatever Is Lovely
Say It Stickers
Books of the Bible Little Bits
One & Only Stamp Set
You Rule Bible Mat
Sweet Cherry Color Shine
Watercolors


https://www.etsy.com/shop/TheCutShoppe