Showing posts with label Heidi Swapp. Show all posts

Wednesday, June 15, 2016

Hip Kit Club | Live Colorfully

This is a personal blog. All editorial content and projects are intellectual property of ashleyhortondesigns.com. I do receive compensation and material product from Hip Kit Club to develop my craft posts, but all ideas and opinions are my own.

I'm stopping in today, to share my first layout with the June 2016 Hip Kits from Hip Kit Club!  I wanted to use our June Sketch for this first layout. The circle design went along perfectly with the cut file I designed for this month. I cut the design from White cardstock included in the June 2016 Cardstock Add-On and backed each one with patterned paper from the June 2016 Main Kit. I used a mix of Pink Paislee, Simple Stories and Pebbles Inc. patterned papers behind the cut files.


Once the cut files were backed and machine stitched, I added them to one of the Hip Kit Club Exclusive papers for my background. There are so many fun embellishments in the June Kits, and I loved using them to finish the layout. The Dear Lizzy Die Cut Watercolor Phrases in the Main Kit, worked perfectly for my title. The rest of my embellishments came from the June 2016 Embellishment Kit and the June 2016 Project Life Kit. I love the different textures created by the Simple Stories enamel dots, Jillibean Soup wood veneers, Heidi Swapp and Fancy Free buttons.


Once I finished all of the embellishing, I covered my photo, and added some splatters of Black spray mist with Color Shine from my stash. I had so much fun on my first layout with the June Kits and the June Sketch!


You can play along with our Weekly Challenge going on through Thursday, using the June Sketch as inspiration. Check it out in the Hip Kit Club Member Forum!


https://www.etsy.com/shop/TheCutShoppe
   

Thursday, December 17, 2015

Hip Kit Club | Seriously Cheeky

This is a personal blog. All editorial content and projects are intellectual property of ashleyhortondesigns.com. I do receive compensation and material product from Hip Kit Club to develop my craft posts, but all ideas and opinions are my own.

It's time to share a new layout with the December 2015 Hip Kit & Add-On Kits from Hip Kit Club!  I thought it would be fun to use some of the products in the December Color Add-On Kit for my layout.  I started out, by coloring the Heidi Swapp Watercolor Words with the Shimmerz Golden Wheat paint.  I just dipped the tip of my finger into the Shimmerz paint and added it to the Watercolor Words, then I set them aside to dry, while I worked on the rest of my layout.


I chose the Maggie Holmes frame paper for my background.  I just love all of those cute frames.  Lots of room for adding patterned paper and embellishments!  I used the Maggie Holmes 6x6 Paper Pad included in the December 2015 Embellishment Kit to cut several patterns that I could add to some of the frames.  Then I stitched around 4 of the frames, that had pre-printed phrases, with different colored embroidery floss.


By this time, the Heidi Swapp Watercolor Words were dry, and I used "Seriously" and "Cheeky" for my title.  Then I placed "Shine" and "Beautiful" around the layout to create a visual triangle.  This helps draw the eye around the layout and down to my photo, which I added to one of the bottom frames.  I finished the layout by adding some of the Maggie Holmes Chipboard and Wood Veneer pieces from the December 2015 Main Kit.


I can't wait to work on some more layouts this month, with the December Kit!  There's so much included, I just want to use all of it!  And if the December Kits aren't fabulous enough, now we've got the January 2015 Kits to look forward to!  They were revealed on the Hip Kit Club Website yesterday, so make sure you stop by to check them out!  You won't be disappointed!

 
https://www.etsy.com/shop/TheCutShoppe

Friday, November 6, 2015

Hip Kit Club | Perfect Pumpkins

I have another layout to share with you today, using the gorgeous October 2015 Hip Kit & Add-On Kits from Hip Kit Club!  I wanted to create a fun background element on this layout, and mix in several patterned papers from the October 2015 Main Kit.  I designed the background in Silhouette Studio, and worked on putting it together before adding my photo and other embellishments.


Once I had the background finished, I placed my photo and the embellishment cluster to the right, using some of the Simple Stories wood veneers included in the Main Kit and one of the Pink Paislee arrows from the October 2015 Embellishment Kit.  I also layered one of the Project Life cards from the October 2015 Project Life Kit, behind my photo, because the "such a good time" sentiment was perfect with my photo.


I liked that my photo had a good bit of White space at the top, and I used it to place my title.  This is a great way to keep your title from getting lost in the background, if you have a busy background pattern.  I wanted to include several embellishments from the Kits, so I placed a few more wood veneers from Simple Stories, Bits & Ephemera from Pink Paislee and Pebbles Inc., and enamel dots from Heidi Swapp around the layout.


To finish off the layout, I added a bit of machine stitching to a few of the embellishments.  I love the extra texture that stitching adds to a layout!

I also have a Process Video to go along with my layout, if you would like to check it out!


And now, it's time to be on the look out for the November 2015 Hip Kit & Add-On Kits!  If you're a subscriber, they'll be coming your way soon!  If you have subscribed yet, make sure you visit the Hip Kit Website and sign up today!

Thursday, October 22, 2015

Hip Kit Club | Hello Fall

This is a personal blog. All editorial content and projects are intellectual property of ashleyhortondesigns.com. I do receive compensation and material product from Hip Kit Club to develop my craft posts, but all ideas and opinions are my own.

Give me some Fall themed papers/embellishments, photos and cut files and I am a very happy scrapper!  I am still going strong with the October 2015 Hip Kit & Add-On Kits, from Hip Kit Club. For today's layout, I wanted to incorporate some of the Hip Kit Club cut files, and used the background cut file I created and some of the cute leaves from one of Kim Watson's cut files!


I started by cutting the background cut file from White card stock from the October 2105 Cardstock Add-On.  Then I layered it over one of the Amy Tangerine patterned papers.  Before machine stitching, I cut some of the background words from one of the Jen Hadfield papers and then placed them in the negative spots.  I really liked the mix of typography this added in the background.

 
Once I had the background completed, I added my photo and started layering embellishments from the October 2015 Main Kit, October 2015 Embellishment Kit and the October 2015 Project Life Kit.  I wanted to keep my photo and embellishments clustered in the center of the layout, to keep from covering a lot of the background work.  


I wanted to also incorporate some of the other cut files, included with this month's Kits.  I separated one of the leaf shapes from the fun Fall wreath cut file, created by Kim Watson.  Then I cut them from two different colors of card stock, included in the October 2015 Cardstock Add-On Kit.  Once the leaves were cut, I ran them through my sewing machine, to get a bit of added texture. 

I've still got more in store, using the October 2015 Hip Kit & Add-On Kits, so make sure you keep checking in on the Blog and Facebook page!  And we've got some awesome Kits coming up!  Make sure you head over to the Hip Kit Website to check out the November Hip Kit & Add-On Kits and keep an eye out for the upcoming December Daily Kit!

https://www.etsy.com/shop/TheCutShoppe

Thursday, July 9, 2015

Hip Kit Club | Just Keep Swimming

This is a personal blog. All editorial content and projects are intellectual property of ashleyhortondesigns.com. I do receive compensation and material product from Hip Kit Club to develop my craft posts, but all ideas and opinions are my own.

As soon as the July 2015 Hip Kit & Add-On Kits, arrived on my doorstep, I had to get it open and sorted!  And then I immediately started on my first layout!!  I just couldn’t wait to use all of those new goodies.  There is always one paper every month, that catches my eye and this month it was the Sunshine paper from October Afternoon, included in the July 2015 Main Kit and the July 2015 Paper Add-On Kit.  I really love the burst pattern, and decided to machine stitch down each row.  After I finished my stitching, I used the Abandoned Coral Distress Paint from the July 2015 Color Add-On Kit to add some splatters to the background.  I added some of the Distress Paint to plastic packaging and then used a brush with a little bit of water, to pick up the color and splatter it on the background.


I layered two photos over the fun cards included in the July 2015 Project Life Kit, and placed them in the center of the burst pattern.  I also used the Heidi Swapp wood veneer arrows, included in the Project Life Kit, to point toward the photos.  I decided to add the title to the right of my photos and I used a mix of the October Afternoon Letter Stickers and AC Thickers, from the Main Kit and the Project Life Kit.


I finished the layout, by adding several die cut hearts, cut from the Crate Paper Poolside paper.  Once the hearts were placed on the layout, in a scattered look, I added machine stitching down the center of each one.  I also printed my journaling on White cardstock and cut it into strips to add below the photos.


If you haven’t had a chance to get the July 2015 Hip Kit & Add-On Kits, make sure you visit the Hip Kit website to pick them up!  And if you become a new Subscriber, you will receive a FREE Paper Add-On with your Subscription!  Just use the Code ashley, when you sign up for your subscription!

Paper_Ashley

https://www.etsy.com/shop/TheCutShoppe

Monday, May 4, 2015

Hip Kit Club | You're Cute Indeed

Over the weekend, Hip Kit Club, hosted a National Scrapbook Day in the Facebook Member Forum.  The Design Team has been posting fun challenges all weekend!  I was up with my challenge yesterday afternoon, and wanted to stop in and share the layout I created for my challenge, Stitching!


I created some hand-made star embellishments, by tracing various size stars, poking holes with a paper piercer, and stitching with White embroidery floss.  I also added machine stitching down the center of each of the stars.

I also have a new Process Video to go along with my layout!


There is still time to play along with this weekend's challenges!  You can visit the Hip Kit Club Member Forum on Facebook and find all of the challenge albums under photos.  Layouts must be added to the coordinating challenge album by midnight, Tuesday, May 5th.  Winners will receive a $10 Gift Certificate to the Hip Kit Club Online Shop and winners will be announced on Thursday, May 7th.

We also have a FREE Cut File set available for download in the Facebook group, so make sure you stop by to download it!

https://www.etsy.com/shop/TheCutShoppe?show_panel=true

Thursday, April 30, 2015

Hip Kit Club | Just For Fun

Do you ever know exactly what product you want to use, but just can’t figure out how to place it on the page?  That’s exactly what happened with the layout I’m sharing today, using the April 2015 Hip Kit & Add-On Kits.  I had all of the product on my desk, and moved it around on the page three times, before I finally decided on my final design.


There was one simple technique, that made the light bulb go off, and that was adding some Yellow in the background using the Prima watercolor pencils, included in the April 2015 Color Add-On.  That pop of color gave me a base layer for adding my photo and embellishments and everything fell into place from there.  I just used the Yellow pencil to draw on the White cardstock, from the April 2015 Cardstock Add-On Kit, and added some water to my brush to blend it.


So next time you are feeling stuck on a design, don’t give up.  There could be that one idea that totally turns around the page design for you!!

https://www.etsy.com/shop/TheCutShoppe?show_panel=true

Thursday, April 23, 2015

Hip Kit Club | You Make Me Smile

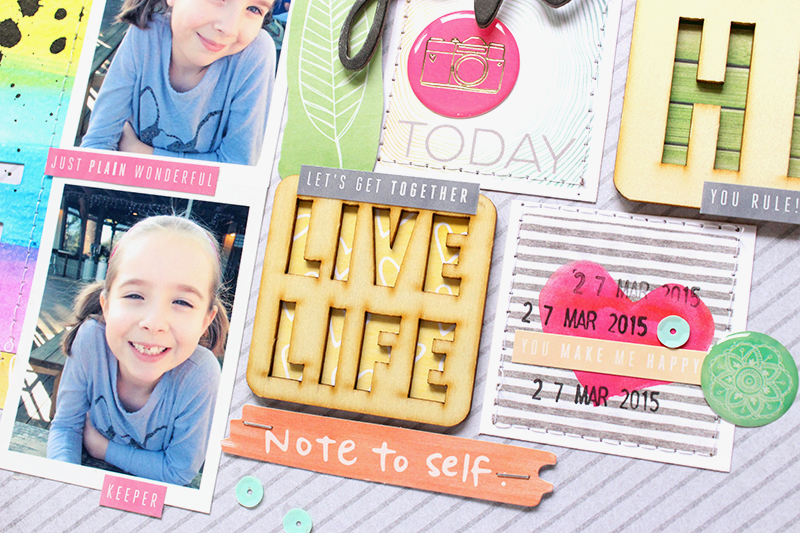
It's Thursday, and that means it's time to share a new layout for Hip Kit Club, using the April 2015 Hip Kits & Add-On Kits.  I like to call this layout “basic, with controlled Mixed Media”!  HA!  If you’re interested in Mixed Media, but are worried about trying it directly on your layout, this is a great way to get comfortable with it.  I used one of the Heidi Swapp watercolor papers included in the April 2015 Color Add-On Kit, with the Prima watercolor pencils.  This technique lets you get creative with Mixed Media, but gives you the option of using it off the page and then adding it to your layout.


I used the watercolor pencils on the HS watercolor paper to create a rainbow look.  This is super simple!  Just color across the paper with the watercolors and then use a brush and water to spread the color!  Easy peasy, lemon squeezy!  Once the watercolor dried, I adhered the card to my background paper and machine stitched around the edges.


And adding the card, gave me a great base for the rest of my page design.  I decided to do a photo strip down the center of the layout, and then create a fun embellished look on the opposite side of the layout.  The Heidi Swapp Wood Veneers in the April 2015 Project Life Kit were perfect for the grid design that I wanted to create to the right of my photos.  I mixed in some of the patterned paper squares cut from the Webster’s Pages What A Day patterned paper included the April 2015 Embellishment Kit.  And, of course, I had to add some Black Color Shine splatters, once I completed the layout!  I love the contrast of the Black ink layered over the bright watercolors!

So if you’re thinking about trying Mixed Media, make sure you check out the monthly Color Add-Ons!  You definitely won’t be disappointed.  There are lots of fun ways to use the products, and when you receive stencils, mists or paint daubers you get a great value, because they can be used multiple times or last for a while!

https://www.etsy.com/shop/TheCutShoppe?show_panel=true

Thursday, April 16, 2015

Hip Kit Club | Puppy Love

I’m here today to share two new layouts with you, using the April 2015 Hip Kit & Add-On Kits.  You can probably tell from the title of my post, that these layouts will include some puppy photos!  I love that you can basically scrap any photo you want, with each month’s Hip Kit.  Every day photos are my favorites to scrap, and the Hip Kits always have just the right mix of products for creating the perfect layout.
 
First up, is a layout using a banner design across the top of the layout.


This layout was really easy to put together.  I used a mix of the patterned papers included in the April 2015 Main Kit, along with embellishments from the April 2015 Embellishment Kit.  I started out by cutting some of the patterned papers into banner shapes, and adding in a couple of tags from the Amy Tangerine Bits pack included in the Main Kit.  Once I had all of the papers in place, I stitched along the top with my sewing machine.  I created my title with a mix of Thickers from the Main Kit and the Embellishment Kit, and finished the layout by adding some chipboard pieces, epoxy stickers and word phrase stickers.

I have a new Process Video to go along with this layout, and I would love for you to check it out!


My second layout, is based on a previous design that I’ve worked with and loved!  There’s definitely not anything wrong with repeating a design, if you love it.  Like they say, if it ain’t broke, don’t fix it!


I knew I wanted to start out with the fun Claire patterned paper from Amy Tan, that’s included in the April 2015 Main Kit and the April 2015 Paper Add-On Kit.  I loved all of the colors it included, and knew it would work well with all of the embellishments in this month’s Kit.  I cut the paper to a point and added it to the White cardstock, that’s included in the April 2015 Cardstock Add-On Kit.  I also wanted to add another look to the patterned paper, so I stamped with the Diamond border stamp from the Elle’s Studio set, included in the April 2015 Color Add-On Kit.  Then I completed the layout design, by adding my photo to the center of the page, and angled my title along the lines of the patterned paper.

This month’s Kit is filled with lots of great colors, and I love how they all mix together!  If you didn’t get a chance to pick up the April Hip Kits, then make sure you stop by the Shop to get yours!

https://www.etsy.com/shop/TheCutShoppe?show_panel=true

Thursday, April 9, 2015

Hip Kit Club | My Happy Place

I’m stopping in today to share my first layout with the April 2015 Hip Kit & Add-On Kits!  The colors in this month’s Kits are so bright and fun…perfect for a beach photo!  I had to have the April Color Add-On Kit, because I wanted to try out the Prima Watercolor Pencils.  And they worked great on the Heidi Swapp Die Cut Watercolor Paper!


I thought the HS Die Cut Watercolor Paper, would be perfect for my title and also as a focal point for adding my photo.  Before I adhered it to the Cienna patterned paper, that I used for my background, I used the Prima Watercolor Pencils to add some Pink and Yellow to the Die Cut.  Then I placed the Die Cut in the center of the background and stitched across the phrase.


I wanted to continue the Pink and Yellow color scheme, so I chose embellishments and Thickers from the Main Kit and the Embellishment Add-On Kit.  I framed my photo with the large Yellow chipboard frame from the Rise & Shine collection from Amy Tangerine, and added several embellishments from the Bits and Chipboard pieces, also from the Rise & Shine collection.  After I had everything in place, I added some splatters of Black Color Shine to contrast the minimal color scheme.


I can’t wait to create some more layouts with this month’s kit!  There are so many different options, with the various patterned papers and fun embellishments!  If you haven’t had a chance to get your April Kits, make sure you stop by the Shop to check them out.

https://www.etsy.com/shop/TheCutShoppe?show_panel=true

Thursday, March 12, 2015

Hip Kit Club | Card Duo

Due to some weather delays, the post office had a little trouble getting my March Hip Kit from Hip Kit Club to me, in time to create a layout with the new kit.  But never fear, I still had plenty of goodies in my February 2015 Hip Kit, and used some left over bits and pieces to create a card duo!


The cardstock sheets from the February Cardstock Add-On, are perfect for creating a base for your cards.  I used one of the kraft pieces for this card, and used a mix of My Mind’s Eye products and Evalicious products.  The MME rub-on worked perfectly over the cardstock, to create part of the sentiment for my card.


You can create unique background looks for your cards using the Heidi Swapp Washi Tape included in the February 2015 Embellishment Kit.  I tore several strips from one of the rolls and layered it over one of the patterned papers from the We R Memory Keepers 6×6 Paper Pad, that came in the Embellishment Kit, too!

So if you’re like me, and just can’t throw away those little paper scraps, try whipping up some quick cards, once you reach the end of your kit!

https://www.etsy.com/shop/TheCutShoppe?show_panel=true

Thursday, February 19, 2015

Hip Kit Club | Blowin' Kisses

Today I'm stopping in to share a new layout and Process Video with you, for Hip Kit Club!  This is my third layout for the month, using the February 2015 Hip Kit & Add-On Kits.  And I still have a ton of product, to make a lot more layouts!  

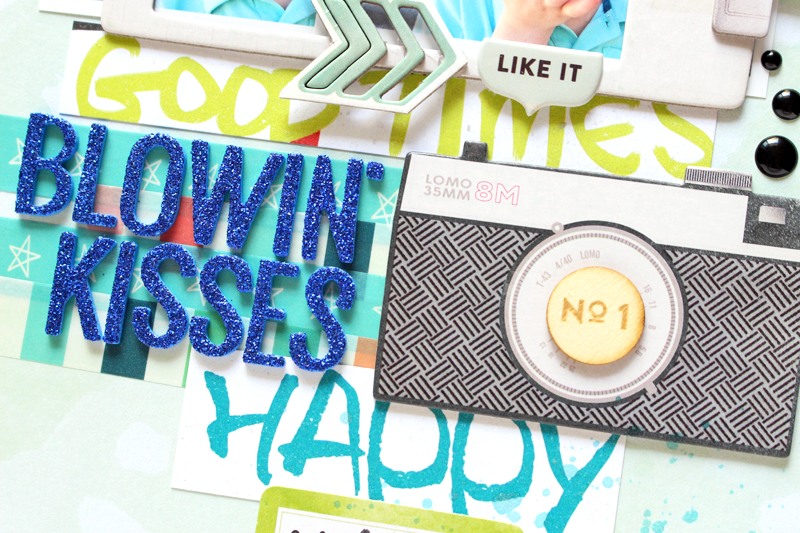
One of my favorite things about each month’s Hip Kit, is the variety of ways you can use the products and the different looks you can create on your layouts.  We have two daughters and a son, so I like using product that can be used for feminine and masculine layouts.  So this week, I used some of the Blues, Greens and Blacks from the Kit to create a masculine layout.


I’ve been holding on to the Wild Berry paper from MME, trying to decide how I wanted to use it.  So I thought it would be fun to cut out some of the words, and layer them in the background on my layout.  And that Teal color picked up the color of our son’s shirt in the photos!   I wanted to overlap the photos just a bit, and then I layered the chipboard frame over them and embellished around the photos with some of the Evalicious, MME and Crate Paper goodies.


I really love the dimension that the Crate Paper Chipboard adds to your layouts.  The big camera worked perfectly next to my title, using the American Crafts Thickers.

If you would like to see more on this layout, check out my newest Process Video.


There are so many ways you can use your Hip Kits, so look for ways to make the most out of your Kit.  And if you haven’t checked out the March Kit reveal yet, make sure you visit the Shop, and get yours before they’re all sold out!!

Here's a look at what you'll find in the March Kits!


https://www.etsy.com/shop/TheCutShoppe?ref=ss_profile