Over the weekend, Hip Kit Club, hosted a National Scrapbook Day in the Facebook Member Forum. The Design Team has been posting fun challenges all weekend! I was up with my challenge yesterday afternoon, and wanted to stop in and share the layout I created for my challenge, Stitching!
I created some hand-made star embellishments, by tracing various size stars, poking holes with a paper piercer, and stitching with White embroidery floss. I also added machine stitching down the center of each of the stars.
I also have a new Process Video to go along with my layout!
There is still time to play along with this weekend's challenges! You can visit the Hip Kit Club Member Forum on Facebook and find all of the challenge albums under photos. Layouts must be added to the coordinating challenge album by midnight, Tuesday, May 5th. Winners will receive a $10 Gift Certificate to the Hip Kit Club Online Shop and winners will be announced on Thursday, May 7th.
We also have a FREE Cut File set available for download in the Facebook group, so make sure you stop by to download it!
Showing posts with label Webster's Pages. Show all posts
Monday, May 4, 2015
Thursday, April 30, 2015
Hip Kit Club | Just For Fun
Do you ever know exactly what product you want to use, but just can’t figure out how to place it on the page? That’s exactly what happened with the layout I’m sharing today, using the April 2015 Hip Kit & Add-On Kits. I had all of the product on my desk, and moved it around on the page three times, before I finally decided on my final design.
There was one simple technique, that made the light bulb go off, and that was adding some Yellow in the background using the Prima watercolor pencils, included in the April 2015 Color Add-On. That pop of color gave me a base layer for adding my photo and embellishments and everything fell into place from there. I just used the Yellow pencil to draw on the White cardstock, from the April 2015 Cardstock Add-On Kit, and added some water to my brush to blend it.
So next time you are feeling stuck on a design, don’t give up. There could be that one idea that totally turns around the page design for you!!
There was one simple technique, that made the light bulb go off, and that was adding some Yellow in the background using the Prima watercolor pencils, included in the April 2015 Color Add-On. That pop of color gave me a base layer for adding my photo and embellishments and everything fell into place from there. I just used the Yellow pencil to draw on the White cardstock, from the April 2015 Cardstock Add-On Kit, and added some water to my brush to blend it.
So next time you are feeling stuck on a design, don’t give up. There could be that one idea that totally turns around the page design for you!!
Thursday, April 23, 2015
Hip Kit Club | You Make Me Smile
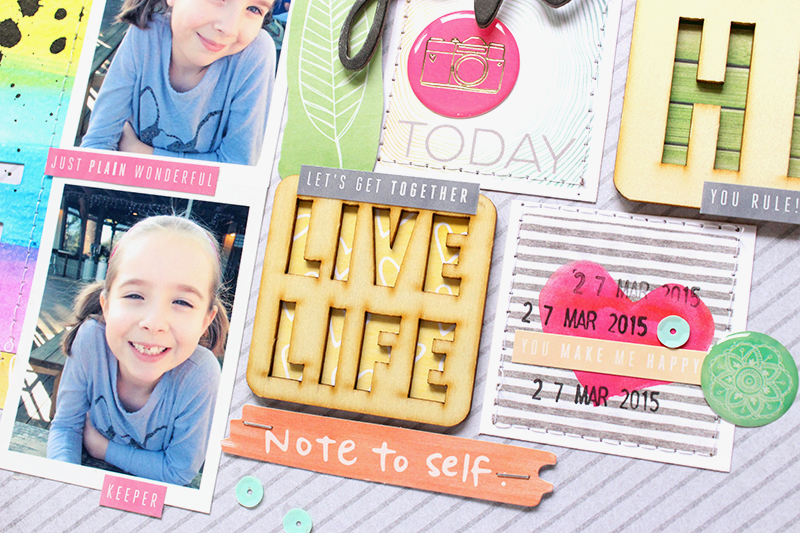
It's Thursday, and that means it's time to share a new layout for Hip Kit Club, using the April 2015 Hip Kits & Add-On Kits. I like to call this layout “basic, with controlled Mixed Media”! HA! If you’re interested in Mixed Media, but are worried about trying it directly on your layout, this is a great way to get comfortable with it. I used one of the Heidi Swapp watercolor papers included in the April 2015 Color Add-On Kit, with the Prima watercolor pencils. This technique lets you get creative with Mixed Media, but gives you the option of using it off the page and then adding it to your layout.
I used the watercolor pencils on the HS watercolor paper to create a rainbow look. This is super simple! Just color across the paper with the watercolors and then use a brush and water to spread the color! Easy peasy, lemon squeezy! Once the watercolor dried, I adhered the card to my background paper and machine stitched around the edges.
And adding the card, gave me a great base for the rest of my page design. I decided to do a photo strip down the center of the layout, and then create a fun embellished look on the opposite side of the layout. The Heidi Swapp Wood Veneers in the April 2015 Project Life Kit were perfect for the grid design that I wanted to create to the right of my photos. I mixed in some of the patterned paper squares cut from the Webster’s Pages What A Day patterned paper included the April 2015 Embellishment Kit. And, of course, I had to add some Black Color Shine splatters, once I completed the layout! I love the contrast of the Black ink layered over the bright watercolors!
So if you’re thinking about trying Mixed Media, make sure you check out the monthly Color Add-Ons! You definitely won’t be disappointed. There are lots of fun ways to use the products, and when you receive stencils, mists or paint daubers you get a great value, because they can be used multiple times or last for a while!
I used the watercolor pencils on the HS watercolor paper to create a rainbow look. This is super simple! Just color across the paper with the watercolors and then use a brush and water to spread the color! Easy peasy, lemon squeezy! Once the watercolor dried, I adhered the card to my background paper and machine stitched around the edges.
And adding the card, gave me a great base for the rest of my page design. I decided to do a photo strip down the center of the layout, and then create a fun embellished look on the opposite side of the layout. The Heidi Swapp Wood Veneers in the April 2015 Project Life Kit were perfect for the grid design that I wanted to create to the right of my photos. I mixed in some of the patterned paper squares cut from the Webster’s Pages What A Day patterned paper included the April 2015 Embellishment Kit. And, of course, I had to add some Black Color Shine splatters, once I completed the layout! I love the contrast of the Black ink layered over the bright watercolors!
So if you’re thinking about trying Mixed Media, make sure you check out the monthly Color Add-Ons! You definitely won’t be disappointed. There are lots of fun ways to use the products, and when you receive stencils, mists or paint daubers you get a great value, because they can be used multiple times or last for a while!
Wednesday, March 4, 2015
Hip Kit Club | Hello Good Stuff
I am currently waiting for the awesome March Hip Kit from Hip Kit Club, and while I'm waiting I thought I would share one more layout using the February 2015 Hip Kit & Add-On Kits! I wanted to add several of the awesome patterned papers from the Kit, onto my layout, so I cut strips and placed them across my page. And instead of doing a 12x12 format this week, I decided to do 8.5x11!
I also wanted to incorporate the gorgeous Gold Thickers from Crate Paper into my design, so I placed them horizontally under my photos to line up with the patterned papers. To add some more interest to my layout, I stitched across each of the patterned papers and added some Black mist splatters. I brought in a little bit more Gold, using some of the Chipboard pieces from the Crate Paper sheet included in the February 2015 Embellishment Kit.
This was a fun layout and I liked doing the 8.5x11 size this week! But I think I'll mostly stick to the 12x12 size, because it gives me lots of room to add all of the awesome goodies that are included in each month's Kits!!
And if you haven't picked up your March Hip Kits yet, make sure you visit the Shop and place your order before they are sold out!
Thursday, February 26, 2015
Hip Kit Club | Enjoy the Journey & Lovely
Today I have not one, but two layouts to share with you for Hip Kit Club!! I thought it would be fun to do something a little bit different this week, so I mixed in a few items that I had left in my January 2015 Hip Kit and some Thickers from the December 2014 Hip Kit. I love how the products fit so easily together and you can extend the life of your kits, by mixing in previous Kits.
I started this layout by cutting frames from the WRMK patterned paper and the Webster’s Pages patterned paper and layering them over White cardstock. Once I had the two patterned papers in place, I used the heart stencil from the January Kit, to add a spray misted heart design on the White cardstock. I wanted to create a large title on my layout, using the American Crafts Thickers and Journey rub-on from the My Mind’s Eye rub-on pack. I embellished using a mix of the Crate Paper Chipboard, Evalicious Wood Veneers and My Mind’s Eye Enamel Dots and then pulled in some of the Heidi Swapp Ephemera and the Wood Veneer Frame from the January 2015 Hip Kits.
For this second layout, I wanted to create a lot of layering and a faux Mixed Media look. The WRMK Secret Crush patterned paper gives you an instant water color look, without having to put a lot of work into it. But I did want to separate my layers and photo from the background paper, so before I added my elements, I added some Black water color paint to the background. Then I built my layers, using some of the papers from the WRMK 6×6 Paper Pad included in the February 2015 Embellishment Kit. To finish my layout I used a few more of the Heidi Swapp Ephemera pieces, Wood Veneer Frame and Elle’s Studio Cork Embellishment from the January 2015 Hip Kits. They worked great with the Crate Paper Chipboard, Evalicious Wood Veneers and My Mind’s Eye Enamel Dots, included in the February 2015 Hip Kits! And the American Crafts Dear Lizzy Thickers from the December 2014 Hip Kit, were perfect for adding a little touch of Gold to my layout!
I also created a Process Video for this second layout, if you would like to check it out!!
Soon you'll be seeing projects with the March 2015 Hip Kit & Add-On Kits, so be on the look out for those!
Thursday, February 19, 2015
Hip Kit Club | Blowin' Kisses
Today I'm stopping in to share a new layout and Process Video with you, for Hip Kit Club! This is my third layout for the month, using the February 2015 Hip Kit & Add-On Kits. And I still have a ton of product, to make a lot more layouts!
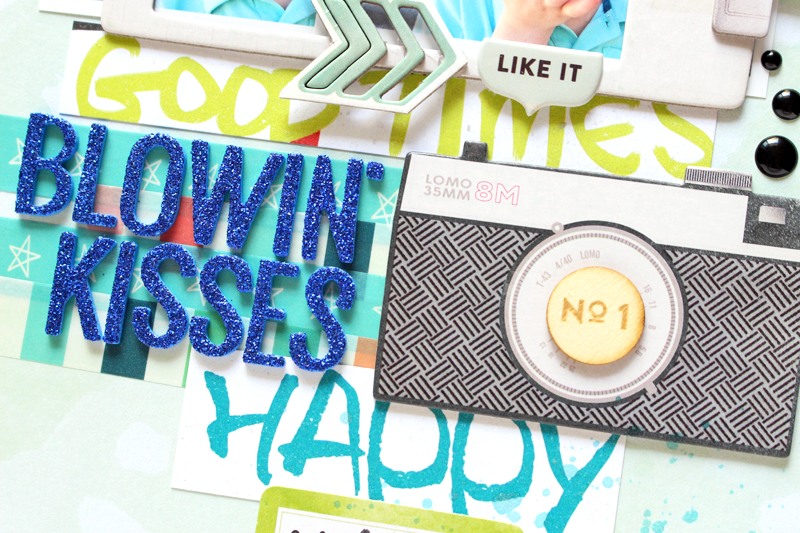
One of my favorite things about each month’s Hip Kit, is the variety of ways you can use the products and the different looks you can create on your layouts. We have two daughters and a son, so I like using product that can be used for feminine and masculine layouts. So this week, I used some of the Blues, Greens and Blacks from the Kit to create a masculine layout.
I’ve been holding on to the Wild Berry paper from MME, trying to decide how I wanted to use it. So I thought it would be fun to cut out some of the words, and layer them in the background on my layout. And that Teal color picked up the color of our son’s shirt in the photos! I wanted to overlap the photos just a bit, and then I layered the chipboard frame over them and embellished around the photos with some of the Evalicious, MME and Crate Paper goodies.
One of my favorite things about each month’s Hip Kit, is the variety of ways you can use the products and the different looks you can create on your layouts. We have two daughters and a son, so I like using product that can be used for feminine and masculine layouts. So this week, I used some of the Blues, Greens and Blacks from the Kit to create a masculine layout.
I’ve been holding on to the Wild Berry paper from MME, trying to decide how I wanted to use it. So I thought it would be fun to cut out some of the words, and layer them in the background on my layout. And that Teal color picked up the color of our son’s shirt in the photos! I wanted to overlap the photos just a bit, and then I layered the chipboard frame over them and embellished around the photos with some of the Evalicious, MME and Crate Paper goodies.
I really love the dimension that the Crate Paper Chipboard adds to your layouts. The big camera worked perfectly next to my title, using the American Crafts Thickers.
If you would like to see more on this layout, check out my newest Process Video.
There are so many ways you can use your Hip Kits, so look for ways to make the most out of your Kit. And if you haven’t checked out the March Kit reveal yet, make sure you visit the Shop, and get yours before they’re all sold out!!
Here's a look at what you'll find in the March Kits!
Thursday, February 5, 2015
Hip Kit Club | Hello Beautiful 9
Hi everyone! Today I'm stopping in to share my first layout with the February 2015 Kit from Hip Kit Club! These kits have so many amazing goodies, it was tough deciding where to start. But the Webster's Pages wood grain paper, was calling my name, so I knew I had to go with it first!
I chose the wood grain paper for a neutral background, because I wanted to work with the My Mind’s Eye Jubilee embellishments, which included a lot of color. The bits from the MME Mixed Bag, were perfect for adding around the rings of the wood grain design.
Thanks for taking a look! And I would love for you to Subscribe to my Channel, to keep up with new process vidoes!
I chose the wood grain paper for a neutral background, because I wanted to work with the My Mind’s Eye Jubilee embellishments, which included a lot of color. The bits from the MME Mixed Bag, were perfect for adding around the rings of the wood grain design.
And since I used so many flat pieces from the MME Mixed Bag, I wanted to use one of the Evalicious Flair Buttons and some of the Wood Veneers from the February 2015 Embellishment Kit, for another level of dimension on my layout.
I’m also sharing a Process Video for today’s layout, if you would like to see how I put my page together.
Tuesday, October 29, 2013
Pumpkin Latte at the Pumpkin Patch!
***Linked up at Paper Issues.***
I knew when we received the October Scrapbook Kit Pumpkin Latte from The Paper Bakery, that I would definitely have to use this kit on a Pumpkin Patch layout. I used a mix of the Webster's Pages and Amy Tangerine goodies from the Kit and an awesome Flair Button from the Autumn Colors set.
How cute is the Yellow Apple Paper Clip from Webster's Pages??!! I knew it would make a perfect embellishment on this page!!
The October Scrapbook Kit is Sold Out, but you can still pick up some of the extra goodies in the Shop...like the Autumn Colors Flair Set. And there are some awesome Wood Veneers that you won't want to miss! If you want to make sure you get a guaranteed Kit each month, then don't forget to sign up for a monthly Subscription!
I knew when we received the October Scrapbook Kit Pumpkin Latte from The Paper Bakery, that I would definitely have to use this kit on a Pumpkin Patch layout. I used a mix of the Webster's Pages and Amy Tangerine goodies from the Kit and an awesome Flair Button from the Autumn Colors set.
How cute is the Yellow Apple Paper Clip from Webster's Pages??!! I knew it would make a perfect embellishment on this page!!
The October Scrapbook Kit is Sold Out, but you can still pick up some of the extra goodies in the Shop...like the Autumn Colors Flair Set. And there are some awesome Wood Veneers that you won't want to miss! If you want to make sure you get a guaranteed Kit each month, then don't forget to sign up for a monthly Subscription!
Friday, October 11, 2013
Silhouette DT Announcement & Mums the Word!
Before I share my layout today for The Paper Bakery, using the new October Scrapbook Kit, Pumpkin Latte, I have a BIG announcement! I am one of the newest members of the Silhouette Design Team! I was very shocked to receive the notification email last Friday, but very excited to be invited to the Team. You can check out the official announcement here on the Silhouette Blog. And here is a look at all of the talented Ladies, I will be designing with:
Now, on to my layout!! I have to say, that I really LOVE the October Scrapbook Kit from The Paper Bakery! I created this layout, within two hours of the Kit arriving on my doorstep and getting it open. The photo, papers and title all just came together so easily!
This Kit is filled with YUMMINESS!! There is a mix of Amy Tangerine's new Cut & Paste collection, Pebbles, Webster's Pages and Elle's Studio. One of my favorite items in this Kit, might just be the awesome Gold and Silver rub ons from Pink Paislee!! I love the way the Gold arrows, circles and chevron look against the dark wood grain paper from the Cut & Paste collection. I also added in a couple of extras not included with the Kit, such as the A-MAZ-ING Wood Veneer journal card and the Gold sequin stars. Both of these items are available in The Paper Bakery shop.
I am also sharing a tutorial on creating your own Sketch in the Silhouette Studio software, as a part of my post on The Paper Bakery Blog today. Make sure you visit here to check it out!!
And don't forget, that you can get a monthly subscription to any of our Kits: Scrapbook Kit, Project Kit, Mixed Media Kit, Card Kit and Capture 365 Kit! There is a lot to choose from and new items are always being added to the Shop!
Supplies: Patterned Paper: American Crafts, Webster's Pages, & Pebbles; Rub Ons: Pink Paislee; Chipboard: American Crafts; Flair Button, Wood Veneer journal card & Sequins: The Paper Bakery; Other: Acrylic Paint
AND, if you have some downtime this weekend and you're looking for some amazing creative inspiration, make sure you check out the newest issue of Life.Paper.Scrapbook Magazine. There are tons of beautiful pages in this issue, and you can take a look here!
_______________________________________________________
Now, on to my layout!! I have to say, that I really LOVE the October Scrapbook Kit from The Paper Bakery! I created this layout, within two hours of the Kit arriving on my doorstep and getting it open. The photo, papers and title all just came together so easily!
This Kit is filled with YUMMINESS!! There is a mix of Amy Tangerine's new Cut & Paste collection, Pebbles, Webster's Pages and Elle's Studio. One of my favorite items in this Kit, might just be the awesome Gold and Silver rub ons from Pink Paislee!! I love the way the Gold arrows, circles and chevron look against the dark wood grain paper from the Cut & Paste collection. I also added in a couple of extras not included with the Kit, such as the A-MAZ-ING Wood Veneer journal card and the Gold sequin stars. Both of these items are available in The Paper Bakery shop.
I am also sharing a tutorial on creating your own Sketch in the Silhouette Studio software, as a part of my post on The Paper Bakery Blog today. Make sure you visit here to check it out!!
And don't forget, that you can get a monthly subscription to any of our Kits: Scrapbook Kit, Project Kit, Mixed Media Kit, Card Kit and Capture 365 Kit! There is a lot to choose from and new items are always being added to the Shop!
Supplies: Patterned Paper: American Crafts, Webster's Pages, & Pebbles; Rub Ons: Pink Paislee; Chipboard: American Crafts; Flair Button, Wood Veneer journal card & Sequins: The Paper Bakery; Other: Acrylic Paint
AND, if you have some downtime this weekend and you're looking for some amazing creative inspiration, make sure you check out the newest issue of Life.Paper.Scrapbook Magazine. There are tons of beautiful pages in this issue, and you can take a look here!
Subscribe to:
Posts (Atom)