Showing posts with label Halloween. Show all posts

Tuesday, October 25, 2016

Crate Paper | The Flash

This is a personal blog. All editorial content and projects are intellectual property of ashleyhortondesigns.com. I do receive compensation and material product from Crate Paper to develop my craft posts, but all ideas and opinions are my own.

It's almost Halloween, and I'm here today to share a new layout  using the Cool Kid collection from Crate Paper.  I know I’ve said it before, but I love how versatile this collection is.  I’ve already used it for everyday layouts of our son, travel themed projects, a back to school layout, and now I’m using it for a Halloween layout!


Last year, our son wanted to be The Flash for Halloween. The colors in the Cool Kid collection coordinated perfectly with the colors in his costume.  I decided to go with a full patterned paper background and used the Handsome patterned paper.  I really liked the look of the Red and White stripes in the background.  Since I had a lot of Red in the photo, I needed to break up the striped pattern a bit, so I layered the Boys Club patterned paper behind the photo. 


The Play Thickers worked great for the title of my layout.  I loved the contrast of the wood letters against the Black patterned paper.  I also wanted to repeat the word brave on the layout, since our son was a superhero.  I used a mix of the Puffy Phrase & Accent Stickers and Pennants.  And I loved that the Puffy Phrase & Accent Stickers and Wood Embellishments both included a lightning bolt.  They are a fun complement to The Flash costume!


Most of my embellishments are clustered around the photo, so I decided to create a scattered look on the layout, using some of the stars from the Embellishment pack.  I randomly placed them around the layout and adhered them with liquid adhesive.  Then I sprinkled on some Black Color Shine to emphasize the scattered look.


The Cool Kid collection worked great for a Halloween layout, even though it’s not a Halloween themed collection.  Think of fun ways you can use the Cool Kid collection to focus on your child’s costume, on your next layout!

This post contains affiliate links, which means I will receive a small commission from any purchases made from product clicks on this post.

PRODUCTS USED: 


Tuesday, September 29, 2015

American Crafts | Boo Crew

This is a personal blog. All editorial content and projects are intellectual property of ashleyhortondesigns.com. I do receive financial compensation and material product from American Crafts to develop my craft posts, but all ideas and opinions are my own.

It's Halloween Week on the American Crafts Blog, and I was up yesterday with a new layout!


How to: Layer 9 banner shaped pieces from the Halloween Banner Kit on a white cardstock background. Machine stitch around each of the banner shapes with black thread. Place one of the large spider webs from the banner kit in the center of the layout. Use a paper piercer to punch holes around the shape of the spider web and then back stitch over the shape with the carrot twine. Place the doily spider webs on each of the remaining 8 banners and add a button or brad to the center. Adhere your photo to the center spider web with pop dots to add dimension. Use Thickers above and below the photo for your title. Embellish around your photo with a screenprinted clothespin and adhesive layered embellishments. Finish by adding orange acrylic paint around the edges of your layout.

Supplies: Halloween (340373) - Banner Kit, Halloween (340377) - Doilies, Halloween (340389) - Brads, Halloween (340382) - Brads, Halloween (340378) - Adhesive Layered Embellishments, Halloween (340390) - Buttons, Halloween (340388) - Screenprinted Clothespins, Halloween (366507) - Carrot Twine, Halloween (340023) - Black and Orange Twine, American Crafts (340363) - Washi Tape, Dear Lizzy (370089) - Woodland Thickers, Dear Lizzy (366187) - Cordial Thickers

https://www.etsy.com/shop/TheCutShoppe

Tuesday, November 18, 2014

A Flair for Buttons | The Doc Is In

Even though Thanksgiving is almost here, I'm stopping in today to share a Halloween layout that I created for A Flair for Buttons.  That's the great thing about Scrapbooking...you can work on any holiday you want to, all year long!  I just couldn't resist putting together one of my favorite photos of our middle daughter in her Halloween costume, with the Halloween Fun Flair set.


I wanted most of the focus on my photo, and also wanted to make use of the White space on the left side of my photo.  I used two of the Flair Buttons from the Halloween Fun Flair set, right on my photo, along with some tags and wood veneers!  I love the simple Black & White color scheme of these two Flair Buttons, because you don't have to stick with a typical Halloween color scheme on your layout.  I used a lot of White on this layout, to keep the focus on the photo and then added in traditional Halloween colors, by using small amounts of Black, Yellow and Orange.  And I thought it would be fun to use the Flower Power cut file from The Cut Shoppe, to go along with the little flower on Doc McStuffins' headband, and I added some Gelatos under several of the flowers, for a pop of color.

There are lots of fun Halloween Flair sets available in the Shop, so make sure you stop by and check them out!  Here's a full look at the set I used for my page.

https://www.etsy.com/listing/106098150/halloween-fun-flair?ref=shop_home_active_7&ga_search_query=halloween

And, I'm excited to share that A Flair for Buttons and The Cut Shoppe will be teaming up this Friday, November 21st, for an awesome Blog Hop!  Make sure you join us for all of the inspiration, giveaways and coupon codes for both shops!!


Hope to see you there!!

https://www.etsy.com/shop/TheCutShoppe?ref=ss_profile

Friday, October 31, 2014

American Crafts | Boo Banner

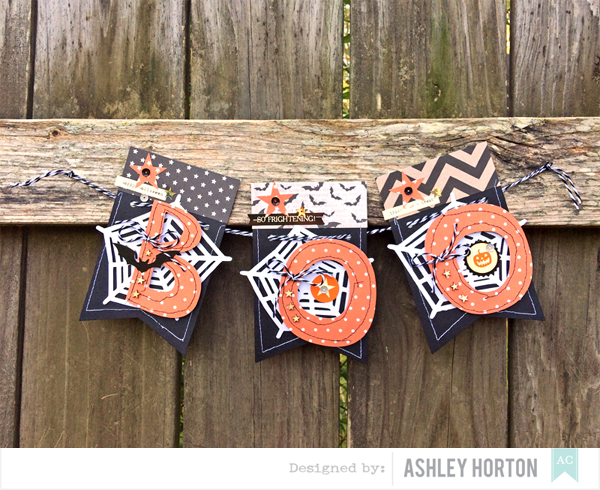
It's Halloween, so I couldn't let today go by, without sharing a Halloween project!  This week on the American Crafts Blog, it's been all about Halloween!  I created a fun Boo Banner, using the Haunted Hollow collection and even have a tutorial to go along with it.  It's a fun project and great to display in your home with your Halloween decor!


1. I started out by choosing three banner pieces from the DIY Shop Notch Banner pack. I left the perforated top on the banner pieces to make my banner size a little larger. Then measure three strips of patterned paper to add to the top of your banner pieces.
Tutorial 1
 
2. Next, add some stitching around the edges of each of your banner pieces. You can use machine stitching or hand stitching.
 
Tutorial 2
 
3. Now you can start building layers for each of your banner pieces. I cut three Spider Web shapes from American Crafts White Cardstock, using my Cameo.
 
Tutorial 3

4. I also used my Cameo to cut the letters for the word Boo and then added some messy stitching to each letter with my sewing machine.
 
Tutorial 4

5. Adhere your die cut Spider Webs to each of the banner pieces and then add pop dots under each of your letters to add some dimension to the banner.
 
Tutorial 5

Tutorial 6
 
6. Once your letters are in place, you can start embellishing each banner piece with stickers from the Accent & Phrase Stickers sheet.

Tutorial 7

7. Use a punch and punch out several star shapes to add to your banner.
 
Tutorial 8

8. Take the twine that is included with the Notch Banner pack and cut three pieces to tie around each of the letters on your banner.
 
Tutorial 9

9. Now you can thread the twine through your banner pieces. I kept my twine doubled to add a little more oomph! 
 
Tutorial 10
 
10. Then flip your banner over and add some strips of washi tape to hold your twine in place.
 
Tutorial 11
 
 
I hope this tutorial has helped to inspire you to create your own Halloween home decor using the Haunted Hollow collection!
 
Supplies:  Supplies: DIY Shop (366652) - Notch Banner, Haunted Hollow (368904) - 12x12 Paper Pad, Haunted Hollow (368675) - Die Cut Cardstock Shape, Haunted Hollow (368677) Accent & Phrase Stickers, Knock Out Punch (KOP63102) - Star
 
https://www.etsy.com/shop/TheCutShoppe?ref=ss_profile
 

Thursday, October 3, 2013

American Crafts Halloween Collection & Free Printables!

**Linked up at Paper Issues.**

Did you know, that American Crafts has a fun new Halloween collection??!!  It's available only in Target stores and has a great 6x6 paper pad, sequins, mini clothespins, star stickers, phrase stickers, Washi Tape, and more!  Today, I wanted to stop by and share a layout and Halloween countdown calendar that I created with this collection.

Since there are no 12x12 papers with the Halloween line, I decided to create my own background using some of the American Crafts cardstock.  I used Orange as my base, and then used my Silhouette Sketch Pens to draw the spider web design on my White cardstock.  After the design finished drawing, I misted over the paper with some Mister Huey's Spray Mist.


I was looking for a fun use of the sequins that come with this line and decided to incorporate them into the circle/star embellishment.  I cut the shape on my Cameo and then adhered a piece of Vellum to the backside.  Then, I placed some of the sequins over the Vellum and then adhered a second piece, to close off the Vellum pocket.


I also wanted to add a touch of Glitter to my layout, so I cut 2012 on my Cameo and then layered some adhesive on the numbers.  Before the adhesive dried, I sprinkled over the numbers with the Black WOW! American Crafts Glitter, to add just a little sparkle!


Next up is the Halloween Countdown Calendar.  I created this calendar last year, for our Christmas Countdown.  When I made it, I thought it would be a good idea to paint the frame a bright Lime Green, because I like non-traditional colors for Christmas and I knew the Green would also work for Halloween.  That allows me to use the same frame and just have the pre-made tags ready to put on for Halloween and Christmas each year.


Again I used the 6x6 papers from the paper pad, to create each of the tags.  This is also a great use for the numbers from your Thicker sets.  I incorporated the mini clothespins, sequins, star stickers, phrase stickers, and Washi Taps into the different tags I created for the calendar.

Make sure you check your local Target for the American Crafts Halloween collection!  You won't be disappointed and it is perfect for creating your upcoming Halloween layouts, home dec pieces or even for fun treat bags to give out to Trick-or-Treaters!!

Before you go, I have a set of Thanksgiving/Halloween Free Printables to share with you.  You can download the PDF file HERE or the JPEG file HERE.  Feel free to use the Printables on your upcoming projects!


Supplies:  6x6 Paper Pad (97144) - AC Halloween; Screenprinted Clothespins (97150) - AC Halloween; Decorative Tape (97138) - AC Halloween; Sequins (97145) - AC Halloween; Duplicate Stickers (97151) - AC Halloween; Star Stickers (97140) - AC Halloween; White (71259) - Cardstock; Orange (71249) - Cardstock; Soiree (366186) - Thickers


Thursday, October 18, 2012

A Spooky Situation!

Happy almost Friday!!  :)  Happy Thursday, just doesn't sound all that awesome!!  But I do have an awesome Washi Tape from Love My Tapes to share with you today, that I used on a Halloween layout.  I knew that the black & white "lace" patterned Washi Tape would be perfect for a Halloween page.  I have held off using it, specifically for this layout.  Here is the layout I created, and then I'll tell you how I used the tape:


I thought the tape would look great placed behind a negative cut title.  I roughly measured the area for my title and cut it on my Expression.  Then, I took three strips of the Washi Tape and lined them all up on a white piece of cardstock.  After my title finished cutting, I just placed the Washi Tape piece behind it and then trimmed it down to the the size of my title spot!  Very easy and I love the way it looks behind the Orange chevron...definitely got that "spooky" effect I was going for!  This look could work for any of your tapes and layout themes, and it gives a little added interest to your title!  Another great idea for this technique would be for negative cut shapes...circles, triangles, or whatever you decide to create!


I also added in some of the Mint Green diagonal Washi...I think it just might be my favorite!!  And speaking of favorites...I am TOTALLY  in LOVE with the Witch Hazel collection from October Afternoon.  It is definitely my favorite Halloween line to date, from any company.  I only ordered a small quantity, but I have a feeling that I will have some more of it in my cart on one of my online shopping stops!!  I decided to add the chicken wire modeling paste on a whim and really loved how it popped on the Teal background paper.  I thought about adding some mist over it for color, but decided I really liked the look of the stark white.

Thanks for stopping by today!!  And make sure you check out Love My Tapes on Facebook, the Blog, and LMT is also now on Pinterest!!

Products Used:  Patterned Paper, Stickers & Tin Pins:  October Afternoon; Washi Tape:  Love My Tapes; Punches:  Martha Stewart & EK Success; Wood Veneers & Mister Huey's Spray Mist:  Studio Calico; Mini Chicken Wire Mask:  The Crafter's Workshop; Modeling Paste:  Liquitex; Font:  CK Fraternity; Brads:  The Paper Studio; Mini Round Gems:  Recollections; Other:  Embroidery Floss, Stick Pins & Button