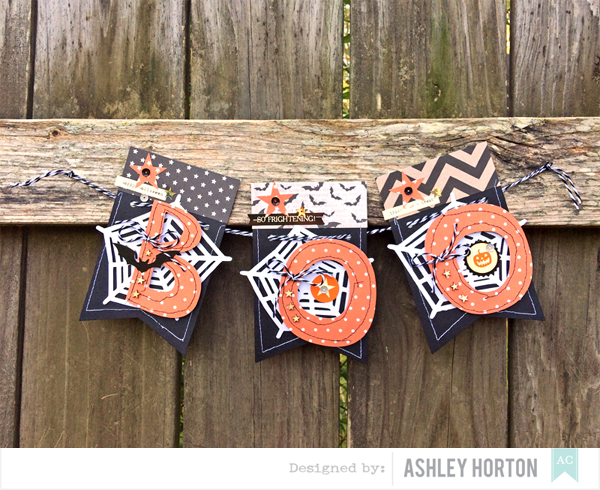
1. I started out by choosing three banner pieces from the DIY Shop Notch Banner pack. I left the perforated top on the banner pieces to make my banner size a little larger. Then measure three strips of patterned paper to add to the top of your banner pieces.
2. Next, add some stitching around the edges of each of your banner pieces. You can use machine stitching or hand stitching.
3. Now you can start building layers for each of your banner pieces. I cut three Spider Web shapes from American Crafts White Cardstock, using my Cameo.
4. I also used my Cameo to cut the letters for the word Boo and then added some messy stitching to each letter with my sewing machine.
5. Adhere your die cut Spider Webs to each of the banner pieces and then add pop dots under each of your letters to add some dimension to the banner.
6. Once your letters are in place, you can start embellishing each banner piece with stickers from the Accent & Phrase Stickers sheet.
7. Use a punch and punch out several star shapes to add to your banner.
7. Use a punch and punch out several star shapes to add to your banner.
8. Take the twine that is included with the Notch Banner pack and cut three pieces to tie around each of the letters on your banner.
9. Now you can thread the twine through your banner pieces. I kept my twine doubled to add a little more oomph!
10. Then flip your banner over and add some strips of washi tape to hold your twine in place.
I hope this tutorial has helped to inspire you to create your own Halloween home decor using the Haunted Hollow collection!
Supplies: Supplies: DIY Shop (366652) - Notch Banner, Haunted Hollow (368904) - 12x12 Paper Pad, Haunted Hollow (368675) - Die Cut Cardstock Shape, Haunted Hollow (368677) Accent & Phrase Stickers, Knock Out Punch (KOP63102) - Star


No comments:
Post a Comment