Saturday, April 16, 2016

Hip Kit Club | May Kit Reveal

This is a personal blog. All editorial content and projects are intellectual property of ashleyhortondesigns.com. I do receive compensation and material product from Hip Kit Club to develop my craft posts, but all ideas and opinions are my own.

The May Hip Kit reveal went up on the Hip Kit Blog yesterday, and they are amazing!!  If you love color and lots of great exclusives, then you'll definitely want to get your hands on the May kits!

HIP KIT CLUB – MAY 2016- MAIN KIT
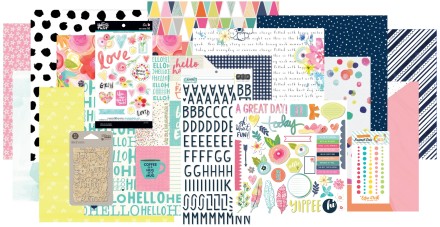
Main
Hip Kit Club Member Price:  $29.95 (requires a 3 month minimum subscription)
CLICK HERE to join!
Individual Kit Purchase Price:  $34.95

Products Included:
  • 1 sheet – HKC Exclusive – Meadowbrook – Frolic Paper – designed by Kimberly Hutchison
  • 1 sheet – HKC Exclusive – Meadowbrook – Lazy Days – designed by Kim Watson
  • 1 sheet – HKC Exclusive – Meadowbrook – Summer Breeze – designed by Kim Watson
  • 1 sheet – HKC Exclusive – Meadowbrook – Lucy In The Sky – designed by Kim Watson
  • 1 sheet – HKC Exclusive – Meadowbrook – Notes from Home – designed by Kim Watson
  • 1 pkg. – HKC Exclusive – Meadowbrook – Navy Puffy Alphabet Stickers – designed by Kimberly Hutchison
  • 1 pkg – HKC Exclusive – Meadowbrook – Ephemera – designed by Kim Watson
  • 1 sheet – Jillibean Soup – Healthy Hello Soup – Bite Paper
  • 1 sheet – Jillibean Soup – Healthy Hello Soup – Jar of Jambo Paper
  • 1 sheet – Jillibean Soup – Healthy Hello Soup – Cup of Ciao Paper
  • 1 pkg. – Jillibean Soup – Healthy Hello Soup – Wood Veneer
  • 1 sheet – Bella Blvd – Faith Illustrated – She Blooms Paper
  • 1 pkg – Bella Blvd – Faith Illustrated – She Blooms – Chipboard Icons
  • 1 pkg. – Echo Park – Summer Party – Enamel Dots


HIP KIT CLUB – MAY 2016 – PROJECT LIFE ADD-ON KIT
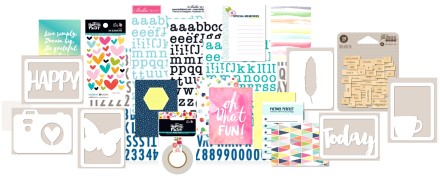
Project Life
Price:  $29.95*
*Hip Kit Club members receive a 15% off on all Add-On Kit purchases

Products Included:
  • 24 HKC – Exclusive Project Life Cards (not all shown) – designed by Kim Watson & Kimberly Hutchison
  • 1 pkg. – Jillibean Soup – Healthy Hello Soup – Mini Placemats
  • 1 pkg – Jillibean Soup – Life Wordfetti – Wood Veneer
  • 1 sheet (12×12) Bella Blvd. – Rainy Day Alphabet Stickers
  • 1 pkg. Bella Blvd. – Faith Illustrated – She Blooms Enamel Hearts
  • 1 roll Bella Blvd.- Faith Illustrated – She Blooms – Bloom Washi Tape

HIP KIT CLUB – MAY  2016 EMBELLISHMENT ADD-ON KIT
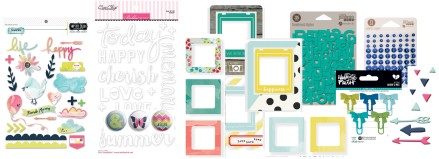
Embellishment
Price:  $29.95*
*Hip Kit Club members receive a 15% off on all Add-On Kit purchases

Products Included:
  • 1 pkg. – HKC Exclusive – Meadowbrook – Puffy Stickers designed by Kim Watson
  • 3  HKC Exclusive – Meadowbrook – Flair Buttons designed by Kimberly Hutchison
  • 3 HKC Exclusive – Meadowbrook – Acrylic Arrows
  • 15 pieces – HKC Exclusive – Meadowbrook  – Triangle Acrylic Shapes
  • 1 pkg. Bella Blvd – Today Chipboard Word Stickers
  • 1 pkg. Bella Blvd – Faith Illustrated – Adam’s Mix Cute Clips
  • 1 pkg. Jillibean Soup – Navy Blueberry Self Adhesive Sequins
  • 1 pkg. Jillibean Soup – Tart Teal Thin Chip Alphabet
  • 1 pkg. – Simple Stories – Life in Color – Chipboard Frames

HIP KIT CLUB – MAY 2016 COLOR ADD-ON KIT
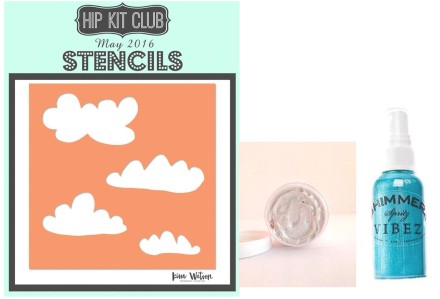
Color
Price:  $21.95*
*Hip Kit Club members receive a 15% off on all Add-On Kit purchases

Products Included:
  • 1 HKC Exclusive – Cloud Stencil designed by Kim Watson
  • 1 jar – Shimmerz – Dazzlerz – Spun Sugar Texture Paste
  • 1 bottle – Shimmerz – Vibez – Jeni B Bleu

HIP KIT CLUB – MAY 2016 PAPER ADD-ON KIT
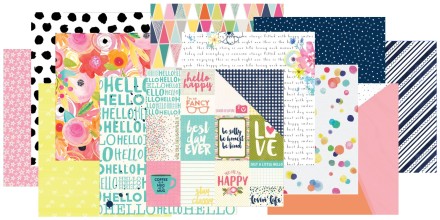
Paper
Price:  $13.95*
*Hip Kit Club members receive a 15% off on all Add-On Kit purchases

Products Included:
  • 1 sheet – HKC Exclusive – Meadowbrook – Frolic Paper – designed by Kimberly Hutchison
  • 1 sheet – HKC Exclusive – Meadowbrook – Lazy Days – designed by Kim Watson
  • 1 sheet – HKC Exclusive – Meadowbrook – Summer Breeze – designed by Kim Watson
  • 1 sheet – HKC Exclusive – Meadowbrook – Lucy In The Sky – designed by Kim Watson
  • 1 sheet – HKC Exclusive – Meadowbrook – Notes from Home – designed by Kim Watson
  • 1 sheet – Jillibean Soup – Healthy Hello Soup – Bite Paper
  • 1 sheet – Jillibean Soup – Healthy Hello Soup – Jar of Jambo Paper
  • 1 sheet – Jillibean Soup – Healthy Hello Soup – Cup of Ciao Paper
  • 1 sheet – Bella Blvd – Faith Illustrated – She Blooms Paper

HIP KIT CLUB – MAY 2016 – CARDSTOCK ADD-ON KIT
Cardstock
Price:  $11.95*
*Hip Kit Club members receive a 15% off on all Add-On Kit purchases

Products Included:
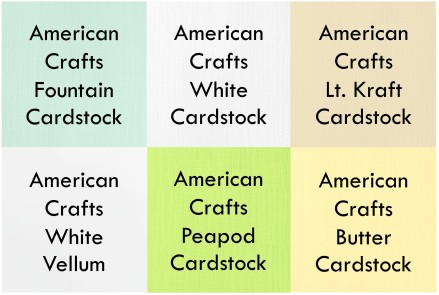
  • 2 sheets American Crafts – Fountain Cardstock
  • 2 sheets – American Crafts – White Cardstock
  • 2 sheets – American Crafts – Lt. Kraft Cardstock
  • 2 sheets – American Crafts – White Vellum
  • 2 sheets – American Crafts – Peapod Cardstock
  • 2 sheets – American Crafts – Butter Cardstock
https://www.etsy.com/shop/TheCutShoppe

Thursday, April 14, 2016

Crate Paper | Beach Beauty

This is a personal blog. All editorial content and projects are intellectual property of ashleyhortondesigns.com. I do receive compensation and material product from Crate Paper to develop my craft posts, but all ideas and opinions are my own.

I love to mix embellishments and patterned paper, but it's also fun to mix collections too!  I thought it would be fun to create a layout using products from all of my new Crate Paper collections, so I did!  I used a little something from Bloom, Little You Girl, Little You Boy and Hello Love on the layout I'm sharing today.


I wanted an eye catching design in the background, so I used several patterned papers from the Bloom collection, to create pleated flowers.  These are really easy and they add a little bit of whimsy to your projects.  I cut my strips for the flowers in sizes ranging from .75x12 up to 2.5x12 inches.  The height of your pleated flowers on the page, depend on how you score and fold them.  If you want them to be a bit flatter, make smaller score marks along the 12 inch strip.


Since a lot of my work went into the pleated flowers, I kept the rest of the layout to a minimal design.  This way I didn't cover the flowers or overpower them with a lot of extra embellishing.  The patterned papers I used came from the Bloom collection and my embellishments came from Little You and Hello Love.


I used the cute buttons from the Little You Girl collection and the Little You Boy collection, to add to the center of each of the flowers.  And I used more embellishments from both collections to layer over and around my photo.  The cute alpha stickers from the Little You Girl collection were perfect for the title of my layout.  I wanted to bring in another texture, so I chose the XOXO wood veneer piece from Hello Love, to add under my photo.

This was such a fun layout to put together, and I think I might just have to reuse this design some other time!  It's easy to change the look, using different patterned paper and embellishments!
 
https://www.etsy.com/shop/TheCutShoppe

Wednesday, April 13, 2016

Hip KIt Club | Emma & Whiskers

This is a personal blog. All editorial content and projects are intellectual property of ashleyhortondesigns.com. I do receive compensation and material product from Hip Kit Club to develop my craft posts, but all ideas and opinions are my own.

What's your favorite strategy for starting a layout, once your Hip Kit from Hip Kit Club arrives? Me? I like to start with either a favorite patterned paper or color scheme from the Kit, and that's exactly what I did for my first layout using the April 2016 Hip Kit & Add-On Kits.


I wanted to cut Kim Watson's April cut file from a multi-colored patterned paper, so I used the hexagon pattern designed by Amy Tangerine for American Crafts from the ‪Better Together collection. Since the ampersand was such a large design on the page, I layered over it with another of the April cut files and my title. I used the Pinkfresh Studio ‪Life Noted‬ Puffy alpha stickers to create a large title across the page.


I brought a little more color to the layout with rub-ons from the Better Together collection, and I added some watercolor to the hearts on the Elle's Studio paper included in the April 2016 Main Kit and the April 2016 Paper Add-On Kit. I also wanted a bit more dimension on the layout, so I used a couple of the wood veneers from My Mind's Eye included in the April 2016 Project Life Kit. 


I had so much fun putting the first of April's layouts together, and I created a new Process Video to go along with my layout!

  
I can't wait to share again with you next week!

http://www.hipkitclub.net/

https://www.etsy.com/shop/TheCutShoppe

Friday, April 8, 2016

Pink Paislee | Paige Kits Card Couple

This is a personal blog. All editorial content and projects are intellectual property of ashleyhortondesigns.com. I do receive compensation and material product from Pink Paislee to develop my craft posts, but all ideas and opinions are my own. 

The Paige Kits created by Paige Evans for her Fancy Free collection, with Pink Paislee are so fun!  You can get the look of Paige's signature style on your layouts, but what about other uses for the Paige Kits?  I used them to create two cards, that were on the Pink Paislee Blog yesterday, and loved the way they turned out!


I really love the die cuts that are included in the Paige Kits. But they are both obviously a little large for cards, so I thought of a different way to use the heart die cut. I placed the heart over a white cardstock card base and traced the triangle shapes with a pencil. Then I used a paper piercer to poke holes along the lines for stitching. I chose 5 colors of embroidery floss that coordinate with the Fancy Free collection and hand stitched each of the triangles. Once you finish stitching, you can cut a piece of patterned paper to the dimensions of your card base and adhere it to the inside of the card to cover your stitching.  


I kept the rest of the card fairly simple so the stitched pattern wouldn’t be completely covered. I wanted to use the “love this” acetate phrase as the sentiment on my card so I placed it on a tilt and used a stapler to attach the words to the card. I completed the design with a few of the pop out heart shapes included in the Paige Kit.

You could create an alternate look for your card with the die cut heart using patterned paper: instead of tracing the triangle shapes directly onto your card, trace them on different patterned papers. Then you can cut out all of the shapes, place the die cut heart over your card base, and then adhere the patterned paper shapes into the coordinating spot on the die cut heart. Once you pull it up, you will have a fun pattern on the front of your card!

I created a different look on my second card by mixing one of the Paige Kits with some of the patterned papers from the Fancy Free collection. I covered my card base and then cut the manufacturer strips from four different patterned papers. Then I added a strip along each edge of the card. I wanted some extra texture on my card, so I machine stitched around the entire outside edge before embellishing.


The Paige Kit included the word “Today” in a navy chipboard piece. I knew that it would make the perfect sentiment for my card. The letters were too large to go across the front of the card as one word so I split it to create fun look. Then I took a couple of the punch out pieces and added them to the card to finish it. I even had the negative chipboard piece leftover from the word “Today”, so I’m saving it to use on a future layout or project! 

If you've been waiting to get your hands on the Paige Kits or any of the new Fancy Free collection, your wait should be over soon!  It's already starting to show up in some stores, so make sure you check in to see if your favorite shop has it!


https://www.etsy.com/shop/TheCutShoppe


I really love the die cuts that are included in the Paige Kits. But they are both obviously a little large for cards, so I thought of a different way to use the heart die cut. I placed the heart over a white cardstock card base and traced the triangle shapes with a pencil. Then I used a paper piercer to poke holes along the lines for stitching. I chose 5 colors of embroidery floss that coordinate with the Fancy Free collection and hand stitched each of the triangles. Once you finish stitching, you can cut a piece of patterned paper to the dimensions of your card base and adhere it to the inside of the card to cover your stitching. - See more at: http://www.pinkpaislee.com/?p=49795#sthash.DRHodqPa.dpuf

Thursday, April 7, 2016

Hip Kit Club | Loveliness & Thank My Lucky Stars for You

This is a personal blog. All editorial content and projects are intellectual property of ashleyhortondesigns.com. I do receive compensation and material product from Hip Kit Club to develop my craft posts, but all ideas and opinions are my own.

Today I'm stopping in to share not just one layout, but two using the March 2016 Hip Kit & Add-On Kits from Hip Kit Club!  That gives me a total of five for this month, and I could probably easily finish 5 other layouts with my kit and still have left overs!!  Too many goodies, and not enough time!  HA!  Here's a look at my first layout, using the March Sketch, that you can find in the Hip Kit Member Forum on Facebook.


I decided to use the sketch as is, but amp it up with one of the Pinkfresh Studio patterned papers in the March 2016 Main Kit.  The pattern was originally at the top of the page, but I flipped it, so I could use the White space to add my photos and PL card from the March 2016 Project Life Kit.  I loved being able to still use a patterned paper for the background, without it overwhelming the photos and embellishments.


I layered some of the Elle's Studio tags from the Project Life Kit with the Pink Fresh Studio Die Cut Shapes from the March 2016 Embellishment Kit, over the PL card for interest.  And I kept the title for my layout on the simple side, by adding the word "Loveliness" from the Pinkfresh Studio Thickers, also included in the March Embellishment Kit.  I also wanted to add some more dimension to the pattern at the bottom of the page, so I mixed in some of the Pinkfresh Studio puffy stickers and Die Cut Shapes.

And I'm sure you can quote me on saying this many times, but I love how you can create so many layouts from the Hip Kits that have totally different looks.  The second layout I'm sharing, uses some of the exclusive patterned papers in the March 2016 Main Kit and March 2016 Paper Add-On Kit, designed by Kim Watson.  I also enlarged one of the March cut files designed by Nicole Nowosad.


Both of the patterned papers used for the background and die cut, were designed by Kim.  I loved the look of the darker Blue on the Teal background.  And I actually limited my color scheme to about 95% of those two colors, adding in a touch of Yellow and Black.  The Basic Grey enamel dots included in the March Project Life Kit were the perfect embellishments to add to the diamond shapes on the background paper.  I mixed the different sizes and alternated the colors of the enamel dots.


I placed my photo at the top of the large title and clustered several embellishments around it, to draw your eye.  And I love the contrast of the Red in the photo, against the color scheme of the layout.  I added another embellishment cluster at the bottom of the layout, to balance the photo and embellishments at the top of the page.


I had so much fun creating with the March Hip Kits, and now I'm looking forward to working with the April 2016 Hip Kit & Add-On Kits!!  They should be arriving any day now!  Make sure you visit the Hip Kit Club website to check them out!

http://www.hipkitclub.net/
 
https://www.etsy.com/shop/TheCutShoppe