Last week the Simple Stories Design Team shared layouts and projects for our product swap with My Favorite Things Stamps. I had so much fun creating with the new collections from Simple Stories and the stamp sets I received from MFT, so I wanted to stop in and share them with you today!
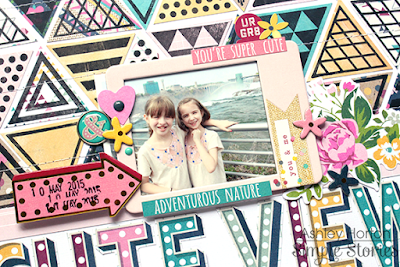
My first layout uses the new So Fancy collection from Simple Stories and the Trendy Triangles stamp set from My Favorite Things.
Before I received the Trendy Triangles stamp set and the new So Fancy collection from Simple Stories, I already had an idea for the design I wanted to do. I wanted to create a custom background for my layout, by stamping the Trendy Triangles onto the patterned papers in the So Fancy 6x6 paper pad.
I used a variety of the large Triangles from the stamp set with a Black ink pad, and stamped them onto various patterned papers in the 6x6 paper pad. I decided to use a White cardstock background, so the patterned paper Triangles wouldn't compete with a patterned paper background. I also stopped the Triangle design halfway on the page, to create a resting spot for my title.
I added my photo to the center of the layout, and placed one of the So Fancy Chipboard Frames over it, to make it stand out from the Triangle design. For my title, I fussy cut the fun letters from the Marquee patterned paper and adhered them right under my photo. I finished the layout, by adding a few Chipboard Pieces, Bits & Pieces, Bradz, and Enamel Dots.
This is a really fun technique for creating a custom background, and you could get completely different looks based on the patterned papers you use, the ink pads you use and the way you arrange the cut out stamped images!
My second layout features the new So Rad collection from Simple Stories and the Picture This stamp set from My Favorite Things.
I don't know about you, but I always struggle with birthday themed layouts. I'm not sure what it is, that throws me off. I think one of the main things, is all of the color that ends up in birthday photos. So I usually like to focus on a posed photo of the birthday boy or girl, and this week just happened to be our son's 6th birthday! I have to say, I was really excited when I put the new So Rad collection together with the Picture This stamp set, to create a layout with his 6th birthday photo!
I wanted to create a fun number element on the layout, so I typed out a large number 6 in my Silhouette Studio software. Then I grabbed a star shape and sized it down to just under an inch. Once I had the right size, I went around the outline of the number 6, with the star shapes, to create a star outlined number. Once all of the stars were in place, I deleted the number, and cut the star shape outline from White cardstock.
I backed each of the stars with different patterned papers from the So Rad 6x6 paper pad. Then I machine stitched around the large 6, to add some more interest and texture. Before I added my photo and embellishments, I splattered Black spray mist onto the background.
I placed my photo to the right of the number 6, and layered some of the So Rad Bits & Pieces, Chipboard Stickers, and Bradz to add interest around the photo. I wanted to balance out the page, so I created a cluster on the top left hand side. The "Wishing You a Snappy Birthday" sentiment from the MFT Picture This stamp set, was perfect for the theme of my layout, without creating an in your face birthday look to the page. I stamped it with an Orange ink pad onto one of the So Rad Snap Cards, and then cut it into a banner shape. I also used the Smile sentiment from the stamp set, to create a scattered look above and below the photo.
It's fun finding ways to use your collections and stamps to create layouts for an occasion, other than everyday photos, even if they are not specifically designed for that occasion!


No comments:
Post a Comment