Friday, February 21, 2014

Silhouette | My Life Everyday

Earlier this week, I had a new layout on the Silhouette Blog.  I had the chance to use some of the new Corrugated Paper and it is so fun!  I love the way it cut and the little touch of texture it added to my page, without adding a lot of bulk!


I spotted this cute welded hearts design, when I was looking through the Popular Designs in the Silhouette Store.  I thought it would be perfect for a background element on my page, and I wanted to layer something behind the open heart shapes.  The Adhesive Corrugated Paper worked perfectly for this.  Once I cut the hearts design, I ungrouped and released the compound path for the shape, and removed all of the individual hearts.  This left me with only the outlined edge, which I cut using the Corrugated Cardboard.  The setting for your blade is 8, and I didn’t have any trouble at all on my cut.  After the outline cut, I added adhesive to my heart die cut and placed it over the outline piece.  The back side of the Corrugated Cardboard already has adhesive, so it is ready to place on  your project right after cutting!

If you are looking for something new to use with your CAMEO, then I definitely recommend the Corrugated Paper!  It's available now and you can pick it up in the Silhouette America Shop!

Shapes:

Supplies:  Patterned Paper & Stickers:  Echo Park My Life Collection Kit; CAMEO, Shapes, & Corrugated Paper:  Silhouette America; Color Shine:  Heidi Swapp; Enamel Dots: My Mind's Eye; Flair Button:  Studio Calico


Thursday, February 20, 2014

Hip Kit Club | You Make My Heart Sing

I am totally in LOVE with the February 2014 Hip Kit & Add-On Kits!!  They are filled with an amazing mix of Elle's Studio, October Afternoon and Chic Tags.  When I received my kit, I was actually sick with a stomach virus, but that didn't stop me from opening it up to take a peek at all of the yummy goodies!  I couldn't wait to get started, and I'm so excited to share my first layout and card with you today, using this month's Kits!!

You Make My Heart Sing


I love creating loose grid designs, and the Click October Afternoon patterned paper, provided me with a great base for my design. I used the rows of stripes, to place my photo, Elle's Studio tags, and title. The Elle's Studio wood veneers and October Afternoon Tin Pin, were perfect for adding a touch of dimension to my layout.

Seriously?


You can put together a quick and easy card, using your February 2014 Hip Kit & Add-On Kits! I used the October Afternoon Yellow polka dot pattern as my base, over the White cardstock. Then I cut a 1.5x1.5 inch square from the same pattern to create corner pieces for my card. I layered two of the Elle's Studio Tags, and added the positive heart shape left over from my "You Make My Heart Sing" layout. Then I added one of the OA Tin Pins and stamped the "la la la la love you" sentiment with the OA roller stamp. I was able to finish this card in 10 minutes!

I hope you enjoyed stopping by today and if you are interested in the Hip Kit Club-February 2014-Main Kit or any of the Add-On Kits, make sure you stop by the Hip Kit Club website for all of the information for subscribing and purchasing!  And don't forget to like our Facebook page and follow us on Pinterest!!

Wednesday, February 19, 2014

Create Magazine | Hello You

Have you had a chance to check out the newest issue of Scrapbook Generations Create magazine??!!  The February issue is filled with so many amazing Sketches and inspiration.  I was so honored to have a layout published in this month's issue, using a one page sketch.  I wanted to pop into today, to share the layout with you.


I didn't deviate much from the original Sketch.  There were originally three photos, but I used two larger photos to fit the area.  I kept the title and journaling in the same place, based on the sketch design.

If you haven't had a chance to take a look at the February issue, just visit the link HERE.  You can also check out the January issue, if you missed it and get to know the talented Create Team.  And don't forget to take a look at the opportunities for submitting for the next issue!

Supplies:  Patterned Paper, Thickers, & Stickers:  American Crafts; Tags & Stamps:  Chic Tags; Wood Veneers:  Studio Calico; Washi Tape:  Pebbles Inc., Enamel Dots:  My Mind's Eye 

Tuesday, February 18, 2014

American Crafts Valentine's Home Decor & Blog Hop WINNER!

Thanks to everyone who visited for the American Crafts Valentine's Day Blog Hop, and left comments and became new followers!!  I loved reading through each of your comments!  Now, let's get to the WINNER of my Giveaway...

CONGRATS KRISSYCLARKMCKEE!!

 
Krissy, please email me at ashleyhorton010675@gmail.com, to receive your prize!

And even though Valentine's has come and gone, I wanted to share the Valentine's Day Home Decor piece that went up on the American Crafts Blog last week.


You could adapt this type of wreath for any holiday, but I will share a tutorial with you today, for creating the Valentine's look.

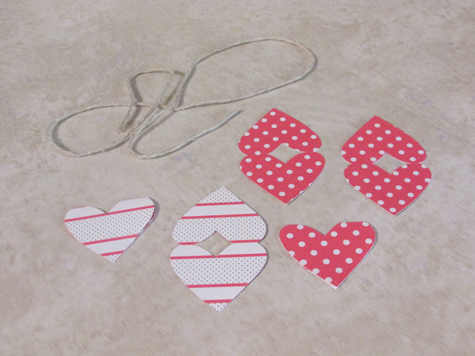
First off, I wanted to add a heart banner across the opening of the wreath. I used Silhouette Studio to create several heart shapes. I welded two of the heart shapes together so that I could fold them over once they were cut.


After my shapes were cut, I folded each of the heart shapes in half. I roughly measured and cut a piece of twine to string across the wreath and attached it by wrapping it around each side and securing the ends on the back with hot glue.


Once the glue dried on the twine, I started to add the heart shapes over the piece of twine and then just used adhesive on each heart to secure the front and back of the heart shapes. This gave me the ability to slide my hearts along the twine to get the spacing just the way I wanted it.


I wanted to keep most of my decorating on the left hand side of the heart. So I used Silhouette Studio, once again, to cut the word "LOVE" to place on the side of the heart.
 

I added a shape from the new Plus One Bits pack where my banner met the wreath on the left side.  Then I placed each of my letters according to the placement of the Die Cut Cardstock Shape.


Once the word was in place and I embellished with a few hearts cut from cardstock, I decided to make an arrow to add over the "O".  I used a paper straw and added a rectangle cut piece of patterned paper to the end. I shaped the top piece of paper over the straw and then adhered both pieces to the top and bottom of the straw.


When the pieces were secure, I cut an angle on the top and bottom to create the fringe at the end of the arrow. You can just use regular scissors to create the fringe look.


I cut one more heart  to add to the tip of my arrow and placed one of the Adhesive Flowers in the center.  

I love the shabby chic look that the Polka Dot Party collection created on the wreath!

Supplies: Fascinating Friends (366165) - Polka Dot Party, Polka Dot Plates (366177) - Polka Dot Party, Cutesy Cupcake (366164) - Polka Dot Party, Clothespins (366208) - Polka Dot Party, Bits (366849) - Die Cut Cardstock Shapes, Adhesive Flowers (366203) - Polka Dot Party

Monday, February 17, 2014

Echo Park | Adventure Bound

***If you are looking for the American Crafts Valentine's Day Blog Hop, please visit HERE.***

Last week, I had a new layout and tutorial on the Echo Park Blog, using the new collection, That's My Boy!  I love the fun colors and stickers included in this collection.  They are perfect for our little guy's photos!


I wanted to create a big impact on my background, so I used a large, layered star shape.  If you would like to see how I created the layered, stitched stars, you can visit my post HERE on the Echo Park Blog for more information.

Supplies:  That's My Boy Collection Pack:  Echo Park; Color Shine:  Heidi Swapp; Wood Veneers:  Studio Calico; Stamps:  Chic Tags; Button:  October Afternoon; Die Cut Machine & Sketch Pens:  CAMEO

Sunday, February 16, 2014

Creative Scrappers Sketch #262 | Heart Breaker

***If you are looking for the American Crafts Valentine's Day Blog Hop, please visit HERE.***

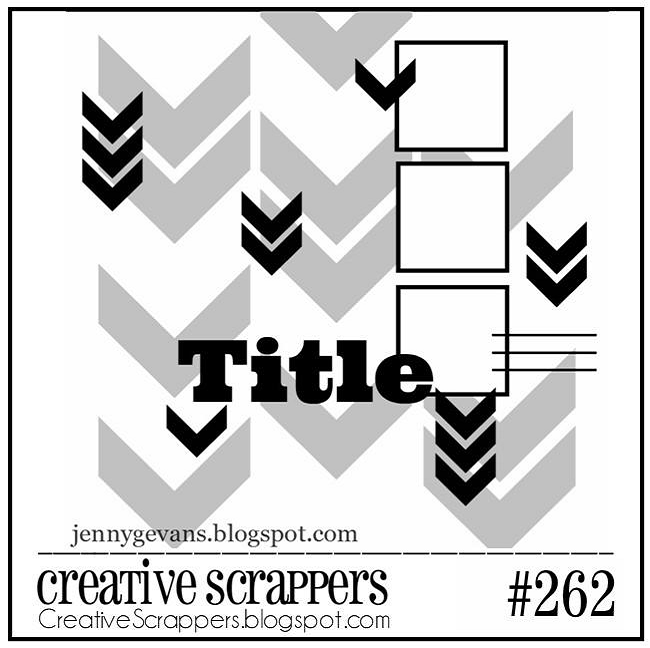
Today we have a new reveal for Creative Scrappers featuring a fun Sketch from Jenny Evans!  The Chevron pattern design is really awesome and I took a simpler approach to my embellishing and layering this time, so the Chevron pattern would stand out.


I used the new Everyday Moments collection from Elle's Studio, and chose papers that used Teal, Gray, Kraft and Yellow to create a masculine color palette for my page.  The large Chevron shapes were cut on my Cameo and I cut down the center of each one, and then mixed the Teal and Kraft pieces together on my background.  I stitched with embroidery floss on the smaller Chevrons to create some texture on my page, and then finished by adding some SC Spray Mist, a few wood veneers and some enamel dots!

Now, it's your turn to play along with us!   To win a prize from our Sponsor, Paper Camellia, all you need to do is create a layout and enter the challenges using our inlinkz widget at the end of the reveals for Sketch 261-262. 


Deadline to submit your layout is February 28th at Midnight EST. 
Visit  Paper Camellia;  Facebook / Kits / Blog
 
Supplies:  Patterned Paper & Tags:  Elle's Studio; Wood Veneers & Spray Mist:  Studio Calico; Thickers & Date Stamp:  American Crafts; Enamel Dots:  My Mind's Eye; Die Cut Machine:  CAMEO

Friday, February 14, 2014

American Crafts Valentine's Day Blog Hop

 
Happy Valentine's Day friends and welcome to the American Crafts Valentine's Day Blog Hop!  The AC Design Team, has a ton of inspiration for you today, so make sure you visit each of the Blogs to see what they created and for the chance to win some prizes!!

As the Blog Hop was in the planning stage, I received the new Winter CHA collections and knew I would dig into the Plus One collection from Amy Tangerine to create my layout.  I wanted to use a photo of our family together, because it is few and far between, that all 5 of us are in a picture together.


The watercolor Pink background immediately jumped out at me, when I looked through my papers.  It had the word "Love" pre-printed which I used as part of my title, and added the word "This" from the Twins Thicker pack.  One of the new products I love in this collection, is the Metal Die set.  I used the XOXO piece and cut it from White cardstock and layered it over some die cut hearts on my page.

I hope my layout has helped add a little love to your Valentine's Day!!  And you are definitely going to want to visit each of the Design Team members Blogs, to see their "love"ly work!!  Here is a list of all the Blogs, you can visit along the way:


Lilith Eeckels

Becki Adams
 
Ashley Horton  <------  You Are Here.


And while you are here, I have a little giveaway of my own!!  Just leave a comment or become a new follower and let me know you did, for the chance to win some of the new DIY Shop collection!  I will announce a winner on Tuesday, February 18th.


Supplies:  Companion (366824) - Plus One, Twins (366837) - Thickers, Twosome (366820) - Plus One, Bits (366849) - Die Cut Cardstock Shapes, Flair (366906) - Adhesive Badges, Accomplice (366822) - Plus One, Accompany (366856) - Stamps, Us (366842) - Remarks, Elements (366852) - Fabric Brads, Mixtape (366839) - Washi Tape, Associate (366860) - Dies