This is a personal blog. All editorial content and projects are intellectual property of ashleyhortondesigns.com. I do receive compensation and material product from Hip Kit Club to develop my craft posts, but all ideas and opinions are my own. Today, I am sharing my first Hip Kit Club layout for our newest term, using the October 2015 Hip Kit & Add-On Kits! This time around, we are doing things a bit differently. The Design Team is alternating weeks posting on the Hip Kit Facebook page and the Blog. So make sure you're following on FB, to see weekly posts and check the Blog for full posts too!Here's the layout, that I created with a mix of product from the October 2015 Main Kit, October 2015 Embellishment Kit and the October 2015 Project Life Kit.I wanted to use the patterned papers from the Kit, to create a decorative background. I cut 2.5 inch squares from several of the patterned papers and then cut each one in half. Then I placed the squares back together, mixing the patterns and then added machine stitching for a quilted look. I finished by adding my photo and embellishments in a grid design! Thanks for stopping in today, and I'll be back next Thursday, with a new layout with the October Kits!
This is a personal blog. All editorial content and projects are intellectual property of ashleyhortondesigns.com. I do receive compensation and material product from Hip Kit Club to develop my craft posts, but all ideas and opinions are my own. The October 2015 Hip Kit & Add-On Kits from Hip Kit Club landed on my doorstep this past weekend, so Fall can officially begin! There are so many fun Fall goodies in this month's Kits, and I am kind of giddy since Fall is my favorite season. Granted, sometimes Fall just kind of passes us by down here in the south, but I'm determined to enjoy any little bit of it. While I was out enjoying the nice weather this past Saturday, a squirrel was visiting and snacking on some flowers. I snapped a few photos of him and knew I wanted to use the picture on my first layout this month!
This is a personal blog. All editorial content and projects are intellectual property of ashleyhortondesigns.com. I do receive compensation and material product from Hip Kit Club to develop my craft posts, but all ideas and opinions are my own. When I start a layout, I usually have some idea in mind of where I am going with the design. But for this layout, I had zip, zilch, nada!! So instead of sitting for an hour and wondering what I should do, I just kind of jumped in. I grabbed one of the Documentary patterned papers from the September 2015 Main Kit from Hip Kit Club and cut some hearts. I mixed the hearts by using the multi-colored Ampersand side and then added in a few hearts from the opposite wood grain side.I liked the way this look turned out in the background, because it allowed me to use some of the patterned paper from the Kit, without the background being completely overwhelming. Layering the patterned paper hearts over White cardstock from the September 2015 Cardstock Add-On, gave the base of the layout a bit of a cleaner look.I wanted to create a vertical design with my photo and a few embellishments, to avoid covering up too much of the background. The "We Are Better Together" tag from the Amy Tangerine Bits pack in the Main Kit, worked great for the title of my layout. And I used one of the Crate Paper Die Cut Words and a few Crate Paper Chipboard pieces from the September 2015 Embellishment Kit, to add a bit of dimension to my layout. I also love that you can adjust those Chipboard pieces, by removing part of the backing and lessening the dimension of the different pieces.And I couldn't resist adding in a bit of stamping with the cute Elle's Studio alpha stamp set, included in the September 2015 Color Add-On Kit. I thought about coloring over them with the Distress Markers also included in the Color Kit, but I wanted a bit more of a contrast, so I went with a Black ink pad instead. I liked the end result of our daughter and son's initials stamped in the background of the layout.I was really happy with the end result of my layout, considering my lack of a plan! That's one of the great things about the Kits from Hip Kit Club, you don't have to over think it. So much of the work is done for you, because of the amazing products included every month! If you are thinking about subscribing, now is a perfect time! Just head over to the Hip Kit Club website and check out the upcoming October 2015 Hip Kits and the information for becoming a new Subscriber!And before I go, I'm so excited to be staying on with Hip Kit Club for another term. I LOVE working with the Kits, and I am looking forward to working with everyone for the upcoming term!
This is a personal blog. All editorial content and projects are intellectual property of ashleyhortondesigns.com. I do receive compensation and material product from A Flair for Buttons and American Crafts to develop my craft posts, but all ideas and opinions are my own. Fall is officially here and I am SO GLAD! I love everything about Fall...the colors, the temperatures and all of the fun activities. And I can't pass up a group of Pumpkins, without snapping a photo, since they are my favorite color, after all!The new Cedar Lane from Pink Paislee is one of my favorite collections for Fall. It has a lot of Fall elements without being overly themey. So I decided to go that same direction with the Flair Buttons that I chose. Instead of using specific Fall Flair, I went with Buttons from the Smash Phrases Flair set and the Today Words Flair.I started my layout, with an inspiration photo I found on Pinterest. I loved the look of the wonky rectangles, with the layered leaves. So I did a similar design and then arranged three Flair Buttons in the center of a few of the leaves. Once the Flair Buttons were placed, I went back and selected embellishments from the Pink Paislee Cedar Lane Bits pack to finish the layout. I tried to alternate all of the embellishments and Flair Buttons on the page, to get just the right balance.And since I had the Wonky Rectangles background designed for my layout, I thought it would be fun to share the Free Cut File with you! You can download the PNG & SVG formats of the cut file HERE!And make sure you visit the A Flair for Buttons Etsy Shop to pick up the Small Phrases Flair set and the Today Words Flair set!

This is a personal blog. All editorial content and projects are intellectual property of ashleyhortondesigns.com. I do receive financial compensation and material product from American Crafts to develop my craft posts, but all ideas and opinions are my own. It's Halloween Week on the American Crafts Blog, and I was up yesterday with a new layout!How to: Layer 9 banner shaped pieces from the Halloween Banner Kit on a white cardstock background. Machine stitch around each of the banner shapes with black thread. Place one of the large spider webs from the banner kit in the center of the layout. Use a paper piercer to punch holes around the shape of the spider web and then back stitch over the shape with the carrot twine. Place the doily spider webs on each of the remaining 8 banners and add a button or brad to the center. Adhere your photo to the center spider web with pop dots to add dimension. Use Thickers above and below the photo for your title. Embellish around your photo with a screenprinted clothespin and adhesive layered embellishments. Finish by adding orange acrylic paint around the edges of your layout.Supplies: Halloween (340373) - Banner Kit, Halloween (340377) - Doilies, Halloween (340389) - Brads, Halloween (340382) - Brads, Halloween (340378) - Adhesive Layered Embellishments, Halloween (340390) - Buttons, Halloween (340388) - Screenprinted Clothespins, Halloween (366507) - Carrot Twine, Halloween (340023) - Black and Orange Twine, American Crafts (340363) - Washi Tape, Dear Lizzy (370089) - Woodland Thickers, Dear Lizzy (366187) - Cordial Thickers
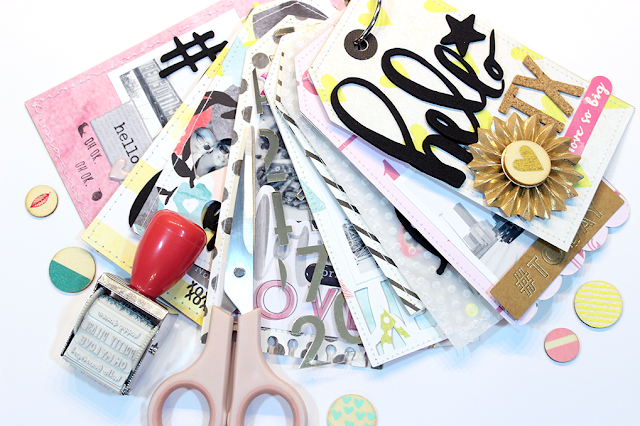
Do you ever feel like you are overwhelmed with photos from a trip, birthday or special occasion and don't have the time to sit down and get them all on layouts? Then head over to Big Picture Classes and join me for my newest class, Mini Made Easy!In this class, I will show you how I created this fun tag album, with photos from a recent trip. There are a lot of different options for Mini Albums, so you can use your own choice of album, or download and cut the Free Tag Album included with the class!The Mini Made Easy Class live on the Big Picture Classes website today! I hope you'll join in the class and add your finished Mini Album to the BPC Gallery!
Thanks so much to everyone that commented for the Pretty Little Studio Giveaway! It's time to announce the WINNER of my Five Favorites giveaway!
CONGRATS HELEN GULLETT!!
Helen please email me at ashleyhorton010675@gmail.com with your mailing information, and I will forward it to PLS!