Friday, October 31, 2014

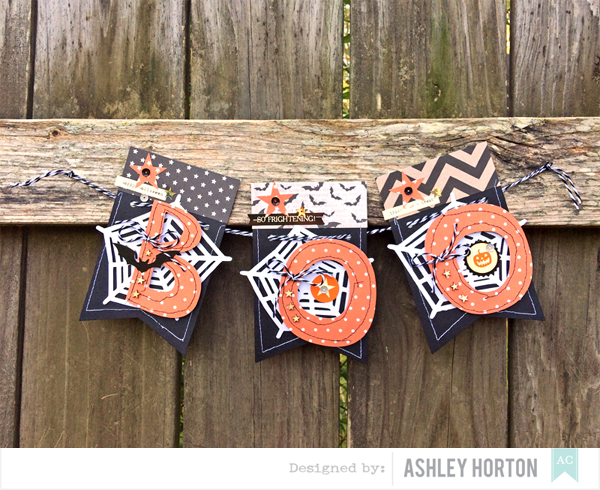
American Crafts | Boo Banner

It's Halloween, so I couldn't let today go by, without sharing a Halloween project!  This week on the American Crafts Blog, it's been all about Halloween!  I created a fun Boo Banner, using the Haunted Hollow collection and even have a tutorial to go along with it.  It's a fun project and great to display in your home with your Halloween decor!


1. I started out by choosing three banner pieces from the DIY Shop Notch Banner pack. I left the perforated top on the banner pieces to make my banner size a little larger. Then measure three strips of patterned paper to add to the top of your banner pieces.
Tutorial 1
 
2. Next, add some stitching around the edges of each of your banner pieces. You can use machine stitching or hand stitching.
 
Tutorial 2
 
3. Now you can start building layers for each of your banner pieces. I cut three Spider Web shapes from American Crafts White Cardstock, using my Cameo.
 
Tutorial 3

4. I also used my Cameo to cut the letters for the word Boo and then added some messy stitching to each letter with my sewing machine.
 
Tutorial 4

5. Adhere your die cut Spider Webs to each of the banner pieces and then add pop dots under each of your letters to add some dimension to the banner.
 
Tutorial 5

Tutorial 6
 
6. Once your letters are in place, you can start embellishing each banner piece with stickers from the Accent & Phrase Stickers sheet.

Tutorial 7

7. Use a punch and punch out several star shapes to add to your banner.
 
Tutorial 8

8. Take the twine that is included with the Notch Banner pack and cut three pieces to tie around each of the letters on your banner.
 
Tutorial 9

9. Now you can thread the twine through your banner pieces. I kept my twine doubled to add a little more oomph! 
 
Tutorial 10
 
10. Then flip your banner over and add some strips of washi tape to hold your twine in place.
 
Tutorial 11
 
 
I hope this tutorial has helped to inspire you to create your own Halloween home decor using the Haunted Hollow collection!
 
Supplies:  Supplies: DIY Shop (366652) - Notch Banner, Haunted Hollow (368904) - 12x12 Paper Pad, Haunted Hollow (368675) - Die Cut Cardstock Shape, Haunted Hollow (368677) Accent & Phrase Stickers, Knock Out Punch (KOP63102) - Star
 
https://www.etsy.com/shop/TheCutShoppe?ref=ss_profile
 

Thursday, October 30, 2014

Hip Kit Club | Hello, Fall Is My Favorite

Hopefully I haven't scared you away with my slight Fall obsession!!  :)  HA!  I just can't help myself, when it comes to Fall layouts.  But never fear...even though my layout today for Hip Kit Club has a Fall theme, my card has a totally different look!!


I wanted to add a little something extra to the Elle's Studio leaf patterned paper, included in the October 2014 Main Kit, without covering up much of the pattern. So I grabbed the Gelato from the October 2014 Stamp Add-On Kit, and decided to color in some of the leaves. Once I had my color on, I just smoothed it around using the tip of my finger. And I added a bit of machine stitching for some added texture, after I let the Gelato color dry for a bit. I also kept the design of my layout simple, to keep from covering the background paper. I wanted to create a large title...I'm all about the large titles! So I used the Story and Journal Thickers under my photo, and added the camera cork embellishment from the Elle's Studio Sycamore Lane Bits package.


I've been using a lot of my scraps from the October 2014 Hip Kit & Add-On Kits, to create cards this month. But I decided to go for a totally different look on today's card and show you the versatility of the Kits! I pulled out the Red and Pink colors included in the Kit, to make a Love card. I've been wanting to use the wood grain frame from the Crate Paper ephemera pack and it ended up being a perfect contrast on my card. It was a little short, to fit under the Love You tag, so I cut it in half and I was able to make it a little longer, than the original size. I also love that wood grain chevron stamp from the Elle's Studio Stamp set, so I used it along with the stamp pad included in the October 2014 Stamp Add-On Kit, to add a little emphasis to my sentiment!

The Design Team will be bringing you our new projects soon, using the November 2014 Hip Kit & Add-On Kits!  So make sure you are ready for some awesome Christmas inspiration!!

Wednesday, October 29, 2014

A Flair for Buttons | Hay Ride

Yesterday I shared a new layout on the A Flair for Buttons Blog and wanted to share it on my Blog, also!  This is a layout about two of my favorite things...my family and Fall!!  We have an annual church Fall festival every year and it has become a tradition to take a family photo on the Hay Ride.  And just in case you missed it...I LOVE Fall...I love the colors, the temperatures, the activities...so yep, pretty much everything.  So put those loves together and it's a match made in heaven, for a Fall themed layout.  And what would my Fall themed layout be, without some awesome Flair Buttons from the A Flair For Buttons shop??!!  Can we say YAY for Wood Chips Fall Flair!!


I wanted to add some large die cut leaves behind my photo, and then use the Flair Buttons from the Wood Chips Fall Flair, to create a visual triangle on my layout.  The visual triangle helps guide your eye from the top of the page, to the photo and then down to the title, highlighting the important parts of your layout.  And plus they are just so darn cute, and perfect for a Fall themed page!

The Wood Chips Fall 2 Flair set is available in the A Flair for Buttons Etsy store, so make sure you stop by to check them out!  And if you're getting ready for Christmas, you won't want to miss the Wood Chip Christmas Flair!!

https://www.etsy.com/listing/204245980/wood-chips-fall-2-flair?ref=shop_home_active_8&ga_search_query=fall

Thanks for stopping in today!!

Supplies:  Flair Buttons:  A Flair for Buttons; Patterned Paper, Stickers, Thickers, & Wood Veneer:  American Crafts; Cut Files:  The Cut Shoppe; Spray Mist:  Studio Calio; Enamel Dots:  My Mind's Eye; Stamps:  Elle's Studio; Tiny Attacher:  Tim Holtz; Die Cut Machine:  Silhouette Cameo 

https://www.etsy.com/shop/TheCutShoppe?ref=ss_profile

Monday, October 27, 2014

American Crafts | Happy Halloween

Last week American Crafts featured the awesome Haunted Hollow collection on the Blog!  I love creating Halloween layouts, and this collection is perfect for all of your spooky or not so spooky Halloween photos!  I wanted to stop in today and share what I created!


Here's a quick how to for re-creating my layout!

Spray your background paper with black spray mist. Cut it down to 11.5x11.5 and adhere it to a full 12x12 patterned paper. Use a die cut machine to cut a large spider web from white cardstock and then add stitching with black thread.  I used the Tangled Web background cut file from my Etsy store, The Cut Shoppe.  Print a 4x4 photo and embellish it with stickers and Die Cut Cardstock Shapes from the Haunted Hollow collection. Add a Decorative Tag to the left side of your photo and use the Happy Halloween wood veneer for your page title.

And make sure you visit the American Crafts Blog all this week, for more Halloween fun!

Supplies: Haunted Hollow (368904) - 12x12 Paper Pad, Haunted Hollow (368675) - Die Cut Cardstock Shapes, Haunted Hollow (368680) - Wood Veneer, Haunted Hollow (368676) - Decorative Tags, Haunted Hollow (368677) - Accent & Phrase Stickers, Thickers (368678) - Wisecrack

https://www.etsy.com/shop/TheCutShoppe?ref=ss_profile
 

Thursday, October 23, 2014

Hip Kit Club | Frightfully Fun

It's time to share a new layout and card for Hip Kit Club, using the October 2014 Hip Kit & Add-On Kits!  I couldn't resist creating a couple of more Halloween projects, with the fun Halloween themed goodies included in this month's Kits!


If you're looking for a fun way to incorporate several photos or a lot of embellishments onto your page, then why not try a grid design! I wanted to use the awesome cards in the American Crafts Haunted Hollow Bits pack, and thought a grid design, would be the perfect way to add them to my layout. I also wanted to use several of the patterned papers, so I cut 4.5x4.5 inch squares, to use as my grid. I wanted the background to be simple, so I used the dark Gray cardstock from the Cardstock Add-On Kit. Once I had each of the squares in place, I stitched around each one with my sewing machine. And then I had plenty of room for adding my title, using the Journal Thickers and embellishing each of the patterned paper squares.


Scrap papers to the rescue! I just can't resist using my scraps, to create cards...especially since I can't bring myself to throw away any of the left over pieces in my Hip Kits each month! I used several left over strips from my Frightfully Fun layout on this card. I wanted a somewhat messy look, so once the strips of paper were in place, I added some Washi Tape over them and then added some zig zag stitching. The Journal Thickers worked perfectly for adding my sentiment, and I used the Jack-O-Lantern from the American Crafts Haunted Hollow Bits pack to add the finishing look to my card.

I'll have one more layout and card to share with you, using the October 2014 Hip Kit & Add-On Kits, and then it will be time for the new November Kits!  The November Hip Kit & Add-On Kits will be filled with lots of awesome Christmas goodies, so make sure you visit the Shop to check them out!

https://www.etsy.com/shop/TheCutShoppe?ref=ss_profile
 

Monday, October 20, 2014

Hip Kit Club Online Crop | Happy Together

This weekend Hip Kit Club held it's first Online Crop! Each of the Design Team members posted a challenge for everyone to play along with and we chatted, of course!  I created a Sketch for Challenge #3 and wanted to stop in and share it with you, and the layout I created based on the Sketch.

Before I share the layout and Sketch, there's still time to play along with the challenges by joining the fun on Facebook. You can find the page HERE, and participate in any or all of the challenges!  All entries are due on Tuesday night!


My layout was created with the October 2014 Hip Kit & Add-On Kits.  I started out with a colored cardstock background on this layout, but it just wasn't coming together for some reason. I decided to switch to White cardstock from the Cardstock Add-On Kit and play with the Double Scoop Mango Gelato from the October 2014 Stamp Kit. After adding my Gelato color to the cardstock, I started building my layout, by adding layers under my photo. I wanted to incorporate some more of the patterned paper onto my layout, so used my paper cutter to cut several triangles from the Crate Paper patterned paper and added them around the edges of my page. I also added some stamping over my Gelato color once it dried, using the Elle's Studio Sycamore Lane stamp set.

I hope you can check in with the challenges and maybe play along with some before the deadline tomorrow night!  All of the challenges are fun and you don't have to use Hip Kit products to play along.  

https://www.etsy.com/shop/TheCutShoppe?ref=ss_profile
 

Friday, October 17, 2014

Blinks of Life Guest Designer

Happy Friday!  I am stopping in today, to share my last two layouts as an October Guest Designer for Blinks of Life, using the October Kits, Sugar & Spice and Cinnamon Roll.  I really loved creating with these kits, and I hope you've enjoyed seeing the layouts I've created!  So let's get to the final two layouts!!


If you haven't had a chance to check out Blinks of Life, make sure you visit the Gallery, for some amazing inspiration!

https://www.etsy.com/shop/TheCutShoppe?ref=ss_profile

Thursday, October 16, 2014

Hip Kit Club | Cute Little Pumpkin

I am having so much fun creating away with the October 2014 Hip Kit & Add-On Kits from Hip Kit Club!  I am stopping in today, to share a new layout and card with you!  I love the versatility of the Kits!  You can create Fall/Autumn layouts, everyday layouts and even Halloween layouts...or cards in my case!


Sometimes when I am starting a layout, there is a paper or embellishment that catches my eye, and I decide to design my layout around it. The Crate Paper Full Heart patterned paper in the October 2014 Hip Kit & Add-On Kits, caught my eye and gave me an idea for this layout. I cut out the I Love Everything About This card from the paper and designed the rest of my page around it. I liked that I could use it to create a long title, by adding the burlap Thickers and the Teresa Collins alpha stickers. And the Gold Thickers from the Story pack and cork embellishments from Elle's Studio, fit right in with the look I wanted to create on my page.


I created a fun Halloween card using some of the scrap pieces left over from my other projects. I tore the edges of my patterned paper and added them to the dark Gray cardstock from the Cardstock Add-On Kit. Then I added embellishments from the American Crafts Haunted Hollow collection, to another piece of scrap paper, as the focus of my card. And I added a bit of messy machine stitching to finish my card!

And make sure you visit the Hip Kit Club Shop to check out the amazing December Documented 2014 Kit!  It is filled with so many awesome goodies for documenting all of your December festivities!!

http://www.hipkitclub.net/

Wednesday, October 15, 2014

A Flair for Buttons | He Calls It "Yogrit"

I've got a new layout to share today for A Flair for Buttons!  Do you like creating fun titles on your layouts?  Ever think about using your kid's quotes as the title of your layout?  That's exactly what I did on my new layout today!  When we're scrapbooking memories, we tend to focus on the photos, but it's fun to document the cute things our kids say.  I wanted to incorporate one of my Flair Buttons in my quote title, on this layout, and here's what I came up with!!


The Creative Agenda collection from Echo Park, had a fun circle sticker, so I knew it would be a great substitute for the "O" in the word "Yogrit", and then I placed my Flair Button, from the I Love Arrows Flair set, in the center of the sticker.  I wanted to add a couple of more Flair Buttons that coordinated with the colors on my page so I chose the star from the My Life Flair Set 4 and the Enjoy Flair Button from the Chalk Words 2 Flair.

So next time you are looking for a fun title for your layout, think about some funny kids quotes you can use.  And look for fun ways to incorporate your Flair Buttons into the title, to add even more impact!

You can find the Flair Button sets I used, in the A Flair for Buttons Etsy store!

I Love Arrows Flair

I Love Arrows

My Life Flair Set 4

My Life Flair Set 4

Chalk Words 2 Flair

Chalk Words 2 Flair

Supplies:  Flair Buttons:  A Flair for Buttons; Patterned Paper, Chipboard & Stickers:  Echo Park; Target Practice Cut File:  The Cut Shoppe:  Color Shine:  Heidi Swapp, Enamel Dots:  My Mind's Eye; Die Cut Machine:  Silhouette Cameo

https://www.etsy.com/shop/TheCutShoppe?ref=ss_profile